Miz Chef

Cooking Up a Healthy Life


2 Comments

Umbrian Cicerchia Soup

cicerchia soupThere’s one thing I love about Eataly, the Italian market in Chelsea in New York, and it’s not the prices. It’s the fact that you can get products that have been imported from Italy, things that you wouldn’t otherwise find, at least not easily.IMG_5261

During one particular perusal of the market, I found cicerchia, an Umbrian hybrid of chickpeas and fava beans. Ceceri means chickpeas, so I imagine that cirechia is a playful word meaning “in the realm of chickpeas.” Italians love playing with their words almost as much as their food.

It’s probably a good thing, though, that cicerchia isn’t available widely. According to Vorrei Italianfood, they contain a neurotoxin and should not be eaten every day over a prolonged period of time (alhough I don’t know what that means.)IMG_5245

I wasn’t sure what to do with them, though, as this was not a common product, at least not in the region where my family is from (Basalicata). Ultimately, I decided to use them in a typical Umbrian dish: chickpea soup.

If you’re able to get your hands on cicerchia, try this recipe—it’s light but filling and scrumptious.
Continue reading


Leave a comment

Colcannon—An Irish Mash

Irish cuisine is traditionally hearty and to the point. Years of impoverishment and famine led to honest cooking that holds the utmost respect for the food being used. In other words, food was not taken for granted. And it made use of foods that were available—the crops that would easily grow in the Irish terrain and the livestock that were raised in the countryside.potatoes

The food probably most associated with Ireland is the potato. Potatoes were introduced in the 16th century and because they grew abundantly and cheaply, they became the most important crop in feeding the masses, which is why when a blight destroyed potato crops in the mid-1800s, famine decimated the population.

Another important item in Irish cuisine is cabbage. It, too, grows abundantly and cheaply and, like potatoes, lasts a long time in storage. Sometimes kale is used, or other members of the cabbage family.AU_MAR~1

Colcannon became known in the 18th century, but some food historians believe that it existed before then. It combines these two staple ingredients in the simplest, most basic of ways: boiled and combined into a mash. Okay, there’s a bit more to it than that, but not much. The potatoes and cabbage are flavored by sautéed leeks and enriched with butter.

For a little more in-depth history of Irish cuisine, and specifically colcannon, check out FoodTimeline.org or DoChara.com.

So, make this traditional Irish dish for St. Patrick’s Day and may the luck o’ the Irish be with you.

Erin go bragh.

(This recipe will be appearing in one of my upcoming cookbooks, so please do not reprint it in any format without express written permission.  That doesn’t mean you shouldn’t print it out–you definitely should! Thanks!)
Colcannon

Colcannon
Mashed Potatoes and Cabbage

4 cups thinly sliced cabbage
1 tbsp + 1 tsp salt
2 large potatoes, quartered
2 tbsp butter
1 cup milk
Pepper to taste
1 tbsp canola oil
2 large leeks, washed and sliced
2 tbsp minced parsley for garnish (optional)

Bring a large pot of water to a boil; add the cabbage and 1 tsp salt. Lower the heat to medium-low and boil until tender, about 12 to 15 minutes. Drain well.

At the same time, place the potatoes in a medium pot and cover with water. Bring it to a boil; lower the heat to medium-low, partially cover, and boil until tender when pierced with a knife, about 15 to 20 minutes. Drain, peel, place in a bowl, and coarsely mash. Add the milk, butter, ½ tablespoon of the salt, and pepper and mix well.

Heat the oil in a wide pan. Add the leeks and sauté until soft and golden brown, about 15 minutes. Add the cooked cabbage and remaining salt and sauté over medium-high heat, stirring often, until cabbage starts to brown. Add to the mashed potatoes and mix well. Taste for seasoning and adjust, if necessary. Transfer the colcannon to a platter. Garnish with parsley and serve hot.

Makes 6 to 8 servings.


2 Comments

My Exploding Nuts (Ginkgo, that is)

IMG_4028

I went to an Asian market the other day with a list in hand. I had specific things that I needed to buy and a short amount of time in which to shop, and I wasn’t looking for anything unusual or new, the way I usually do. I had grabbed my items and was just about to head to the check-out lines when something caught my eye. They were in the refrigerated case, where Asian markets generally keep the more perishable produce, such as mushrooms, water chestnuts, chili peppers, and a host of other delicate items.IMG_4016

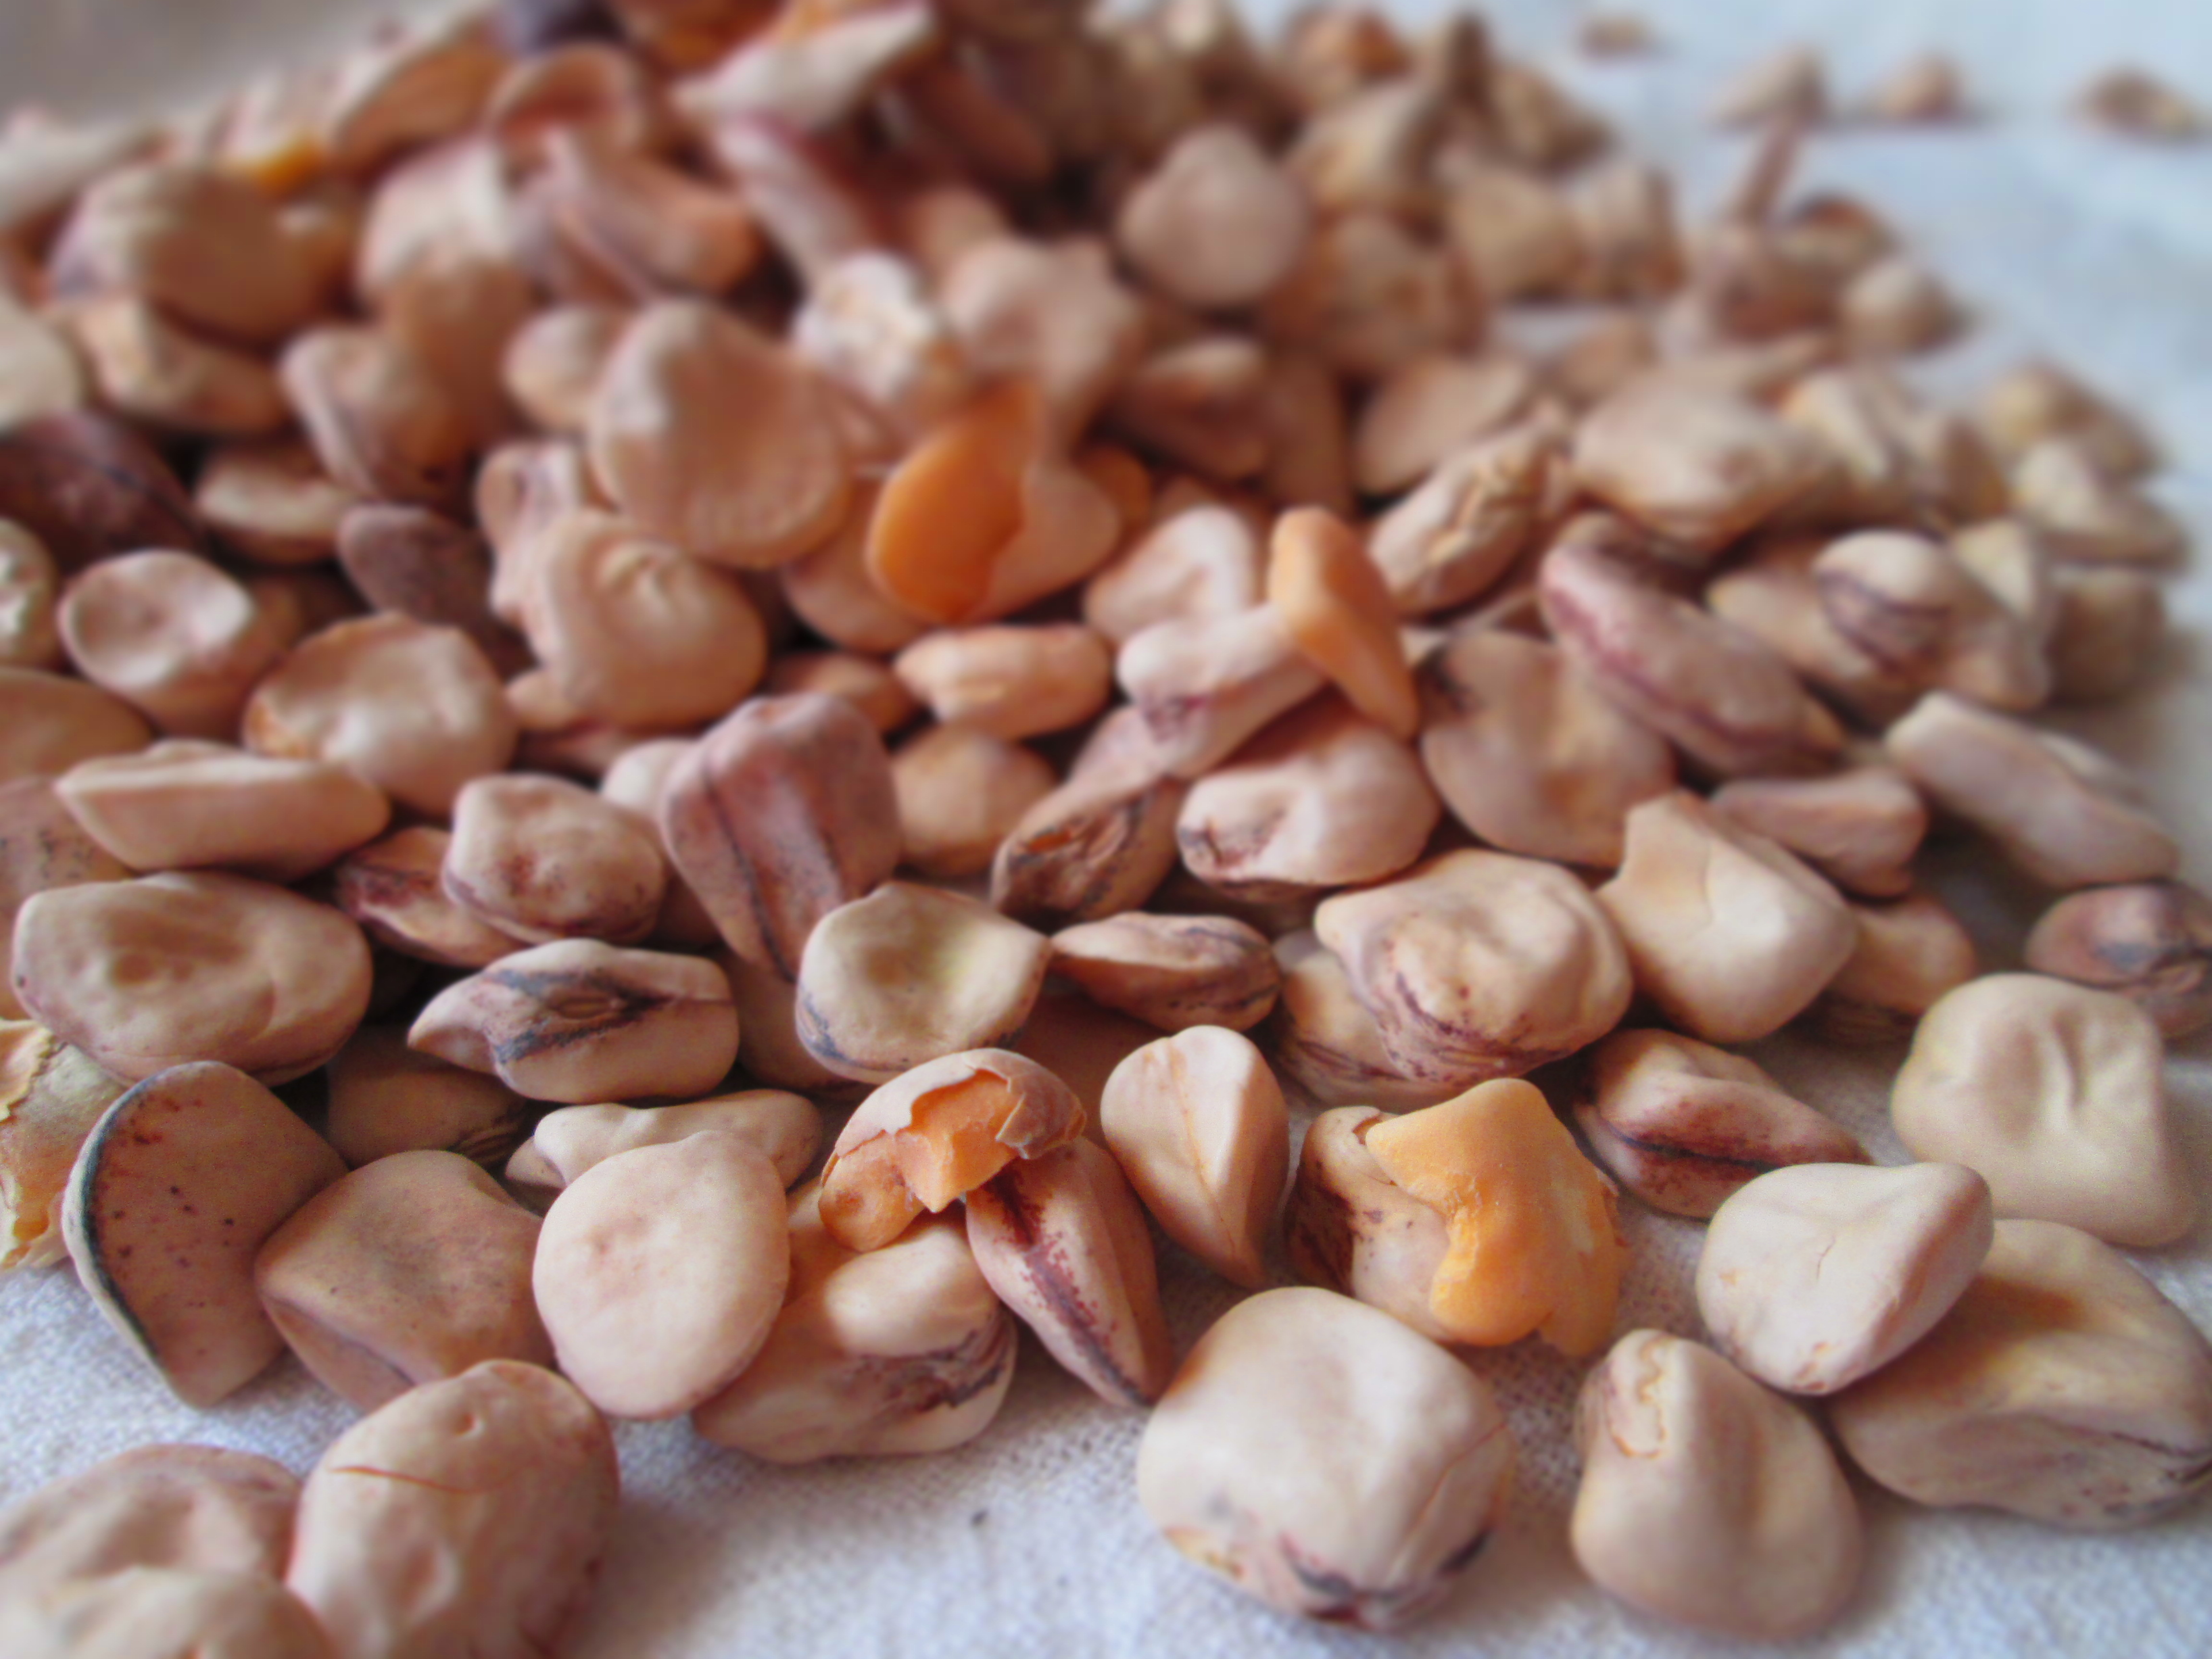
Tucked between packages of freeze-dried ginkgo nuts and little cartons of quail eggs and 100-year-old duck eggs were small red mesh bags with these little white things in them. Curiosity got to me and I picked one up. They looked like pistachio nuts. I looked at the sign, which read, “Ginkgo nuts.”

Interesting. I’d had the freeze-dried ones before in a a stir fry, but I’d never seen the raw, unshelled nuts before. So, yes, I bought them.IMAG2360

Ginkgo trees are the oldest living trees on earth, unchanged for more than 200 million years. Evidence shows that Chinese began cultivating it more than 1,000 years ago. Last week, I unknowingly encountered a ginkgo tree. Because it’s, its leaves were turning yellow from the top down. I thought it was so pretty that I took a photo of it, but when I got near it, I was repelled by an odor of urine. I thought, “Great, some asshole ruined the beauty of this tree by peeing on it.” I posted it on Facebook and was told by one of my former NGI classmates that this was a gingko tree and the smell is natural. It’s believed that this odor was attractive to animals at some point.

What a coincidence that I would buy ginkgo nuts the same week. I asked my friend at work how to use them and she told me that I should boil them, shell them, and peel off the skin that’s on each one. While I trusted her advice, I wondered if there were any other methods. I read that another common way to prepare them is pan frying. I decided to try both. I put half in a pot of water and boiled them for about 15 minutes, and pan fried the other half in a little bit of sunflower oil.

After placing them both on the stove, I went into the other room to check on an email. There I was, scrolling through my mail, when I hear this loud POP. As I walked back into the kitchen, there was another big POP. I had a suspicion about what was happening, so I cautiously approached the stove and sure enough, those suckers were popping right out of the pan and shooting across the room. They had become oily little projectiles and little pieces of shell landed on my counter and floor like shrapnel. I shielded my face as I approached the stove because I didn’t want to become a casualty of detonating ginkgo nuts. At arm’s length, I turned off the flame and moved the pan to the back at a safe distance. The whole thing was rather ridiculous, but I pictured getting a sharp piece of shell in my eye and wasn’t thrilled by the thought. In fact, I did get a shot of hot oil right near my eye.

IMG_4023IMG_4027
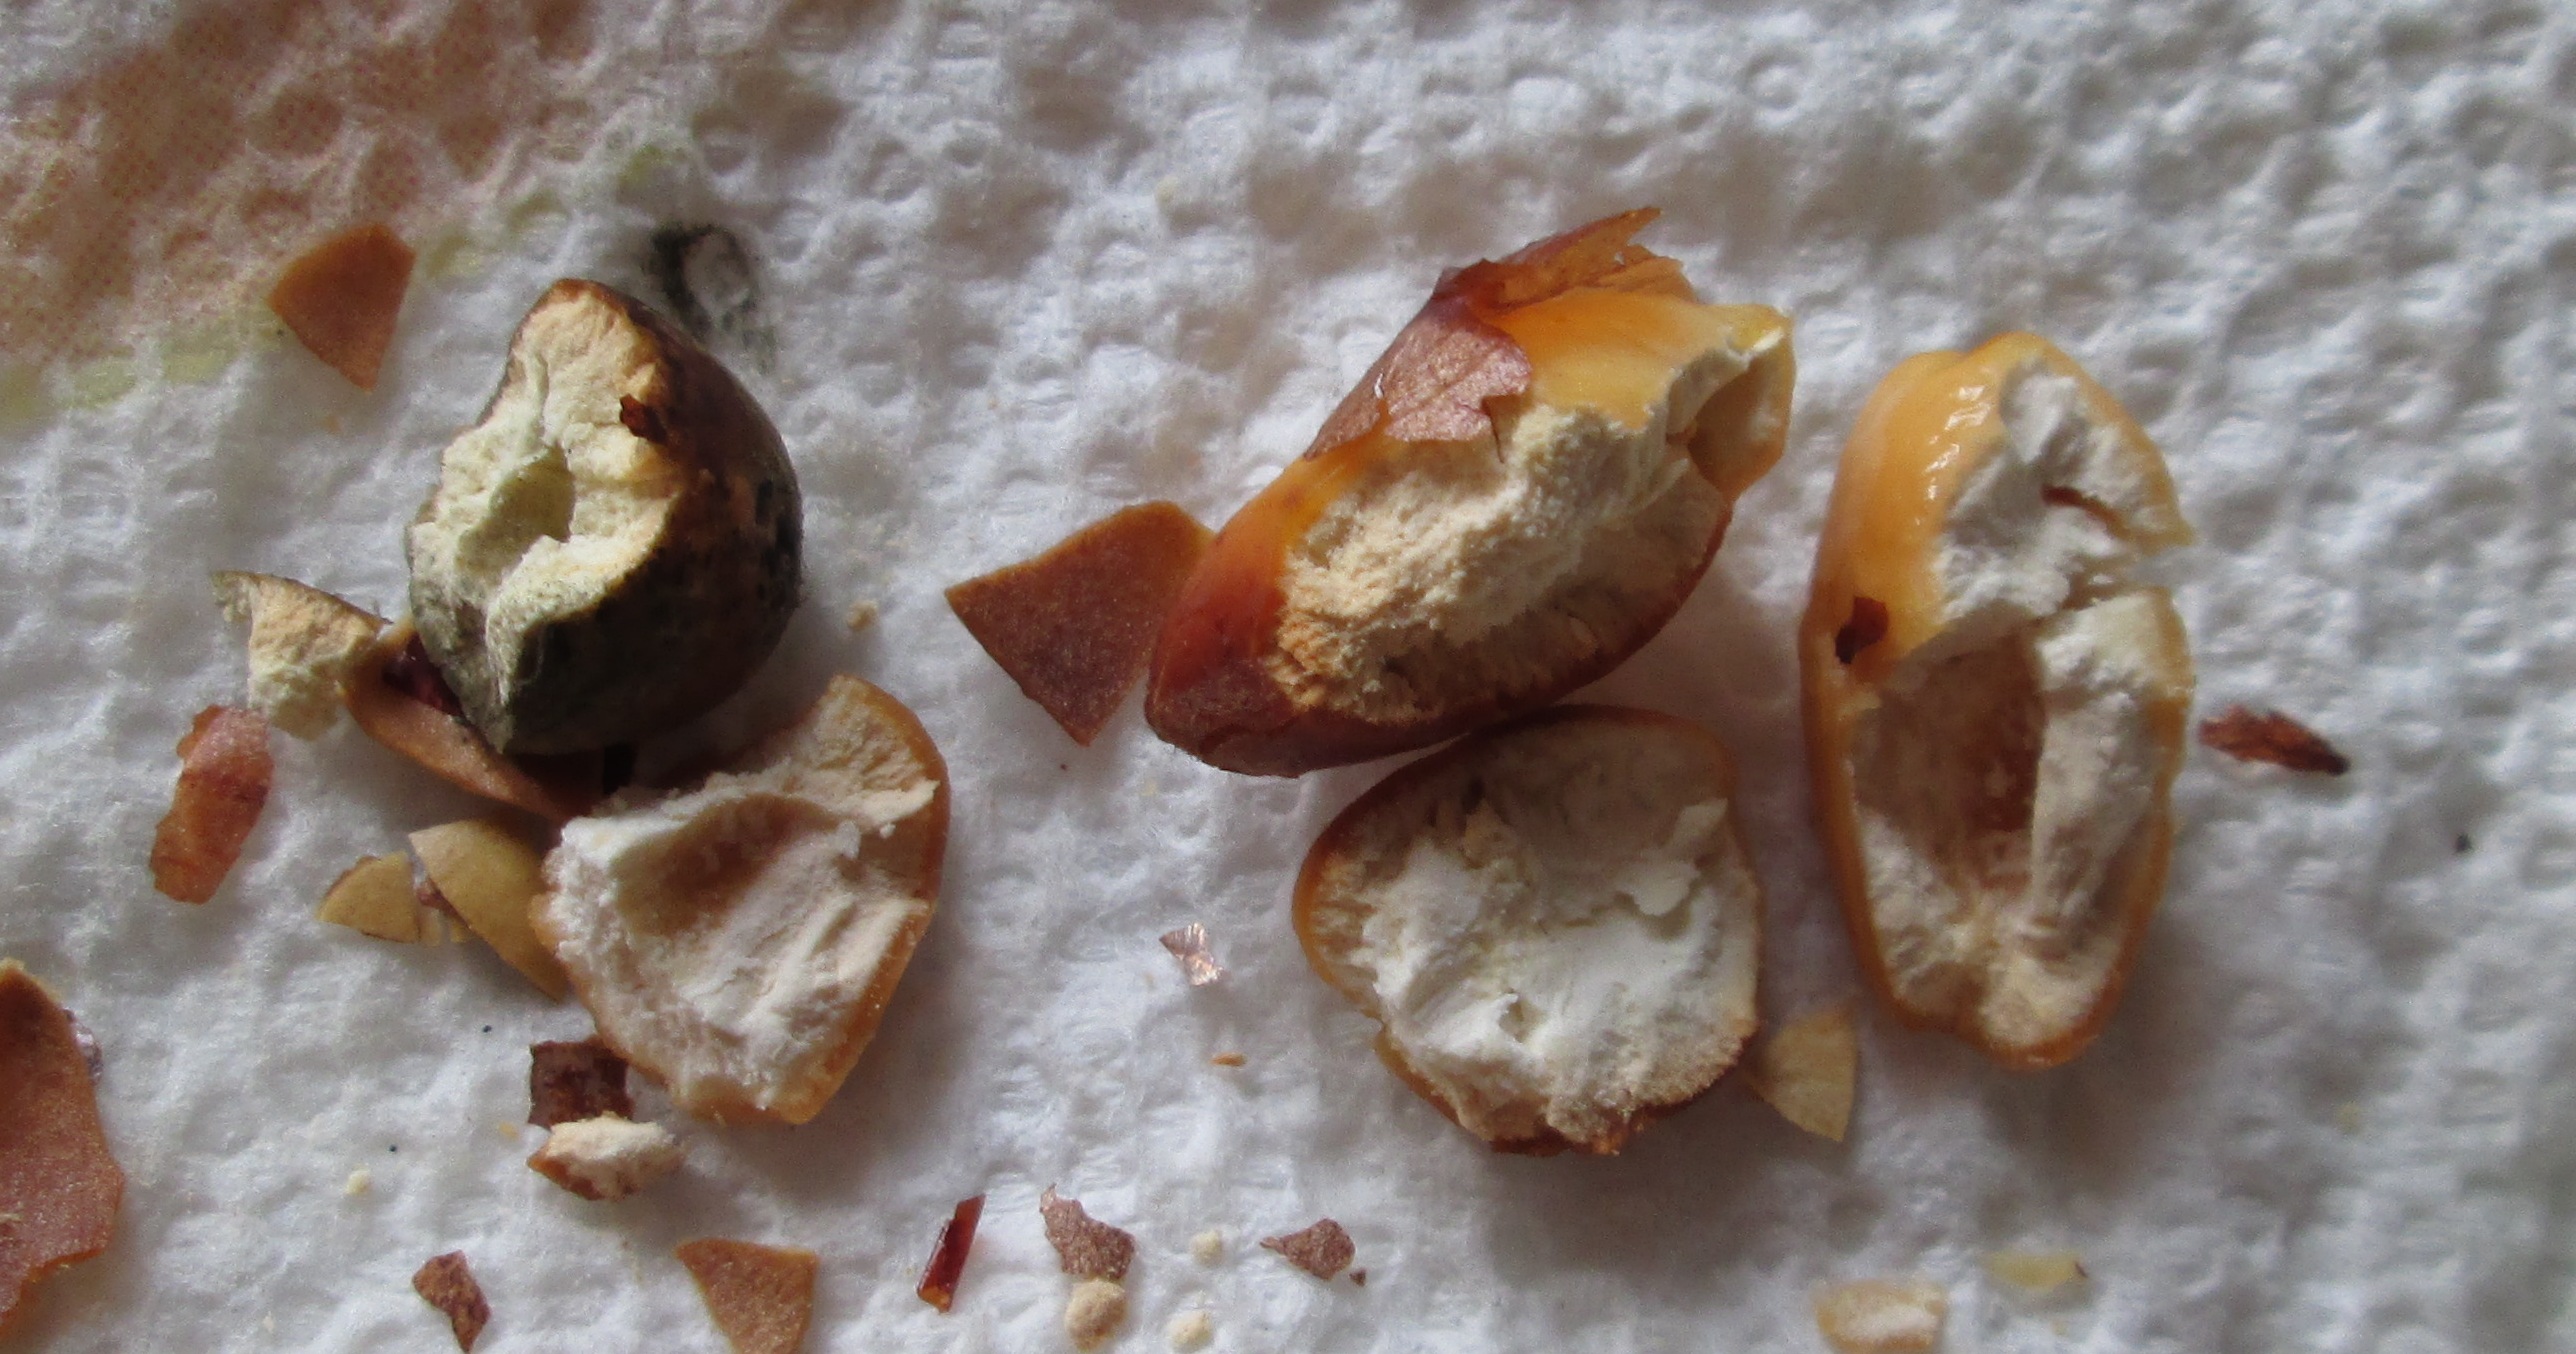
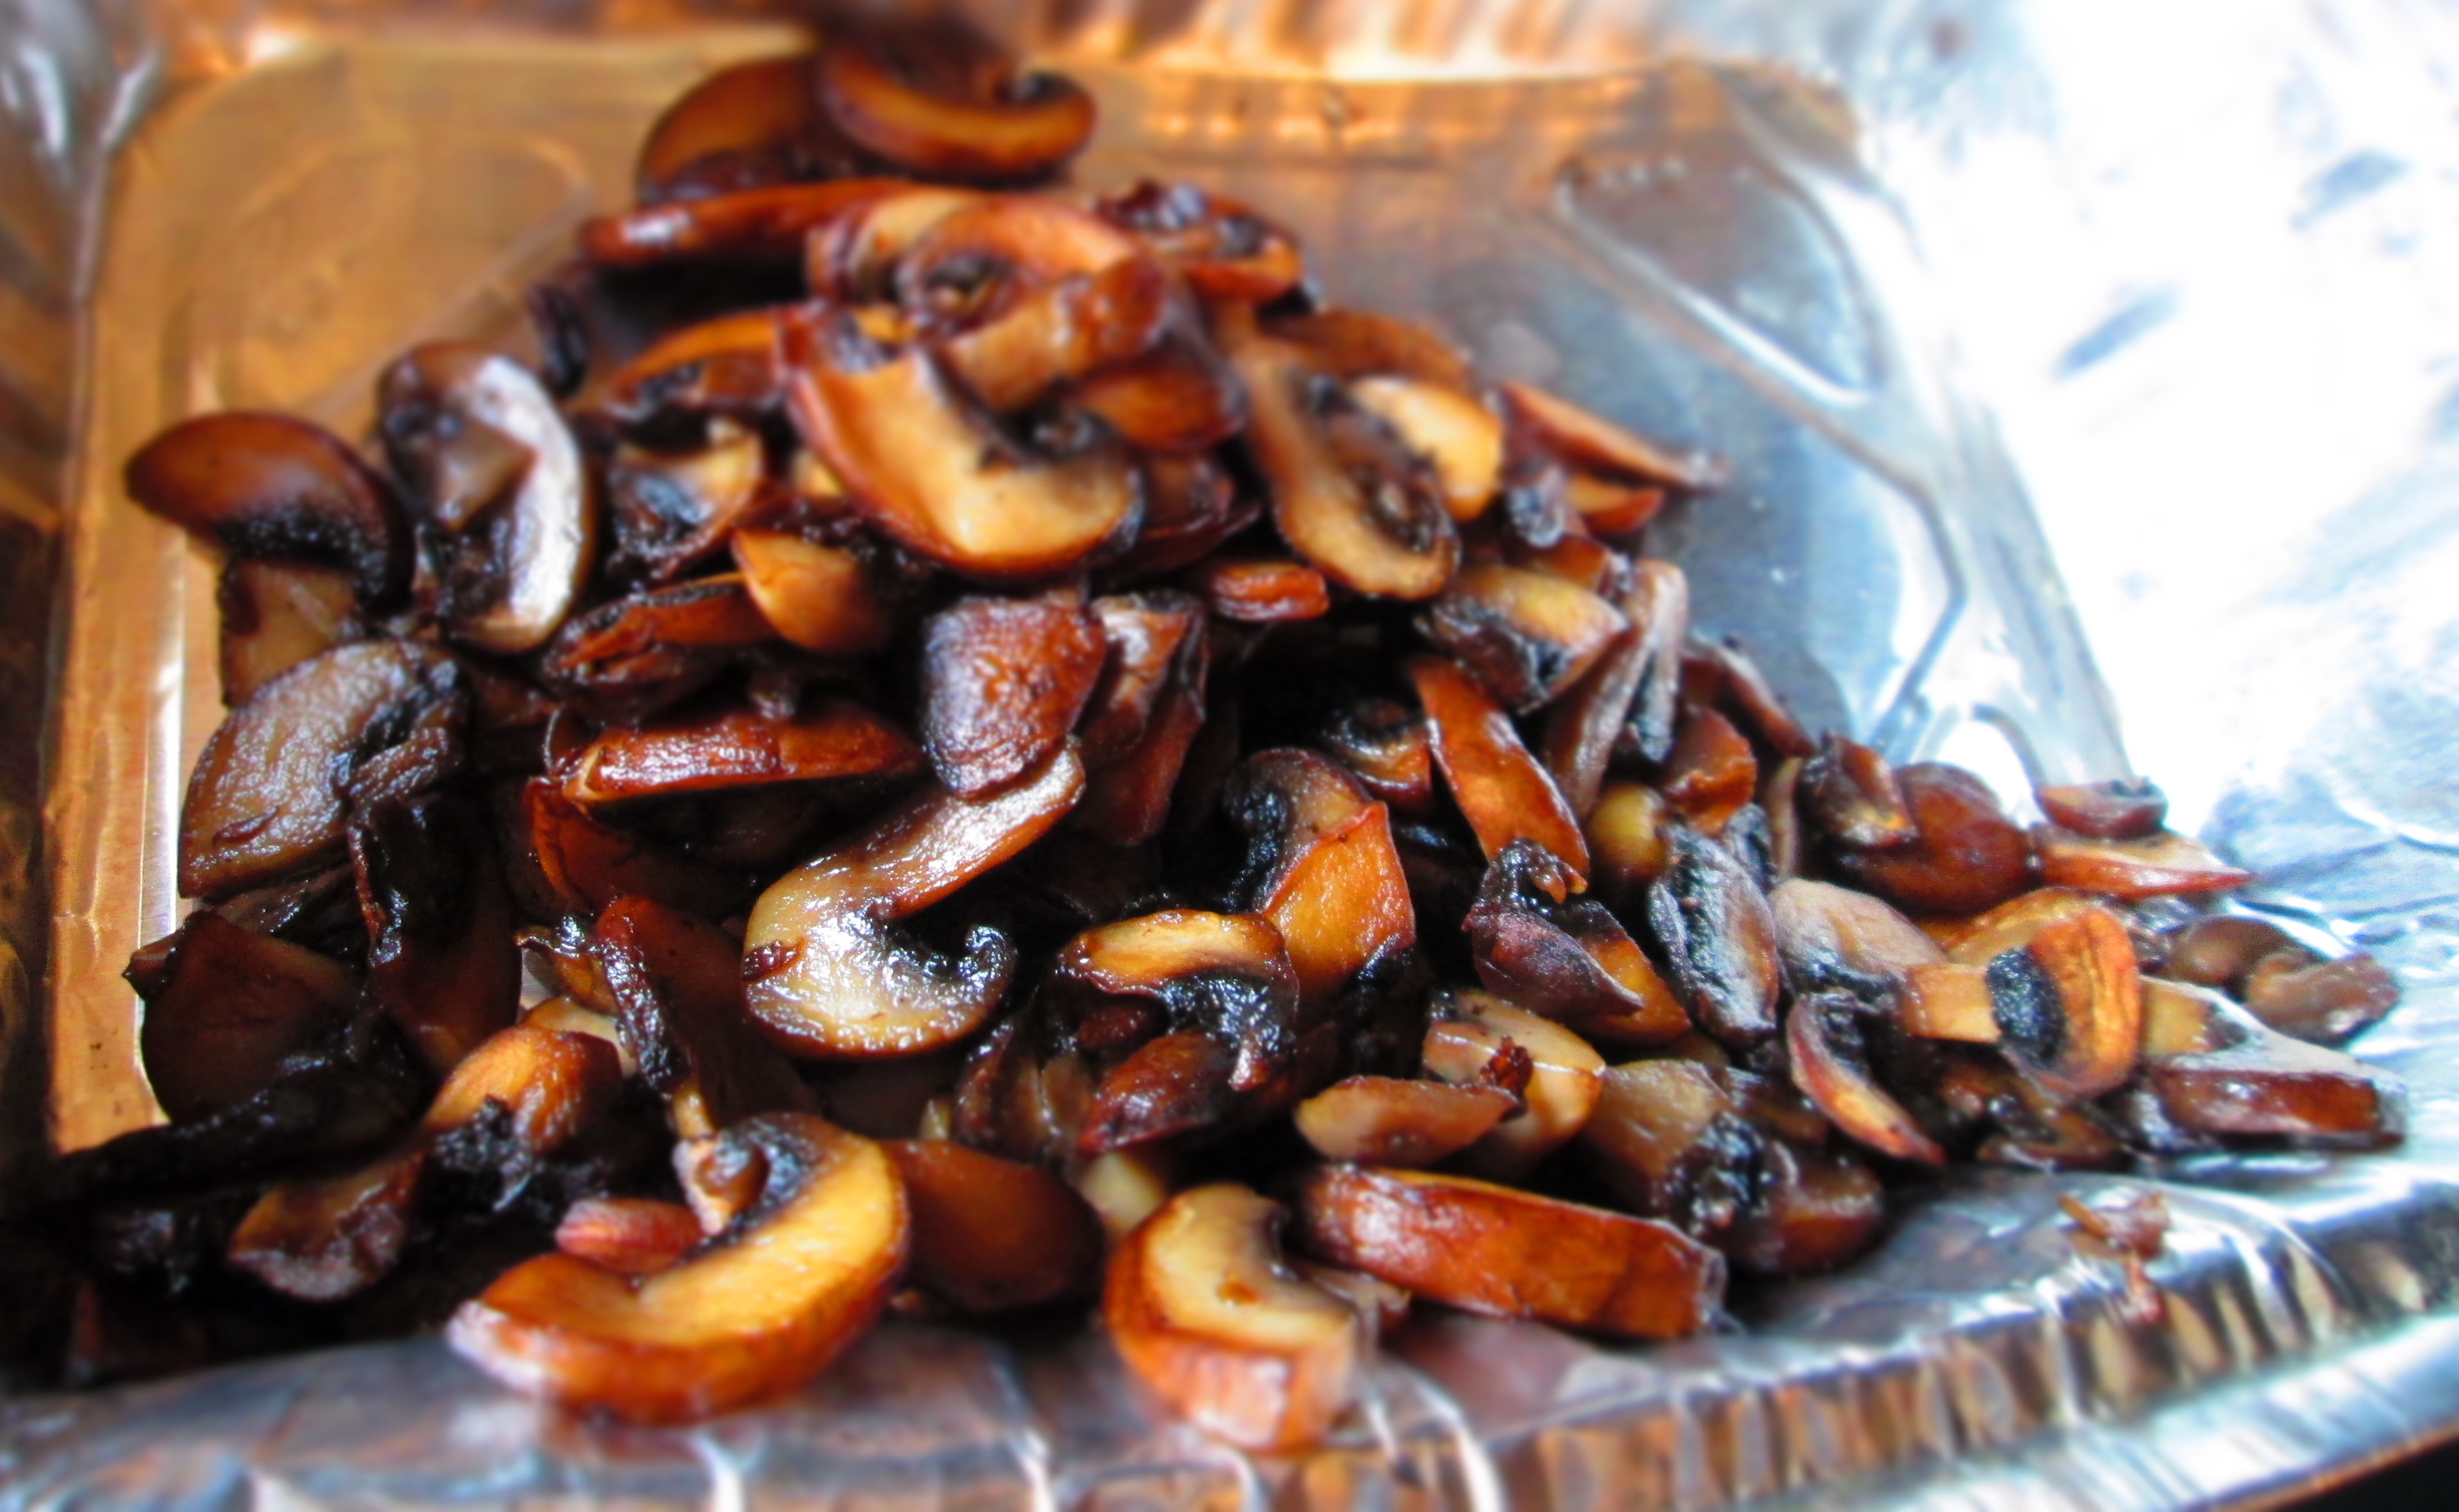
While both methods turned out perfectly fine ginkgo nuts, there were a few differences. The fried ones came out with a nice golden yellow color, while the boiled ones had a smooth creamy look to them. (Pictured above, on the left are the boiled nuts; on the right are the pan fried nuts.) That one is a personal choice. However, I don’t think anyone would argue that struggling to peel skin from a nut is not a fun task. The skins, for the most part, slid off the pan fried nuts, while they stuck a little to the boiled ones. I mean, it wasn’t as difficult as removing skin from, say, hazelnuts or Brazil nuts, but I did struggle a tiny bit. A few came out looking like plaster, crumbling into dust—I assumed those were rotten. IMG_4025

To avoid the missile launch from your frying pan, I think timing the cooking would help. I had them in there for approximately 8 to 10 minutes before they started exploding, so maybe keeping them in the pan for about 5 minutes would do the trick. And cracking them first would probably prevent the fireworks, too.

I also discovered that the pan fried nuts were less bitter than the boiled nuts. So if you’re going to eat them out of hand, I suggest pan frying them. Ultimately, they just tasted better.

All of this pertains to ginkgo nuts that have been removed from the fruit. If you have access to the fruit, handle them carefully. The fruit contains urushiol, the same element that’s found in poison ivy, and may cause a skin reaction. Also, your hands will smell like cheese, I’ve been told. You should wear gloves and remove the flesh from around the nuts. The upside is that ginkgo nuts are known to stimulate the brain, staving off memory loss and Alzheimer’s Disease. They’re also used in Chinese culture to help with breathing/lung problems, such as asthma and bronchitis. Chinese also believe them to be aphrodisiacs.

Whether you boil or fry them, whack them gently with a mallet (or meat tenderizer or blade of a knife, or whatever you’ve got handy). Or you can crack each one with a nut cracker. Don’t whack or crack them too hard as the nuts are rather delicate. Sprinkle them with a little sea salt and enjoy. Or add them to stir fries, soups and stews, or just about anything you would add nuts to.

The medical warnings about ginkgo nuts is that adults shouldn’t have more than 8 in one day and children should have a maximum of 5. And word on the street is that if you are allergic to cashews or mangoes, you should avoid them altogether.

Anyway, that’s the story of my exploding nuts. So, just let my stupid experience be your guide when trying this Asian specialty. Here’s hoping your nuts don’t explode.

IMG_4028

Ginkgo Nuts for Snacking

1 small bag ginkgo nuts
1 teaspoon cooking oil
Sea salt

Rinse nuts under running water.

If frying:
Lay the nuts out on paper towels to dry.
Heat the oil in a small frying pan. Add the nuts and cook, stirring occasionally, for about 5 minutes. Remove from heat and let cool until you can handle them.

If boiling:
Place nuts in a small pot and cover with water. Bring to a boil and cook about 10 minutes. Drain and let cool.

Lay the nuts on a dish towel. Gently whack the nuts with a mallet (or other object) so that crack. Remove the shells and skins (a paper towel may help you rub the skins off more easily).

Sprinkle with salt and enjoy (in moderation!).


Leave a comment

Going Flakey with Quinoa

IMG_3478

I call Jackson Heights, Queens, the United Nations because half of the world’s cultures, nationalities, and identities can be found there. And where there are ethnic enclaves, there are markets that cater to those enclaves.IMG_3474

This New York neighborhood is home to just about every Central and South American nation you can find on the map, and I’m always going home with some new product I’ve never seen or tried before.

My forays into various ethnic markets have introduced me to many different grains in many different forms, from rice flakes to lotus nut puffs (okay, not technically a grain) to cracked corn. This past week, I found quinoa flakes.

The package recommends putting a couple of tablespoons into a smoothie or yogurt, and I’ve read suggestions to put it in baked goods in place of flour or oats. But I figured it would make a good breakfast porridge, too. I cooked a small quantity by itself, just to see what it was like. It tasted like…well…quinoa. It even had the little signature “strings” of cooked quinoa. But I found it to be a bit blah. Kind of like baby food.IMG_3484

So then I blended it with rolled oats and made a half-and-half porridge. I added some maple syrup to give it some flavor, and topped it off with some chopped pecans for texture. It turned out much lighter than regular oatmeal, but because quinoa has protein, it’s filling nevertheless. And because it’s lighter, I think it would make a great breakfast for someone who is sick or has stomach issues.

Here’s the recipe for my preparation:

IMG_3488

Quinoa-Oat Porridge

½ cup quinoa flakes
½ cup rolled oats
Pinch salt

Optional toppings:
Maple syrup
Honey
Chopped nuts
Fruit

Bring 2 cups water to a boil in a small pot. Add quinoa flakes, oat, and salt; lower heat, cover, and simmer 5 minutes, or until desired thickness. You can add more water if you want it looser.

Transfer to 2 bowls. Top with whatever toppings you like.


Leave a comment

Spigarello, the Secret Broccoli

My parents have a vegetable garden. In the days when both my parents were fully healthy, so was their garden. They grew numerous things, and several varieties, including tomatoes, squash, peppers, lettuce, eggplant, basil, parsley, and mint. These days, my parents are elderly and my father’s health issues keep him from moving around too much. Consequently, their garden is kept down to whatever little they can handle. Which makes me sad on numerous levels.Spigarello

Every now and then, they tried something new, and have even gotten things growing in there that they had not planted, or they planted what they thought was one thing but got something else. A couple of summers ago, they wound up with a peach tree. To this day, they don’t know where it came from. It made the most beautiful, delicious peaches. But easy come, easy go—as mysteriously as the tree appeared, it died for no apparent reason that same year. Bizarre.Spigarello

This year, they planted what they thought was kale. But this strange leafy plant grew instead. It kind of has kale-ish leaves, but it is not kale. The plant also closely resembles broccoli rabe, but it does not have broccoli rabe’s signature mini broccoli-like heads. Nor does it have broccoli rabe’s bitterness. It just tastes kind of herbal and grassy. So, we all just happily ate this mystery plant.

Then, this past week, my friend Linda gave me something out of her CSA box. (For those of you not familiar with CSAs, it stands for community-supported agriculture. Local farms prepare boxes each week of whatever is ready to be harvested. You pay a fee and go pick up your box each week. You don’t know what you’re getting until you pick it up, and the surprise is half the fun.) This item was listed as spigarello. She had no idea what it was or what to do with it, so she gave it to me. Imagine my surprise when, upon investigation, that this is the stuff growing in my parents’ garden! Mystery solved.Spigarello

Native to southern Italy, spigarello (aka spigariello) is an heirloom broccoli variety and has been called by some websites as the “parent of broccoli rabe.” I’ve read that it’s all the rage right now in California but has been featured by some top restaurants here in New York as well, including Tom Collichio’s Craft.

Because spigarello is kin to broccoli rabe, it can be used like it. You can sauté it, put it into soups, or bake it in casseroles. But since it does not have the bitterness of broccoli rabe, it can also be used in salads without sending the bitter part of the  taste belt on your tongue into orbit.

So, here is my favorite (and the most classic) recipe for broccoli rabe (which appears in Vegetarian Italian: Traditions, Volume 1), prepared with spigarello. Thanks to Linda for providing the clue.

Sauteed Spigarello with Garlic and Red Pepper

3 tablespoons olive oil
2 large garlic cloves, thinly sliced
Crushed red pepper to taste
1 pound spigarello (or broccoli rabe)
½ teaspoon salt, plus more to taste

In a large pot, combine the oil, garlic, and red pepper and sauté over medium heat until the garlic is well browned, about 3 to 5 minutes.

Meanwhile, cut the stems off the spigarello, and remove any blackened or yellowed leaves. Cut large pieces into edible lengths.

Add the spigarello, salt, and ½ cup water to the pot and stir. Continue cooking until the spigarello is tender, about 10 to 15 minutes. If it gets dry, add a little more water. Transfer the spigarello and the juices to a serving platter. Season with more salt, if desired.

Serve hot, cold, or at room temperature with crusty pieces of Italian bread.

Keep leftovers in a sealed bowl in the refrigerator up to 5 days.

Makes 4 to 6 servings.


2 Comments

Papalo, the Unsung Cilantro

I just love finding new items to try. I was at the farmer’s market one day and saw something called papalo. I’d never heard of it and had no idea how to use it, but I bought a bundle and did some research.

Papalo leaf

Papalo leaf

Turns out that papalo is an herb that grows wild in Mexico, Arizona, and Texas. Most popular in Mexican cooking (although it’s also used in South American cuisines), it’s been compared closely to cilantro. It looks nothing like cilantro but its flavor is mildly cilantro-like with citrus overtones. In fact, it is often used in dishes in place of cilantro. It tends to be used in raw applications more than cooked ones, and is especially popular in salsas and guacamole.

There’s a traditional Puebla sandwich made with meat, avocado, and chiles, varying with tomatoes, cheese, and onions, and always papalo. As far as I’ve been able to determine, this sandwich is called a cemita, which is also a general word (in Spanish) for “sandwich.”

The word papalo comes from the Native American Nahuatl word for butterfly, papalotl. (Interestingly, it’s similar to the French word for butterfly, papillon.) But I’ve come across numerous names for papalo, including Bolivian coriander (coriander being the word for cilantro in many countries), butterfly weed, pápaloquelite, tepegua, quillquiña, quirquiña, and killi.Papalo

Despite the prevailing belief that papalo should not be cooked, I used it in a batch of vegetarian chili and, predictably, it gave it a citrusy note. The chili seemed somehow “fresher” and more summery. That’s obviously my own association with the flavor profile of the chili but the papalo definitely gave it a nice little zing.

Here’s a recipe for a simple tomatillo salsa, using papalo. Let me know what you think.

Simple Tomatillo Salsa with Papalo

½ lb. tomatillos, husked and rinsed
1 small jalapeno, stemmed, seeded and finely minced
¼ cup minced papalo leaves
¼ cup finely minced white onion
2 tbsp fresh lime juice
Sea salt to taste

Finely chop the tomatillos and place in a bowl. Add remaining ingredients and mix well. Chill for at least ½ hour to allow the flavors to blend.


3 Comments

Chinese Noodle Stir-Fry with Chickpeas

This week, I’d like to share my recipe for Chinese Noodle Stir-Fry with Chickpeas. There’s nothing like a bowl of noodles, no matter what type of cuisine you’re cooking. It’s comforting and satisfying with layers of flavors and textures. The great thing about noodles is that you can a have them with anything and add anything to them.IMG_2595

One of my favorite way to have noodles is stir-fried with lots of vegetables. I particularly like cabbage, so I start with that and build from there.

I also had some fresh chickpeas and green peas that I had shelled from their pods and needed to use them, so I threw those in as well. Green peas are often found in stir-fries and Asian noodle dishes, but chickpeas not so much. I found them to work beautifully in a stir-fry, especially since I’m a little clumsy with chopsticks and was able to pick up the chickpeas fairly well. Their meaty, firm texture also made a nice contrast to the tender noodles and vegetables.

So, here’s the recipes. Enjoy!

Chinese Noodle Stir-Fry with Chickpeas

2 teaspoons coconut or sunflower oil
10 ounces cremini or baby bella mushrooms, thinly sliced
1 10-ounce package Chinese noodles (your preference)
2 teaspoons sesame oil
3 large garlic cloves, sliced
2 cups sliced cabbage
1 small carrot, diced small
1 medium red bell pepper, chopped
½ chickpeas, black-eyed peas, or soy beans
¼ green peas
2 cups greens (spinach, chard, kale, amaranth leaves, etc.)
1 tablespoon soy sauce
2 sliced scallions for garnish

1. Heat coconut oil in a wide skillet. Add the mushrooms and sauté, stirring often, until golden brown, about 15 minutes. Remove mushrooms with a slotted spoon and set aside.

IMG_2588

2. Meanwhile, cook noodles according to package directions.

3. In same pan, add 1 teaspoon sesame oil in a wok or large. Add garlic and cook until fragrant, 1 or 2 minutes. Add cabbage, carrot, and pepper and stir-fry until crisp-tender, about 8 to 10 minutes. Add beans, peas, mushrooms, and soy sauce and continue stir-frying another 2 to 3 minutes.

IMG_2587

4. Add greens cook until wilted. Stir in remaining sesame oil.

IMG_2590IMG_2592

5. Add the cooked noodles and stir to combine. Divide between 2 bowls and garnish with scallions.

Makes 2 servings.

IMG_2599


Leave a comment

Orange-Flavored Yerba Mate

I was in a supermarket in Jackson Heights, Queens, that carries a multitude of Latin American products, and as I often do, I chose a product that I’ve never seen before to purchase and try. This time it was orange-flavored yerba mate. (Actually, I picked up two new products—the other one being lucuma flour, but I’ll leave that for another blog).

For those of you who are not familiar with yerba mate, it’s an herb that when steeped makes an invigorating tea. It’s popular in numerous South American countries and is the national drink of Argentina.IMG_2298

The traditional way to drink yerba mate is to prepare it in a hollowed-out gourd and sip it through a bombilla, a special straw, often made of silver, designed so that it filters out the leaves and twigs. The biggest benefit of yerba mate is that it’s an energy booster. Some say that it’s just as effective at invigorating the body as coffee; others say that it falls somewhere between tea and coffee. It contains antioxidants, and it’s been said that it also helps with weight loss. Like anything else, it has its detractors, too, but the Mayo Clinic recommends that it’s generally safe to enjoy yerba mate in moderation.

Yerba mate with Argentinian mate gourd

Yerba mate with Argentinian mate gourd

The gourd itself is called a mate or guampa, depending on where you are in South America. Traditionally, tomando mate (drinking mate) with friends or guests involves a ritual of sharing out of one of these gourds. The gourds themselves require curing, like seasoning a cast iron pan. The ritual is a symbol of hospitality, and is reminiscent of a Japanese tea ceremony. (For more information about the history of yerba mate, the drinking ritual, and how to “season” a gourd, this site is pretty good. Note that I’m not endorsing this particular brand, only its information!)  The one in the photo here was brought to me by my brother when he returned from a “back to my roots” trip to Buenos Aires, where he was born and spent the first few years of his life. Lovely, isn’t it? In fact, these gourds can be works of art, and antique versions can go for quite a bit of money (I’ve seen up to $300 for ornate examples).

Bombilla

Bombilla

Yerba mate has been available here in the U.S. for some time. I first tried it about 10 years ago. But, until now, I have never seen flavored yerba mate. I came to learn that in South America, yerba mate is often flavored with citrus, mint, or other flavors. Yerba mate has a strong flavor, herbal (duh) and a bit grassy, and I find it slightly bitter, so I’ve never been a huge fan. I was curious to see if the addition of orange would improve the taste for me.

Yes, it did. I found that the citrusy flavor, along with some honey, actually made it a pleasant drink to have. I made sure to have it in the afternoon and it got me through a very busy day.

If you’d like to give yerba mate a try:

Place some yerba mate in a tea ball or filter basket (same amount as you would use for any other tea). Heat some water, but don’t boil it—supposedly, boiling water makes it bitter. Pour over the yerba mate and let it steep for about 5 minutes. Add honey or anything else you like to use in tea. Then, enjoy!

If you’re fortunate enough to have a mate, steep the tea right in the gourd and sip through the bombilla. And don’t forget to share.


2 Comments

Mixed Dal Soup

I picked up some mixed dal at an Indian store in Jackson Heights and since the weather was DSCF0007about to take a turn for the worse, I decided to make mixed dal soup. Mixed dal is a mixture of different split lentils and they make delicious meals. They’re also packed with protein, and with a few greens thrown in, you’ve got a complete, filling, satisfying meal. Toasting the caraway seeds gives the soup a great, complex flavor. And it was just right on a rainy, dreary day. So here’s my version of mixed dal soup.

Mixed Dal Soup DSCF0008

2 tablespoon olive oil
1 small onion, diced small
1 medium carrot, diced small
1 celery rib, finely chopped
¼ lb. sweet potato, diced small
½ teaspoon kosher salt
1 cup mixed dal
1 tablespoon caraway seeds, toasted (optional)
1 teaspoon ground fennel seeds
1 teaspoon garlic salt
freshly ground black pepper
½ lb. bok choy (green tops only), chopped

1. Heat the oil in a medium-large pot. Add the onion, carrot, celery, sweet potato, and kosher salt and sauté 5 minutes, or until vegetables have softened and onions are translucent.

DSCF0009

2. Add the dal, caraway seeds, fennel, garlic salt, pepper, and 4 cups water; mix well. Bring to a boil; lower the heat and cook, partially covered, until the dal are completely soft and disintegrating, about 1 to 1 ½ hours. Stir occasionally.

DSCF0013

3. Add the bok choy and continue cooking a few more minutes until the greens have softened.

DSCF0014

4. Taste the soup for seasoning; adjust as desired. Serve hot.

Makes about 6 servings.


Leave a comment

Cassava Bread

cassava bread 1 cassava bread  2I’m always finding new products to try, and this week, it was cassava bread.

Prior to buying this product, I had seen, and even made, bread made out of cassava, but it was not what is known on the market as “cassava bread.” This particular bread—a typical product in the Dominican Republic—is dry, flat, and cracker-like. It’s quite plain and meant to be eaten as an accompaniment to meats and stews. (What’s funny is that the store where I bought it had it stacked on a shelf in the produce aisle. Um, sure. You know, plantains, potatoes, and cassava bread all go together, right?)

I asked a Dominican friend at work about it when I brought back from the store during my lunch breadk. She warned me that it’s very plain, and she was right. The texture was dry and hard, and the flavor (if it can be called that) is that of saltless toast. But that makes sense. When eating a spicy stew or sauce-covered meat, this bread is probably just right as a counter balance. I tried mine with tomatoes and olive oil, like a bruschetta. It wasn’t bad. It probably does better when left to soak up stew juices, though.

yuca

Photo: Melissa’s Produce

Cassava, by the way, also goes by the names yuca, manioc, and tapioca. It’s a staple food for South America, the Caribbean, Southeast Asia, and Africa, and it can be used fresh (i.e., the root) or as a flour (sometimes called tapioca starch). It’s a creamy white root, very starchy, and pretty bland. But it cooks up like a potato and is extremely versatile. It’s not the prettiest root in town, but it’s filling and is a great vehicle for all kinds of flavors. And it’s gluten free!

And, yes, it’s the same tapioca they use to make tapioca pearls from. That’s what you need for pudding and bubble tea. 🙂

Have you ever eaten cassava bread? How did/do you eat it? I love to learn about how ethnic foods are eaten, so please share.