Miz Chef

Cooking Up a Healthy Life


Leave a comment

Brussels Sprouts-and-Red Onion Frittata

Every season brings with it its own special delicious crops. One of my favorite autumn vegetables is Brussels sprouts. Earthy, cabbage-y, and slightly bitter, Brussels sprouts have traditionally been underrated, and even reviled. Even the words “Brussels sprouts” can bring a look of revulsion to some people’s faces.

O ye, of little faith. You poor honeys just haven’t had them cooked right.

I have used Brussels sprouts in many dishes, but I had never made them in a frittata. Until now. I loved it.

Frittatas, in general, are very forgiving. You can add just about anything and it will taste good. Brussels sprouts are no exception. Paired with red onions, they make this frittata hearty, flavorful, and elegant enough to serve others.

Enjoy!

Brussels Sprouts-and-Red Onion Frittata

Makes 4 servings.

½ lb. Brussels sprouts, trimmed and halved
2 tablespoons olive oil
1 teaspoon kosher salt
1/3 cup finely chopped red onion

3 large eggs
1 tablespoon grated parmesan cheese
Freshly ground black pepper

Preheat the oven the 350 degrees F/176 degrees C.Place the Brussels sprouts in a medium bowl. Add 1 tablespoon of the oil and ½ teaspoon of the salt. Toss until all the sprouts are coated. Spread them out on a baking sheet and roast until nicely browned and tender when pierced with the tip of a knife.Beat the eggs in a medium bowl with the remaining salt, parmesan, and black pepper.

Heat the remaining oil in a small skillet. Add the onion and sauté until they’ve softened and just start to brown, about 2 minutes. Add the Brussels sprouts and spread them out evenly (try to face them cut side down for a nice presentation). Pour the eggs evenly over the onion and sprouts. Lower the heat to low and cover the pan. Cook until the underside of the frittata is browned, about 5 to 7 minutes. (You can check by lifting the frittata on one side with a spatula and peeking underneath.)

Place a plate that is wider than the skillet over the top and a carefully (using a dry kitchen towel or potholder!), flip the frittata over onto the plate. Then slide the frittata back into the skillet.Continue cooking a few more minutes, uncovered, until the frittata is cooked through and the underside has browned.

Remove it from the pan and cut into 4 wedges. Serve hot, warm, or cold.

Advertisement


Leave a comment

Shishito Pepper and Garlic Frittata

Shishito peppers are a hot culinary ingredient right now. And I mean “hot” in a trendy way, not the spicy way. They’re a mild chile pepper, small, elongated, and thin-walled. They’re sweet with a fruity note; however, every once in a while, you might actually get a hot one. There’s no way to recognize a hot one, though—it’s completely random.

Shishitos are easy to cook and work with, and are very versatile. I bought a bunch of them and tried them in various ways. Here I used them in a frittata for a delicious breakfast, lunch, or dinner. Give it a try.

Shishito Pepper and Garlic Frittata

Makes 4 servings.

5 to 6 shishito peppers
3 large eggs
1 teaspoon seasoning of your choice
1 teaspoon kosher salt
1 teaspoon olive oil
4 to 5 large garlic cloves, minced

Broil the peppers or grill them over an open flame until lightly charred. Scrape away any excessively charred skin. Cut off the stems and coarsely chop the peppers. Set aside.In a small bowl, beat the eggs together with seasonings and ½ teaspoon salt.

Heat the oil in a small skillet over medium heat. Add the garlic and heat just until fragrant, about 30 seconds. Don’t let the garlic burn.Add the chopped peppers and remaining salt and sauté a minute. Pour the eggs evenly over the peppers. Lower the heat to low and cover the pan.Cook until the underside of the frittata is browned, about 5 minutes. (You can check by lifting the frittata on one side with a spatula and peeking underneath.)

Place a plate that is wider than the skillet over the top and a carefully (using a dry kitchen towel or potholder!), flip the frittata over onto the plate. Then slide the frittata back into the skillet.Continue cooking a few more minutes, uncovered, until the frittata is cooked through and the underside has browned.

Remove it from the pan and cut into 4 wedges. Serve hot, warm, or cold.


Leave a comment

Coconut Cornbread

There are many different variation of cornbread, and you will often find all sorts of ingredients being called for that aren’t typical or traditional for this very old recipe.

Cornbread goes back to pre-Colonial America. Native Americans made cornbread, along with many other corn-based products, since corn was a staple ingredient of their diet. Settlers, who were introduced to corn in its various forms, began making cornbread as well, sometimes calling it hoe cake (because they could be made on garden hoes against a fire).

The basic recipe was cornmeal, water, salt, and some form of fat. Over the years since, the recipe evolved to include leaveners, milk or buttermilk, and flavoring ingredients. Cornbread became particularly popular in the American South because corn was a staple crop.

Truly, almost anything can be added to cornbread to turn it into a complementary addition to any meal. It can even be savory or sweet.

For this recipe, I replaced the typical dairy liquid with coconut milk (just cuz). And to boost the coconut flavor, I mixed in some shredded coconut. The flavor is a lot more subtle than you would think, but it’s really good. It makes the perfect snack, breakfast, or accompaniment for chili, soup, or beans.

Enjoy!

Coconut Cornbread

Makes 1 cake.

1 cup all-purpose flour
1 cup cornmeal
3 tablespoons sugar
1 tablespoon baking powder
1 teaspoon kosher salt
2 large eggs
1 cup coconut milk
¼ cup mild oil (such as sunflower or safflower)
1 cup shredded coconut
1 cup corn kernels (fresh or frozen)

Grease an 8×8-inch loaf pan (or something of similar size), and line it with parchment paper. Preheat the oven to 375 degrees F.

In a large bowl, combine the flour, cornmeal, sugar, baking powder, and salt. Whisk together.In another bowl, whisk together the eggs, coconut milk, and oil.Add the wet ingredients to the dry ingredients, as well as the shredded coconut and corn.

Mix gently just until the ingredients are combined.Pour the batter into the prepared pan and smooth out the top.Bake for 40 minutes, or until the top is lightly browned and a toothpick inserted into the center comes out clean.


3 Comments

Delicious Date-Nut Bread

Date-nut Bread is a classic winter holiday treat. In fact, it’s become so popular that December 22 is National Date-Nut Bread Day.

Okay, so it’s January, but the cold winter weather continues to call for hearty, comforting foods, and date-nut bread definitely falls into that category.

Dates originated in the Middle East, and they play a huge role in the cuisines from that part of the world. They made their way to the U.S. via the Spaniards, who were introduced to them by the Moors. They are now a popular crop in California.

The word “date” is derived from a Greek word (dáchtylo), which means “finger.” Dates have been shown to help with constipation; promote bone health and ward off osteoporosis; and aid in intestinal disorders, heart problems, anemia, sexual dysfunctions, as well other health issues. They’re a good source of fiber, calcium, iron, phosphorus, potassium, magnesium, and zinc. They also contain thiamin, riboflavin, niacin, folate, vitamin A, and vitamin K. They’re also a great source of energy, so if you’re doing any kind of physical activity, dates are a great thing to add to your snack pack. Be aware, though, that dates contain a fair amount of sugar, so you don’t want to overdo them, unless you plan on burning them off.

Enjoy date-nut bread for breakfast or a snack, by itself, toasted with butter, or with jam, honey, maple syrup, or anything else you like.

Enjoy!

Date-Nut Bread

2 cups chopped dates
1½ teaspoons baking soda
2 large eggs
¾ cup sugar
1 teaspoon vanilla extract
¼ teaspoon allspice
¼ teaspoon kosher salt
2 cups all-purpose flour
1 cup chopped walnuts

Grease an 8×10-inch loaf pan and line it with parchment paper. Preheat the oven to 325 degrees F.

Place the dates and baking soda in a small bowl and cover them with 1 cup boiling water. Stir. Let them sit until they cool down.In a medium bowl, whisk together the eggs, sugar, vanilla, allspice, and salt.Add the flour and dates (including the water), and mix with a wooden spoon. Gently stir in the walnuts.Transfer the mixture to the loaf pan and smooth out the top. Bake for 55 to 65 minutes, or until a toothpick inserted in the center comes out clean.Cool the loaf on a cooling rack for 10 to 15 minutes. Turn out the bread onto the rack and cool completely.Store the loaf wrapped in plastic in the refrigerator up to 5 days.


Leave a comment

Winter Eggnog Pancakes

So, the holidays have come and gone. You’ve shopped until you dropped, partied hardy, and eaten every holiday goodie there was.

Now you’re settling back into a regular routine again. The decorations have come down (maybe), you’ve made your resolutions (possibly), and you’re starting to eat normal and/or healthy food again (hopefully). You open up your refrigerator and find that container of eggnog that never got finished is still there, with still enough eggnog in it that makes you feel bad about throwing it away.

You don’t have to.

There are many ways to use up leftover eggnog, but one of the simplest is pancakes. Eggnog pancakes are kind of like buttermilk pancakes, but they’re richer and more complex.

Okay, so pancakes don’t have to be complex. But it’s really, really great if they’re tasty and satisfying. Made with eggnog, they are.

So, if you’re like me and hate to throw out even a scrap of food, try this recipe with that leftover eggnog. It’s a great post-holiday treat.

Enjoy!

Winter Eggnog Pancakes

Makes 16 pancakes.

1½ cups all-purpose flour
2 teaspoons baking powder
½ teaspoon baking soda
1 tablespoon maple or coconut palm sugar
¼ teaspoon sea salt
¼ teaspoon cinnamon
Pinch nutmeg
Pinch allspice
1½ cups eggnog
1 large egg, lightly beaten
1½ tablespoons unsalted butter, melted

In a large bowl, whisk together the flour, baking powder, baking soda, sugar, salt, cinnamon, nutmeg, and allspice.In a medium bowl or measuring cup, whisk together the eggnog, egg, and melted butter. Pour this into the dry ingredients and mix gently just until blended.Heat a nonstick or cast iron skillet over medium heat. Place several mounds of the batter, a scant ¼ cup each, into the pan about an inch apart. Spread the batter out just a little to ensure even cooking (the eggnog makes the batter thick and it may not spread on its own).Let them cook until bubbles form on top and the bottoms have browned, about 2 minutes. Flip them over and continue to cook until the bottoms have browned and there’s no wet batter on the sides, about another 1 to 2 minutes.Serve with real maple syrup, fruit, jam, or whatever toppings you like.


1 Comment

Squash Blossom Frittata

In summer, along with the abundance of zucchini comes the bounty of squash blossoms, a unique delicacy. In Italian, they’re called fiori di zucca.

You might be wondering, if they’re so fabulous, why don’t they sell them at the produce store or in supermarkets? The reason is that they’re highly perishable. As soon as they’re picked, they begin to deteriorate immediately. The best way to get them, therefore, is to grow zucchini( or any other type of squash) yourself, or get them from a gardening neighbor. Barring that, you can often find them at farmers’ markets.

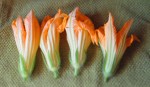
When you do get a batch of blossoms, make sure you handle them gently and use them quickly, preferably within 2 days. To clean them, cut off the stems close to the base. Open them gently with your fingers and check for insects. If you see insects, shake them out. If necessary, run them under a fine stream of running water and then  shake them out gently. If you can, remove the stamens (the long piece inside) as they can harbor insects.

Let them sit on paper towels to dry. If you’re not using them right away, place them in a plastic bag and close it loosely. Store them in the refrigerator.

Squash Blossom Frittata

Makes 4 servings

4 or 5 squash blossoms
5 medium eggs

1 tablespoon parmigiano
¼ teaspoon sea salt
Freshly ground black pepper to taste

Clean the squash blossoms. Open them up very gently and check for insects. Remove the stamens from inside and rinse carefully under a thin stream of water. Place them on a paper towel to dry.In a medium bowl, beat the eggs well with the parmigiano, salt, and pepper.Heat a small nonstick skillet (approximately 6 inches). (If you don’t have a nonstick skillet, use a regular skillet and heat 1 tablespoon butter or olive oil.) Pour in the eggs and arrange the squash blossoms across the top. Cover and cook over medium heat until the underside has browned. Remove the cover. Place a plate that’s wider than the skillet over the top and (using pot holders or kitchen towels!), carefully flip the frittata over onto the plate. Then slide it back into the pan and continue cooking until the underside has browned, another 2 or 3 minutes.Slide the frittata onto a plate or cutting board and cut into wedges. Serve with fresh bread. Enjoy.


Leave a comment

Tempeh Hash

Hash is one of those kitchen sink recipes—it can be made with anything you have on hand—but usually requires potatoes to be considered hash. It used to be a way for restaurants to salvage scraps of food, leftovers from other dishes. And while it’s still a utilitarian dish that helps people use up scraps, it’s become standard dish in its own right. It’s become a breakfast staple with many variations. This is a healthy version because it features tempeh.

Originally from Indonesia, tempeh is a fermented soybean cake. Indonesians consider it a meat substitute and, in fact, it is high in protein. It makes the perfect meat alternative for vegetarian dishes, as it does in this hash recipe. Have it for breakfast, or any other meal.

Continue reading


Leave a comment

Ah, The Cranberry Sauce

Still looking at the bowl of leftover cranberry sauce in the fridge? The nice img_0020
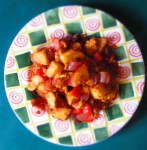
thing about cranberry sauce is that it has a pretty long shelf life (the sugar acts as a preservative). But the question is always, what do I do with it all?

Well, I’m here to help. Once again, here is my list of 12 things to do with leftover cranberry sauce.

  1. Mix a tablespoon of it into chicken or tuna salad.
  2. Make a salad dressing. Add 1 or 2 tablespoons to a homemade vinaigrette.
  3. Use it as a sauce for meats, vegetables, fish, and (my favorite) vegetarian “chicken” patties.
  4. Mix about ½ cup to 1 cup of it into cheesecake before placing it in the oven. (Just swirl it in; don’t overmix.)
  5. Dollop some on top of slices of pound or angel cake.
  6. Stir about 1 cup of it into a big pot of chili.
  7. Make ketchup out of it—add it to a traditional homemade ketchup recipe.
  8. Turn it into salsa by adding some minced jalapeno or some chili powder and cumin to it, or a chutney by adding other dried or fresh fruits, such as raisins, chopped dates, or chopped apple.
  9. Use it as jam for toast, muffins, or bagels.
  10. Mix about ¼ cup into muffin batter (these will be the best cranberry muffins ever!).
  11. Use it as an ingredient in homemade ice cream.
  12. Add it to a breakfast bread.img_5650

This recipe is a healthy loaf (which many people appreciate after Thanksgiving), using whole wheat flour and flax seeds. You can have a healthy post-Thanksgiving breakfast or snack while still enjoying holiday flavors. You don’t need a lot of sugar, either, because there are sweeteners already in the sauce. As for the flax seeds, use a clean coffee grinder to grind it until you get a coarse powder. Enjoy!

img_5646

Cranberry Sauce-Walnut Bread

1 cup whole wheat flour
1 cup all-purpose flour
1 tablespoons flax seeds, ground
2 tablespoons sugar or maple crystals
1 teaspoon baking soda
½ teaspoon ground cinnamon
¼ teaspoon allspice
¼ teaspoon nutmeg
1/2 teaspoon salt
2 large eggs
3/4 cup buttermilk
½ cup cranberry sauce
½ cup chopped walnuts

Preheat oven to 375 degrees F. Line an 8 x 4-inch loaf pan with parchment paper so that parchment sticks out of the sides (or grease it very well).

In a medium bowl, whisk together flours, flax seeds, sugar, baking soda, cinnamon, allspice, nutmeg, and salt.img_5633In a small bowl, mix together eggs and buttermilk.img_5634Mix this into the flour mixture just until all dry ingredients are moistened.img_5635Stir in the walnuts. Swirl in the cranberry sauce, but don’t mix it in completely—you just want it to run through the batter.img_5638Spoon batter into loaf pan. Bake until lightly golden on top and a toothpick inserted in the center comes out fairly clean, about 20 to 25 minutes. Some moist cranberry on the toothpick is okay.

Set pan on a wire rack to cool for 10 minutes. Turn loaf out onto the rack. Serve warm or cool completely.

If you have any cranberry sauce left, dollop a spoonful on each slice.img_5654

Save

Save

Save

Save

Save


Leave a comment

Quick Omelet Cups

IMG_6178

Today’s recipe is one that I created in order to have quick, easy-to-transport, and easy-to-heat breakfasts that fit in with a low-carb diet. Working a full-time job, commuting 15 hours a week, and having a writing career on the side makes it difficult for me to prepare meals for myself on a daily basis.

Obviously, I love to cook, but lack of time and energy keeps me from doing a whole lot of it. To be truthful, I rely on my mom’s leftovers to get me through the week. But when there isn’t enough for a week’s worth of lunches and dinners (never mind breakfast), or when I’m on a particular diet, I have to engage in a long, arduous cooking spree on the weekend.

And that’s what happened when I created these omelet cups. I needed something that I could have for breakfast that would fill me and that I didn’t have to think about–I could just grab some and go.

I wanted to pack them with as many veggies as I could, so I got what was fresh at the farmer’s market that week: zucchini, summer squash, and green beans. Spinach is always a good veggie option for egg dishes, but needed to make this fast (especially because it was a thousand degrees that day and I didn’t want to spend more time in my hot kitchen than I had to). But you can certainly use fresh spinach if you want to.

These are very easy to make, are wonderfully transportable, and easily heated in a microwave or toaster oven. Or eaten at room temperature. They are not only low carb, but gluten and wheat free as well. And since this makes a batch of 12, you can throw some in the freezer for three months.

Enjoy!

Quick Omelet Cups

10 oz. frozen spinach, thawed
1 tablespoon olive oil
½ cup chopped onion
½ cup chopped green bell pepper
½ cup chopped green beans
1 cup chopped zucchini
1 cup chopped summer (yellow) squash
½ teaspoon kosher salt
Freshly ground black pepper to taste
8 large eggs
½ cup shredded cheddar cheese

Squeeze as much water as you can from the spinach and set aside. Grease the cups of a standard 12-cup muffin tin (or 2 6-cups tins) and set aside. (If you want, you can use paper muffin cups.) Preheat the oven to 350 degrees.

Heat the oil in a wide frying pan. Add the onion and sauté until soft and translucent.IMG_6163

Add the green pepper and continue sautéing until the pepper softens. Add the green beans, zucchini, summer squash, salt, and black pepper. Continue sautéing, stirring occasionally, until vegetables have softened and begin to brown.IMG_6164
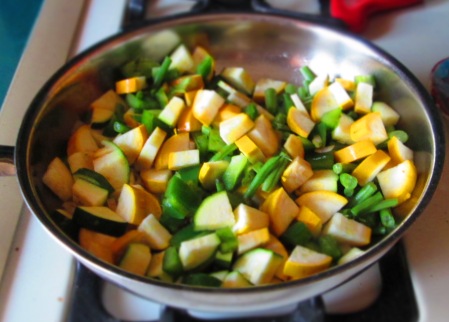
Add the spinach and mix well. Taste for seasoning and adjust if needed.IMG_6165
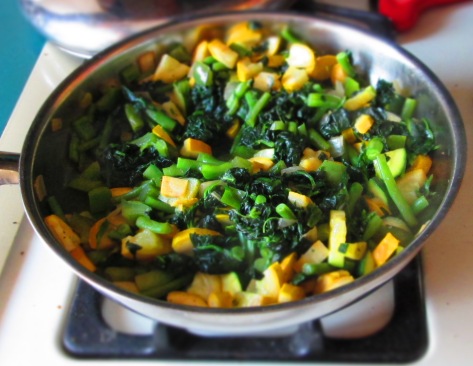
Beat the eggs in a large bowl. Mix in the cooked vegetables, along with the cheese.IMG_6170
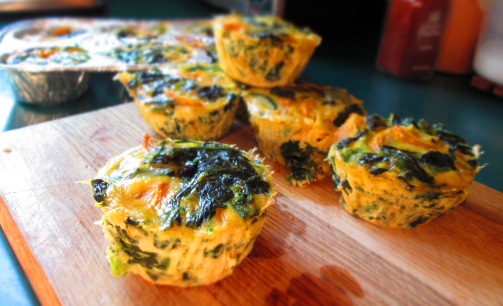
Ladle equal amounts into each of the 12 muffin cups.IMG_6173and bake about 20 minutes, or until a toothpick inserted into the center of an omelet cup comes out fairly clean.IMG_6176Serve hot or at room temperature. These can be kept in the refrigerator up to a week, or frozen up to 3 months.IMG_6184


Save

Save

Save


2 Comments

Cranberry Bread

IMG_5651

Do you still have cranberry sauce leftover from Thanksgiving? I’ll bet many of you do. Maybe it’s a stray can hanging out in the pantry, or it’s a cup or so in the fridge that you haven’t been able to bring yourself to throw out. That’s okay—cranberry sauce lasts a long time in the refrigerator, but at this point, use it or lose it.

There are many things you can do with leftover cranberry sauce, but making a loaf is one of my favorites. (This is a wheat-free version, but it has spelt flour, so if you have—or are making it for someone with—Celiac disease, this isn’t the right recipe for you. It also contains soy flour, so if you’re avoiding soy, again, this isn’t right for you.)

This is not overly sweet, so it makes a nice breakfast loaf, toasted with some butter or jam. But it’s got enough sweetness and crunch from the walnuts (if you want to use them) that it makes a great snack with an extra dollop of cranberry sauce.Pilcrow & Dagger Cover

I’m happy to say that another version of this loaf (not gluten free) appears in the holiday issue of the literary magazine Pilcrow & Dagger, along with my recipe for homemade cranberry sauce. Check out a sneak preview HERE. And if you’re interested in purchasing a copy, you can do so HERE.

So, rescue that leftover cranberry sauce and make this tasty loaf and enjoy.

I hope you all had a wonderful, joyful holiday season, and may 2016 bring happiness and success, whatever that means for you.

Cranberry Bread

Makes 1 (8 x 4) loaf.

1 cup spelt flour
1 cup soy flour
¾ cup chickpea flour
¼ cup rice flour
½ cup sugar or maple crystals
1 teaspoon baking powder
1 teaspoon baking soda
1/4 teaspoon ground cinnamon
¼ teaspoon allspice
¼ teaspoon nutmeg
1 teaspoon kosher salt
3 medium eggs
1 cup buttermilk
2 tablespoons melted coconut oil
½ cup chopped walnuts (optional)
1 cup cranberry sauce

Preheat oven to 375 degrees F. Grease a 8 x 4-inch loaf pan (or line is with parchment paper).

In a medium bowl, whisk together the flours, sugar, baking soda, cinnamon, allspice, nutmeg, and salt.IMG_5633In a small bowl, mix together eggs, buttermilk, coconut oil, and ¼ cup water.IMG_5634Mix this into the flour mixture just until all dry ingredients are moistened. If it seems dry, add a bit more water.IMG_5635

IMG_5636Stir in the walnuts, if you’re using them, then stir in the cranberry sauce, but don’t mix it in completely—just run it through.IMG_5639Spoon the batter into the loaf pan. Bake until golden and a knife inserted in the center comes out fairly clean, about 45 to 50 minutes. Some moist cranberry on the knife is okay.

If the loaf starts getting very dark or starts burn around the edges but the loaf isn’t done, cover it with a piece of foil and continue baking.IMG_5645Set pan on a wire rack to cool for 10 minutes. Turn loaf out onto the rack. Serve warm or cool completely.IMG_5646

IMG_5654