There are so many ways to make a vegetarian chili. Some people, of course, will argue and say that unless there’s meat in it, it can’t be chili, that it’s just a vegetable stew. Whatever. If it tastes like chili, then it’s chili. Or call it vegetable stew. It doesn’t really matter, as long as it tastes good. And this dish does.
It’s also another example of what can be done when you have a little of this and a little of that left over in your fridge and pantry. But trust me, this is worth going out and buying the ingredients for.
Having grown up in a traditional Italian family, pasta was part of my natural landscape. But today, pasta comes in many varieties. I don’t mean just shapes—those have always been. I mean ingredients. And because so many people are carb conscious, and/or avoid wheat, pasta manufacturers have come out with pasta made from wheat flour alternatives. It is now made of quinoa, farro, corn, kamut, black bean flour, and other ingredients.
For this recipe, I found a beautiful red lentil pasta. It’s made with 100% red lentil flour in place of regular flour, so it’s completely gluten free. Its flavor is earthy and nutty, and it pairs very well with sautéed mushrooms. Unfortunately, like any brightly colored foods, they lose their pretty pinkish hue once cooked. I found this particular bag at Eataly in Manhattan, but you can find “alternative” flour pastas in large supermarkets, Italian markets, gourmet shops, and, of course, online.
Enjoy!
Red Lentil Pasta with Sauteed Mushrooms
1 tablespoon olive oil 8 oz. baby bella or cremini mushrooms 2 teaspoons kosher salt 8 oz. red lentil pasta ½ tablespoon salt Freshly ground black pepper to taste ¼ cup grated or shredded parmesan cheese
Heat the oil in a wide skillet, preferably cast iron. Add the mushrooms and 2 teaspoons kosher salt and sauté over medium-high heat, stirring occasionally, until the mushrooms have browned. This will take anywhere from 20 to 30 minutes.Fill a medium saucepan three-quarters with water and bring it to a boil. Add the pasta and ½ tablespoon salt and cook, stirring often, until it’s al dente, about 10 minutes. Drain and transfer to a bowl.If the mushrooms have cooled off, reheat them briefly. Add them to the pasta and season with pepper. Mix in the parmesan. Serve hot.
Today’s recipe is one that I created in order to have quick, easy-to-transport, and easy-to-heat breakfasts that fit in with a low-carb diet. Working a full-time job, commuting 15 hours a week, and having a writing career on the side makes it difficult for me to prepare meals for myself on a daily basis.
Obviously, I love to cook, but lack of time and energy keeps me from doing a whole lot of it. To be truthful, I rely on my mom’s leftovers to get me through the week. But when there isn’t enough for a week’s worth of lunches and dinners (never mind breakfast), or when I’m on a particular diet, I have to engage in a long, arduous cooking spree on the weekend.
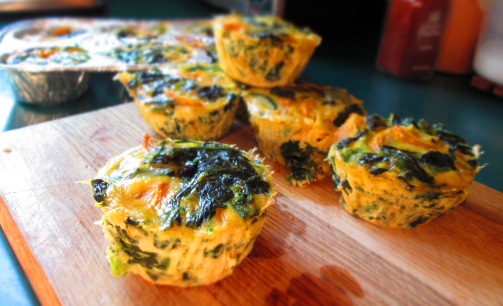
And that’s what happened when I created these omelet cups. I needed something that I could have for breakfast that would fill me and that I didn’t have to think about–I could just grab some and go.
I wanted to pack them with as many veggies as I could, so I got what was fresh at the farmer’s market that week: zucchini, summer squash, and green beans. Spinach is always a good veggie option for egg dishes, but needed to make this fast (especially because it was a thousand degrees that day and I didn’t want to spend more time in my hot kitchen than I had to). But you can certainly use fresh spinach if you want to.
These are very easy to make, are wonderfully transportable, and easily heated in a microwave or toaster oven. Or eaten at room temperature. They are not only low carb, but gluten and wheat free as well. And since this makes a batch of 12, you can throw some in the freezer for three months.
Enjoy!
Quick Omelet Cups
10 oz. frozen spinach, thawed
1 tablespoon olive oil
½ cup chopped onion
½ cup chopped green bell pepper
½ cup chopped green beans
1 cup chopped zucchini
1 cup chopped summer (yellow) squash
½ teaspoon kosher salt
Freshly ground black pepper to taste
8 large eggs
½ cup shredded cheddar cheese
Squeeze as much water as you can from the spinach and set aside. Grease the cups of a standard 12-cup muffin tin (or 2 6-cups tins) and set aside. (If you want, you can use paper muffin cups.) Preheat the oven to 350 degrees.
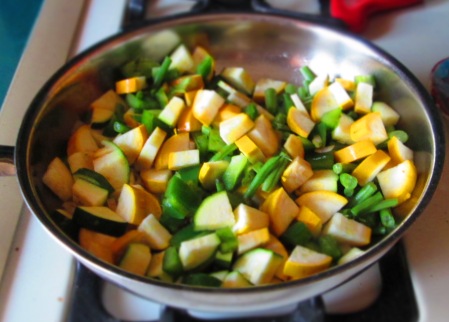
Heat the oil in a wide frying pan. Add the onion and sauté until soft and translucent.
Add the green pepper and continue sautéing until the pepper softens. Add the green beans, zucchini, summer squash, salt, and black pepper. Continue sautéing, stirring occasionally, until vegetables have softened and begin to brown.Add the spinach and mix well. Taste for seasoning and adjust if needed.Beat the eggs in a large bowl. Mix in the cooked vegetables, along with the cheese.Ladle equal amounts into each of the 12 muffin cups.and bake about 20 minutes, or until a toothpick inserted into the center of an omelet cup comes out fairly clean.Serve hot or at room temperature. These can be kept in the refrigerator up to a week, or frozen up to 3 months.
I’ve been making posole salad for picnics, parties, and barbecues years. I think people enjoy it because it’s both something different from the usual fare, while offering something familiar and not too “out there.”
Dried hominy
So what is posole (or pozole)? Not everyone outside of the Latin community is familiar with posole. Posole means “hominy” (from the Nahuatl word pozolle), and actually refers to a stew, popular in Mexico and made with hominy and pork or chicken. But it is sometimes also used (loosely and unofficially) to refer to the hominy itself, which is properly called mote. Corn, in general, is known as maize.
Mote is maize that has had its hulls removed through a process known as nixtamalization. This involves boiling the kernels in a water-and-lime (or ash) solution. The resulting product is used in many traditional dishes throughout Latin America, the most commonly known being posole stew, a dish that goes back to the pre-Colombian Aztecs.Continue reading →
Hey, all. Gluten-free noodle time again! Those black noodles I bought and made last time turned out so good, I wanted to do something else with them. But what? Pasta pie, of course!
Pasta pie is nothing new, but I wanted to give it a new spin by using the black rice noodles. It’s not only tasty, but visually stunning as well. Texturally, of course, it’s a different experience than regular pasta pie, as it always is when replacing regular pasta with gluten-free noodles. The result is a tender, yielding pie, and it won’t sit in your stomach like a brick.
Look for black rice noodles in Asian markets and give this a try. It’s beautiful, fun, and, most important, delicious. Enjoy!
Black Rice Noodle Pie
Makes 8 servings
Approx. 14 oz. black rice noodles (or other gluten-free noodles) 2 tablespoons olive oil 1 cup milk 2 medium eggs, beaten ¼ cup + 2 tablespoons grated Parmigiano-Reggiano 1 teaspoon kosher salt 1 teaspoon black pepper 6 to 8 slices deli provolone cheese (about ¼ lb.)
Preheat the oven to 400 degrees F. Grease an 8-inch springform cake pan with 1 teaspoon of the olive oil. Line the bottom with a piece of parchment paper.
Bring a medium pot of water to a boil. Add the noodles, stir, and cook until firm-tender, about 8 minutes. Drain well.
Transfer to a mixing bowl. Add the remaining olive oil and mix throughout the noodles. Add the milk, eggs, ¼ cup Parmigiano-Reggiano, salt, and pepper. Mix well. The noodles will clump together, so stir well. Tear a couple of slices of the provolone into small pieces to make ¼ cup and stir that into the noodles.
Lay 2 or three slices of provolone on the bottom of the cake pan.
Pour the noodles into the pan (scrape the bowl to get any bits of cheese). Lay 3 or 4 slices across the top of the noodles, then sprinkle on the remaining Parmigiano.
Bake until set (a knife inserted should come out just barely wet) and the cheese is golden brown, about 30 minutes. Let it sit 5 to 10 minutes.
Remove the ring from the pan and invert the pie onto a plate. Remove the bottom and the parchment paper and invert it again onto a serving plate.
I’m on noodle kick. If you read my blog last week, you know that I wrote about noodles then as well. That blog was about the mung bean noodles that I found in an Asian market. Well, in that same market, I found black rice noodles, and, as usual, I couldn’t resist trying them.
A New Superfood
Black foods are not only striking to look at, but they’re typically high in antioxidants because of they’re high levels of pigments. Black rice is high in Vitamin E, which helps the immune system and protects cells from free radical damage. According to a study from the Louisiana State University Agricultural Center, black rice contains more anthocyanin antioxidants than blueberries, making it an even healthier choice than brown rice. As a result, black rice is considered one of the new superfoods. And let’s not overlook the fact that these noodles are gluten free! Here’s more about it at Livestrong.com.
The unfortunate part of using black rice noodles is that once they’re cooked, they’re no longer black but a dark purple. But that’s okay—they’re still pretty to look at. And they still stand out beautifully against white beans and vegetables, which is exactly what I did with this recipe.Continue reading →
Mung bean noodles are noodles that are made from dried, ground mung beans. Mung beans have been consumed since antiquity but are unfamiliar outside of Indian and Asian communities. They are an important part of Ayurvedic cuisine, and are popular for sprouting. (Many of the bean sprouts that come with your salad or in your Asian take-out come from mung beans).
Mung beans are a high source of protein—about 3 grams per tablespoon, or 14 grams per cup. They’re also rich in manganese, potassium, magnesium, folate, copper, zinc and some B vitamins. They’re low on the glycemic index, and high in antioxidants. They’re considered a good food in the battle against heart disease, cancer, diabetes, inflammation, and obesity.
Mung beans can be found in Indian and Asian markets, but are slowly starting to find their way onto supermarket shelves as well. You can get mung bean noodles in Asian markets. The logical conclusion would be to use them in a dish with Asian flavors, right? However, I chose to go Italian style with these, and it worked out beautifully. I simply made them the way I would make a dish of traditional Italian pasta—with olive oil, garlic, and vegetables.
Mung Bean Noodles
Like many non-wheat noodles, these will not come out al dente, like traditional pasta. Mung bean noodles come out soft and somewhat sticky, so the eating experience will be different than what you get from eating traditional pasta, but it’s pleasant and delicious with a slightly nutty flavor. I like to add a little extra virgin olive oil at the end not only for the extra flavor boost but also to counteract the stickiness of the noodles.
I hope you enjoy them.
Italian-Style Mung Bean Noodles
Makes 2 servings.
1 small head broccoli, cut into florets 2 tablespoons + 2 teaspoons olive oil ½ teaspoon kosher salt Freshly ground black pepper to taste 6 to 8 ounces mung bean noodles 2 large garlic cloves, minced 1 teaspoon paprika 2 tablespoons grated cheese 2 teaspoons extra virgin olive oil
Preheat the oven to 350 F. Spread the broccoli out on a baking sheet. Toss with 2 tablespoons olive oil, salt, and pepper. Roast for 10 minutes. Stir and continue roasting until tender when pierced with a knife and browned, about another 10 to 15 minutes.
Bring a medium pot of water to a boil. Add the mung bean noodles and cook, stirring occasionally until tender, about 5 minutes. Drain.
Split the noodles between 2 bowls, and add broccoli to both, and mix well.
Heat the remaining olive oil in a small pan. Add the garlic and sauté just until it becomes fragrant and starts to color.
Add the paprika, swirl it around, and immediately pour equally over the two the bowls of noodles and broccoli.
Sprinkle grated cheese over the top, then the extra virgin olive oil, and serve.
This week in honor of last week’s episode of The Walking Dead, I offer you Warm Sorghum Salad.
Okay, the truth is, I already had this blog post and recipe prepared but it seemed like an appropriate time to post it.
Many people don’t know what sorghum is. It’s a grain that originated in Africa and that’s been used in this country for years as fodder—except in the South, where it’s been a fairly popular grain. Also in the South, sorghum molasses often takes the place of regular molasses, honey, maple syrup, and corn syrup. In short, it’s a liquid sweetener that’s used in baked goods, as well for drizzling on biscuits, pancakes, and toast.
Sorghum is gluten free and inexpensive. But it’s also very use friendly. It’s a diverse grain that can be used in many different dishes. Here’s my Warm Sorghum Salad. It’s great to bring to dinner in the fall and winter, but also to barbecues and picnics in the warmer seasons. And the kale makes it a well-rounded, healthy dish. Enjoy!
Warm Sorghum Salad
Makes 6 servings
1 cup sorghum grain 1 tablespoon olive oil ½ cup minced shallot 1 teaspoon kosher salt ½ lb. mushrooms (preferably a combination of white and baby bella), thinly sliced 1 tablespoon apple cider vinegar 4 packed cups chopped kale Fresh pepper ½ small lemon
Dressing ¼ cup extra virgin olive oil 1 teaspoon balsamic vinegar 1 teaspoon Dijon mustard Freshly ground black pepper to taste
Place the sorghum in a mesh strainer and rinse it under running water for a minute or two. Place it in a small pot along with 3 cups water and bring to a boil. Lower the heat and simmer, partially covered, until tender, about 30 to 40 minutes. Drain well.
Meanwhile, heat the oil in a wide skillet. Add the shallot, ¼ teaspoon salt, and saute until soft and translucent, 2 or 3 minutes. Add the mushrooms and 1/4 teaspoon salt and saute until the water they release dries up and mushrooms brown.When you see browned bits in the pan, deglaze with the apple cider vinegar (add it to the pan and scrape up the brown bits with a wooden spoon).
Add the kale and another ½ teaspoon salt and cover; cook until kale is tender.While that’s cooking, make the dressing and set aside.
When the sorghum is cooked, add it to the pan with the kale and pepper and mix.Pour in the dressing and mix well. Taste for seasoning and adjust if needed. Squeeze the lemon over it and stir.


 There are so many ways to make a vegetarian chili. Some people, of course, will argue and say that unless there’s meat in it, it can’t be chili, that it’s just a vegetable stew. Whatever. If it tastes like chili, then it’s chili. Or call it vegetable stew. It doesn’t really matter, as long as it tastes good. And this dish does.


 Add the spinach and mix well. Taste for seasoning and adjust if needed.
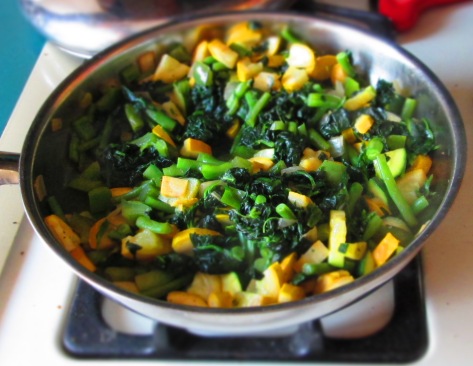 Beat the eggs in a large bowl. Mix in the cooked vegetables, along with the cheese.
 Ladle equal amounts into each of the 12 muffin cups.
 and bake about 20 minutes, or until a toothpick inserted into the center of an omelet cup comes out fairly clean.
 Serve hot or at room temperature. These can be kept in the refrigerator up to a week, or frozen up to 3 months.


 Preheat the oven to 400 degrees F. Grease an 8-inch springform cake pan with 1 teaspoon of the olive oil. Line the bottom with a piece of parchment paper.


 Sprinkle grated cheese over the top, then the extra virgin olive oil, and serve.


 When you see browned bits in the pan, deglaze with the apple cider vinegar (add it to the pan and scrape up the brown bits with a wooden spoon).
 While that’s cooking, make the dressing and set aside.
 Pour in the dressing and mix well. Taste for seasoning and adjust if needed. Squeeze the lemon over it and stir.
