There are so many ways to make a vegetarian chili. Some people, of course, will argue and say that unless there’s meat in it, it can’t be chili, that it’s just a vegetable stew. Whatever. If it tastes like chili, then it’s chili. Or call it vegetable stew. It doesn’t really matter, as long as it tastes good. And this dish does.
It’s also another example of what can be done when you have a little of this and a little of that left over in your fridge and pantry. But trust me, this is worth going out and buying the ingredients for.
This is my first post in a while. I took a hiatus for few weeks because I found myself hosting Thanksgiving dinner for the first time in many years.
I used to host Thanksgiving at my house years ago because my family and my then-partner’s family both were very unyielding in allowing us to divide our time. So, our solution was to do Thanksgiving dinner at our house and have both families. We did this for several years, and I don’t think that either family was thrilled about it. The reasons for that are both simple and complex, but what it came down to was that it made the holiday stressful for both of us.
After my partner and I broke up, the Thanksgiving meal shifted to my parents’ house, and it’s been there for the past decade.
But early this year, my father passed away, and my mother, understandably, no longer wanted to do any holidays. It fell on me to do it.
It was a bit more difficult for me to deal with it this time around because a) I’m a decade older than the last time I did it, and b) my job situation is different, and I wasn’t able to take off the same amount of time that I used to years ago.
Having said that, I was able to take off the Tuesday and Wednesday before Thanksgiving Day, and my current partner flew in to help me. This was tremendously helpful to me, because I truly wouldn’t have been able to get anything done otherwise.
I actually starting prepping my house about a month before. No, really. That’s how long it took me to put things away, organize, and move things around to optimize the space.
The one good thing about all this was that I was so busy prepping, cooking, and serving/cleaning that I didn’t have a whole lot of time to dwell on the fact that it was the first Thanksgiving without my father. I know my mother was depressed, and I felt bad that I couldn’t spend any time comforting her. But I know others did, and I’m glad. It was early on in my preparations, that the emotions hit me, and now, after it’s all over, it’s hitting me again. It’s been strange and surreal not seeing him sitting there at the table with us.
Anyway, my recipe this week is one that comes from the utilitarian in me, and my desire to not waste food and not take for granted the bounty that we’re fortunate to have in this country.
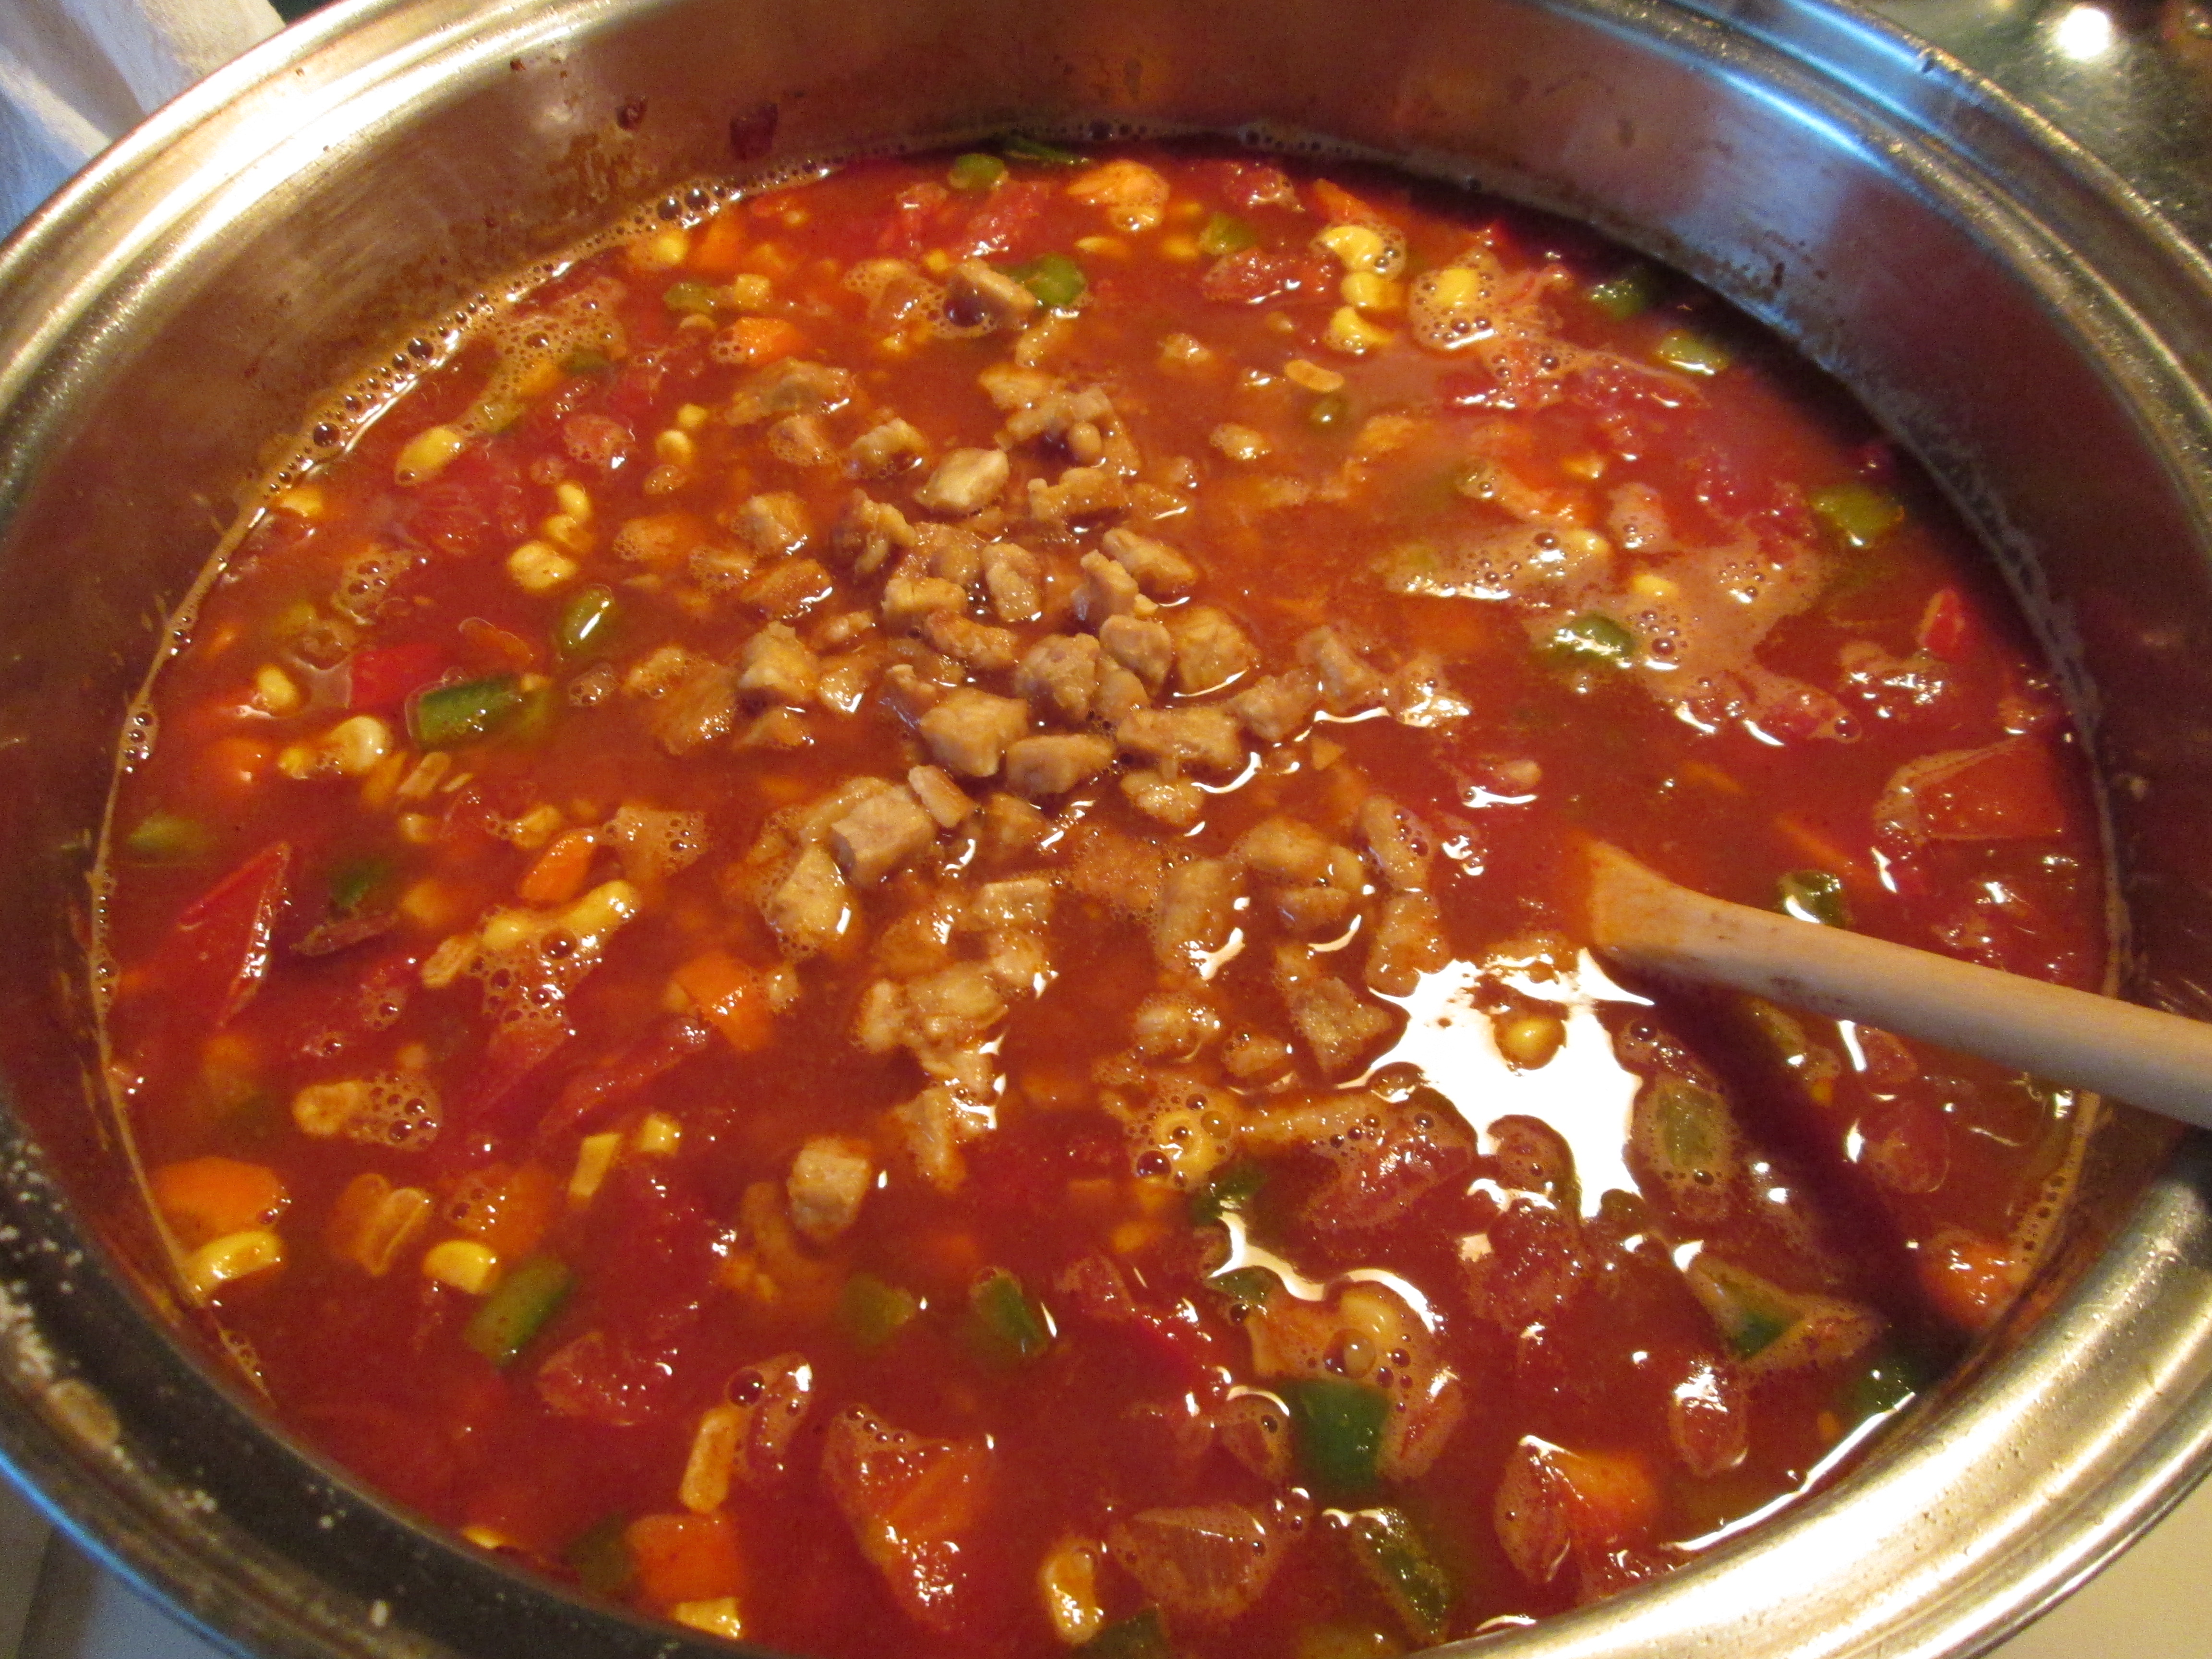
I call this dish Leftover-Thanksgiving-Stuff Chili. It’s exactly what it sounds like: a bunch of stuff I had leftover from Thanksgiving dinner, plus a couple of other things. The nice things is, you can make your own leftover chili with whatever you have in the fridge, or you can follow this recipe, because you know what? It came out great. It’s full of flavor, and because some of the individual elements were made as separate recipes with their own ingredients, the flavors of the chili are layered and complex.
I’ve said this before, but it bears saying again—use leftover cranberry sauce in chili. Its sweet and tart taste adds a great dimension to the dish.
(By the way, the reason you see olives in the photos is because the marinated peppers that I used had olives thrown in there. It was part of the antipasto that I served at dinner. When I say I use everything, I mean it!)
A couple of tips: If you have any beer or wine leftover, use that to deglaze the pot after the tomato paste cooks in, or add it later for a more pronounced flavor. Also, although I’ve listed salt as one of the last items, add the salt a little at a time as you add ingredients, starting with the onions. This ensures that you coax out the maximum flavor from each individual ingredient. Chefs do this regularly, but you will rarely see it written in a recipe because it makes the recipe cumbersome to instruct adding a quantity of salt at each step. But you should do it. 🙂
So, here’s my utilitarian chili. Enjoy!
Leftover-Thanksgiving-Stuff Chili
1 tablespoon olive oil 1 cup chopped yellow onion 1/3 cup chopped red onion 2-3 large garlic cloves, minced 1½ cups chopped green bell pepper 1 tablespoon tomato paste
2 teaspoons chili powder 2 cups broth (you can make part of this beer or wine) 1½ cups chopped tomatoes 2 celery ribs, chopped 1 cup cranberry sauce ½ cup chopped roasted peppers (optional)
3 cups cooked beans (pinto, Roman, Navy, any kind you like)
3 teaspoons kosher salt ½ cup chopped parsley Freshly ground black pepper
Heat the oil in a medium-large sauce pot. Add the onions and sauté over medium-high heat until they’re soft and translucent, about 5 minutes.Add the garlic and sauté another minute. Add the green pepper and sauté until it softens, about 3 or 4 minutes.Add the tomato paste and stir it in well. Mix in the chili powder. Cook, stirring, for about 2 minutes. Deglaze the pot with broth (and or beer/wine). Scrape the bottom of the pot with a wooden spoon to get up any browned bits. Bring it to a boil. Add the remaining ingredients, except the parsley. Mix well. Bring it back to a boil, then lower the heat to medium-low, partially cover, and let it simmer for about 15 minutes, stirring occasionally.Check for seasoning and add more salt and pepper, as desired. Stir in the parsley and serve.
A few months ago I did a blog where I offered a recipe using spaghetti squash. Some people commented to me that they were glad I had done that because they never quite knew what to do with spaghetti squash.
Spaghetti squash can be used in many different ways. This week I decided to use it in a chili. And because spaghetti squash is a fast-cooking squash (about 15 minutes in a steamer), I made the entire recipe a quick-and-easy chili. You can throw this together in less than an hour.
I get into these moods when I crave to make a pot of chili. The thing about chili is that there’s no way to make just a little. Just by its very nature, chili is a big-pot deal. I usually put a lot of it in the freezer and it really comes in handy to have.
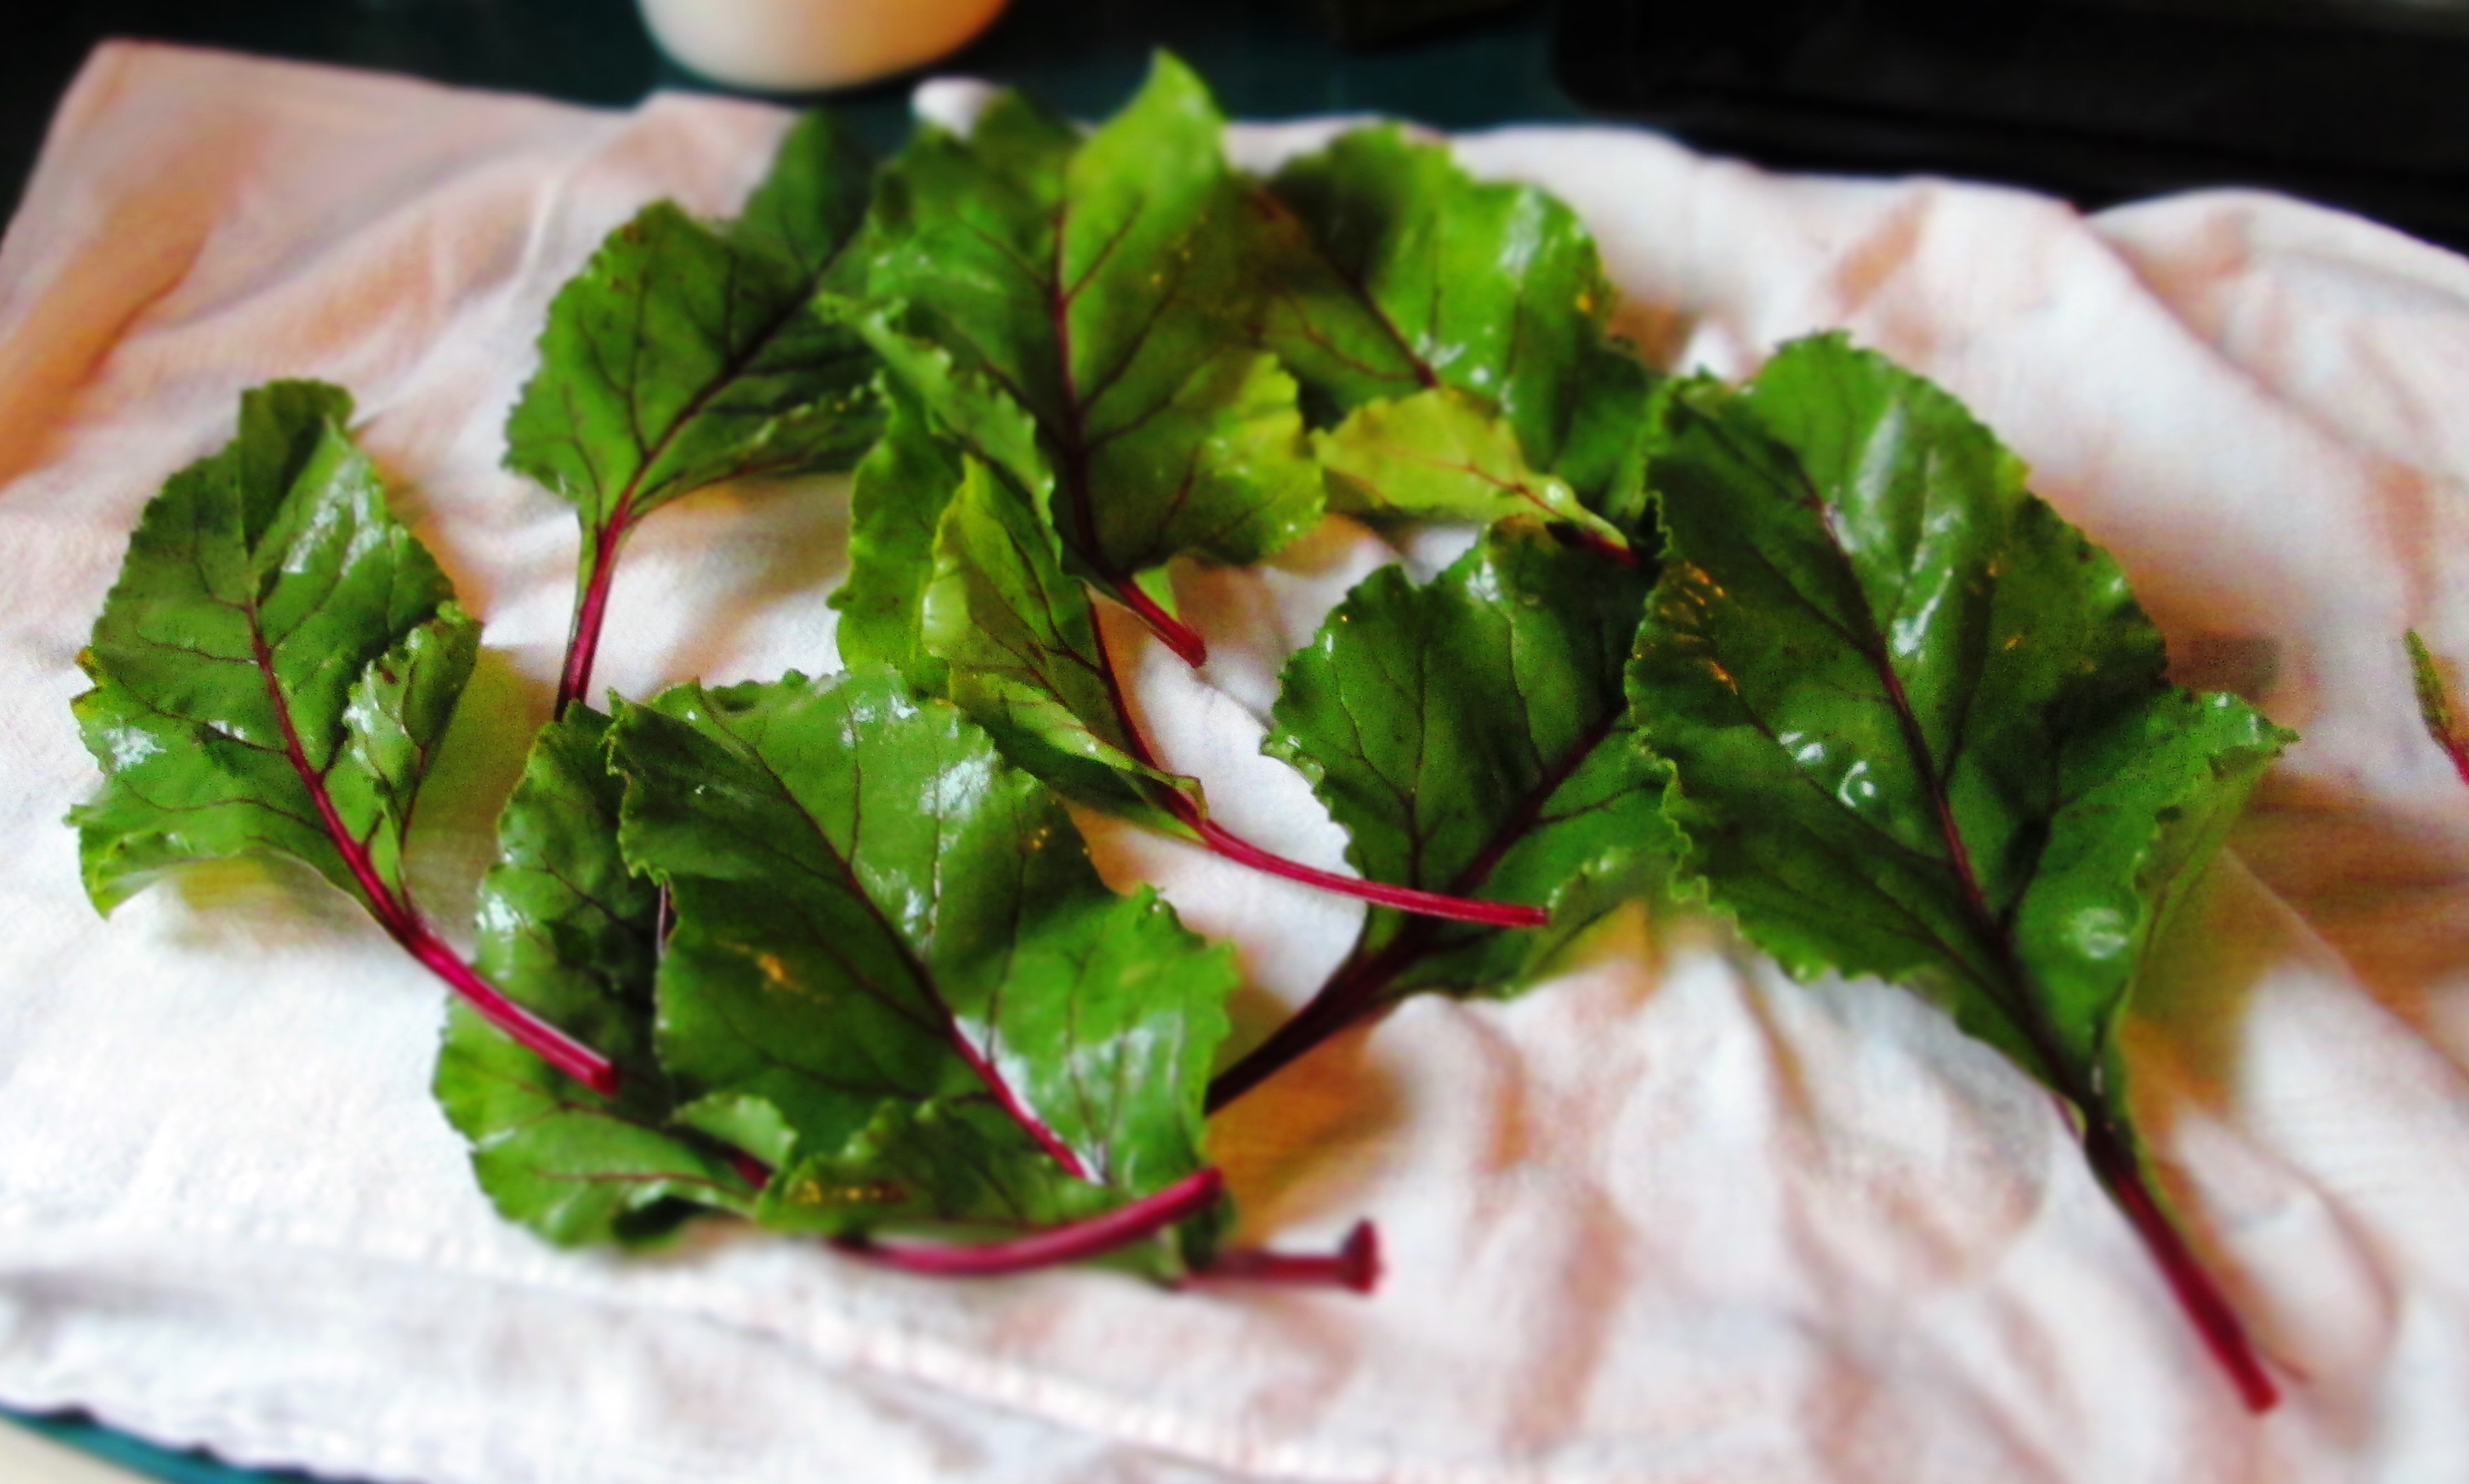
This week, though, I did something a little different. I picked up a bunch of beets at the Greenmarket and it had some beautiful leaves attached. Normally, I would sauté the greens in garlic and olive oil (my favorite and go-to way to cook greens), but I wanted to do something different with those, too.
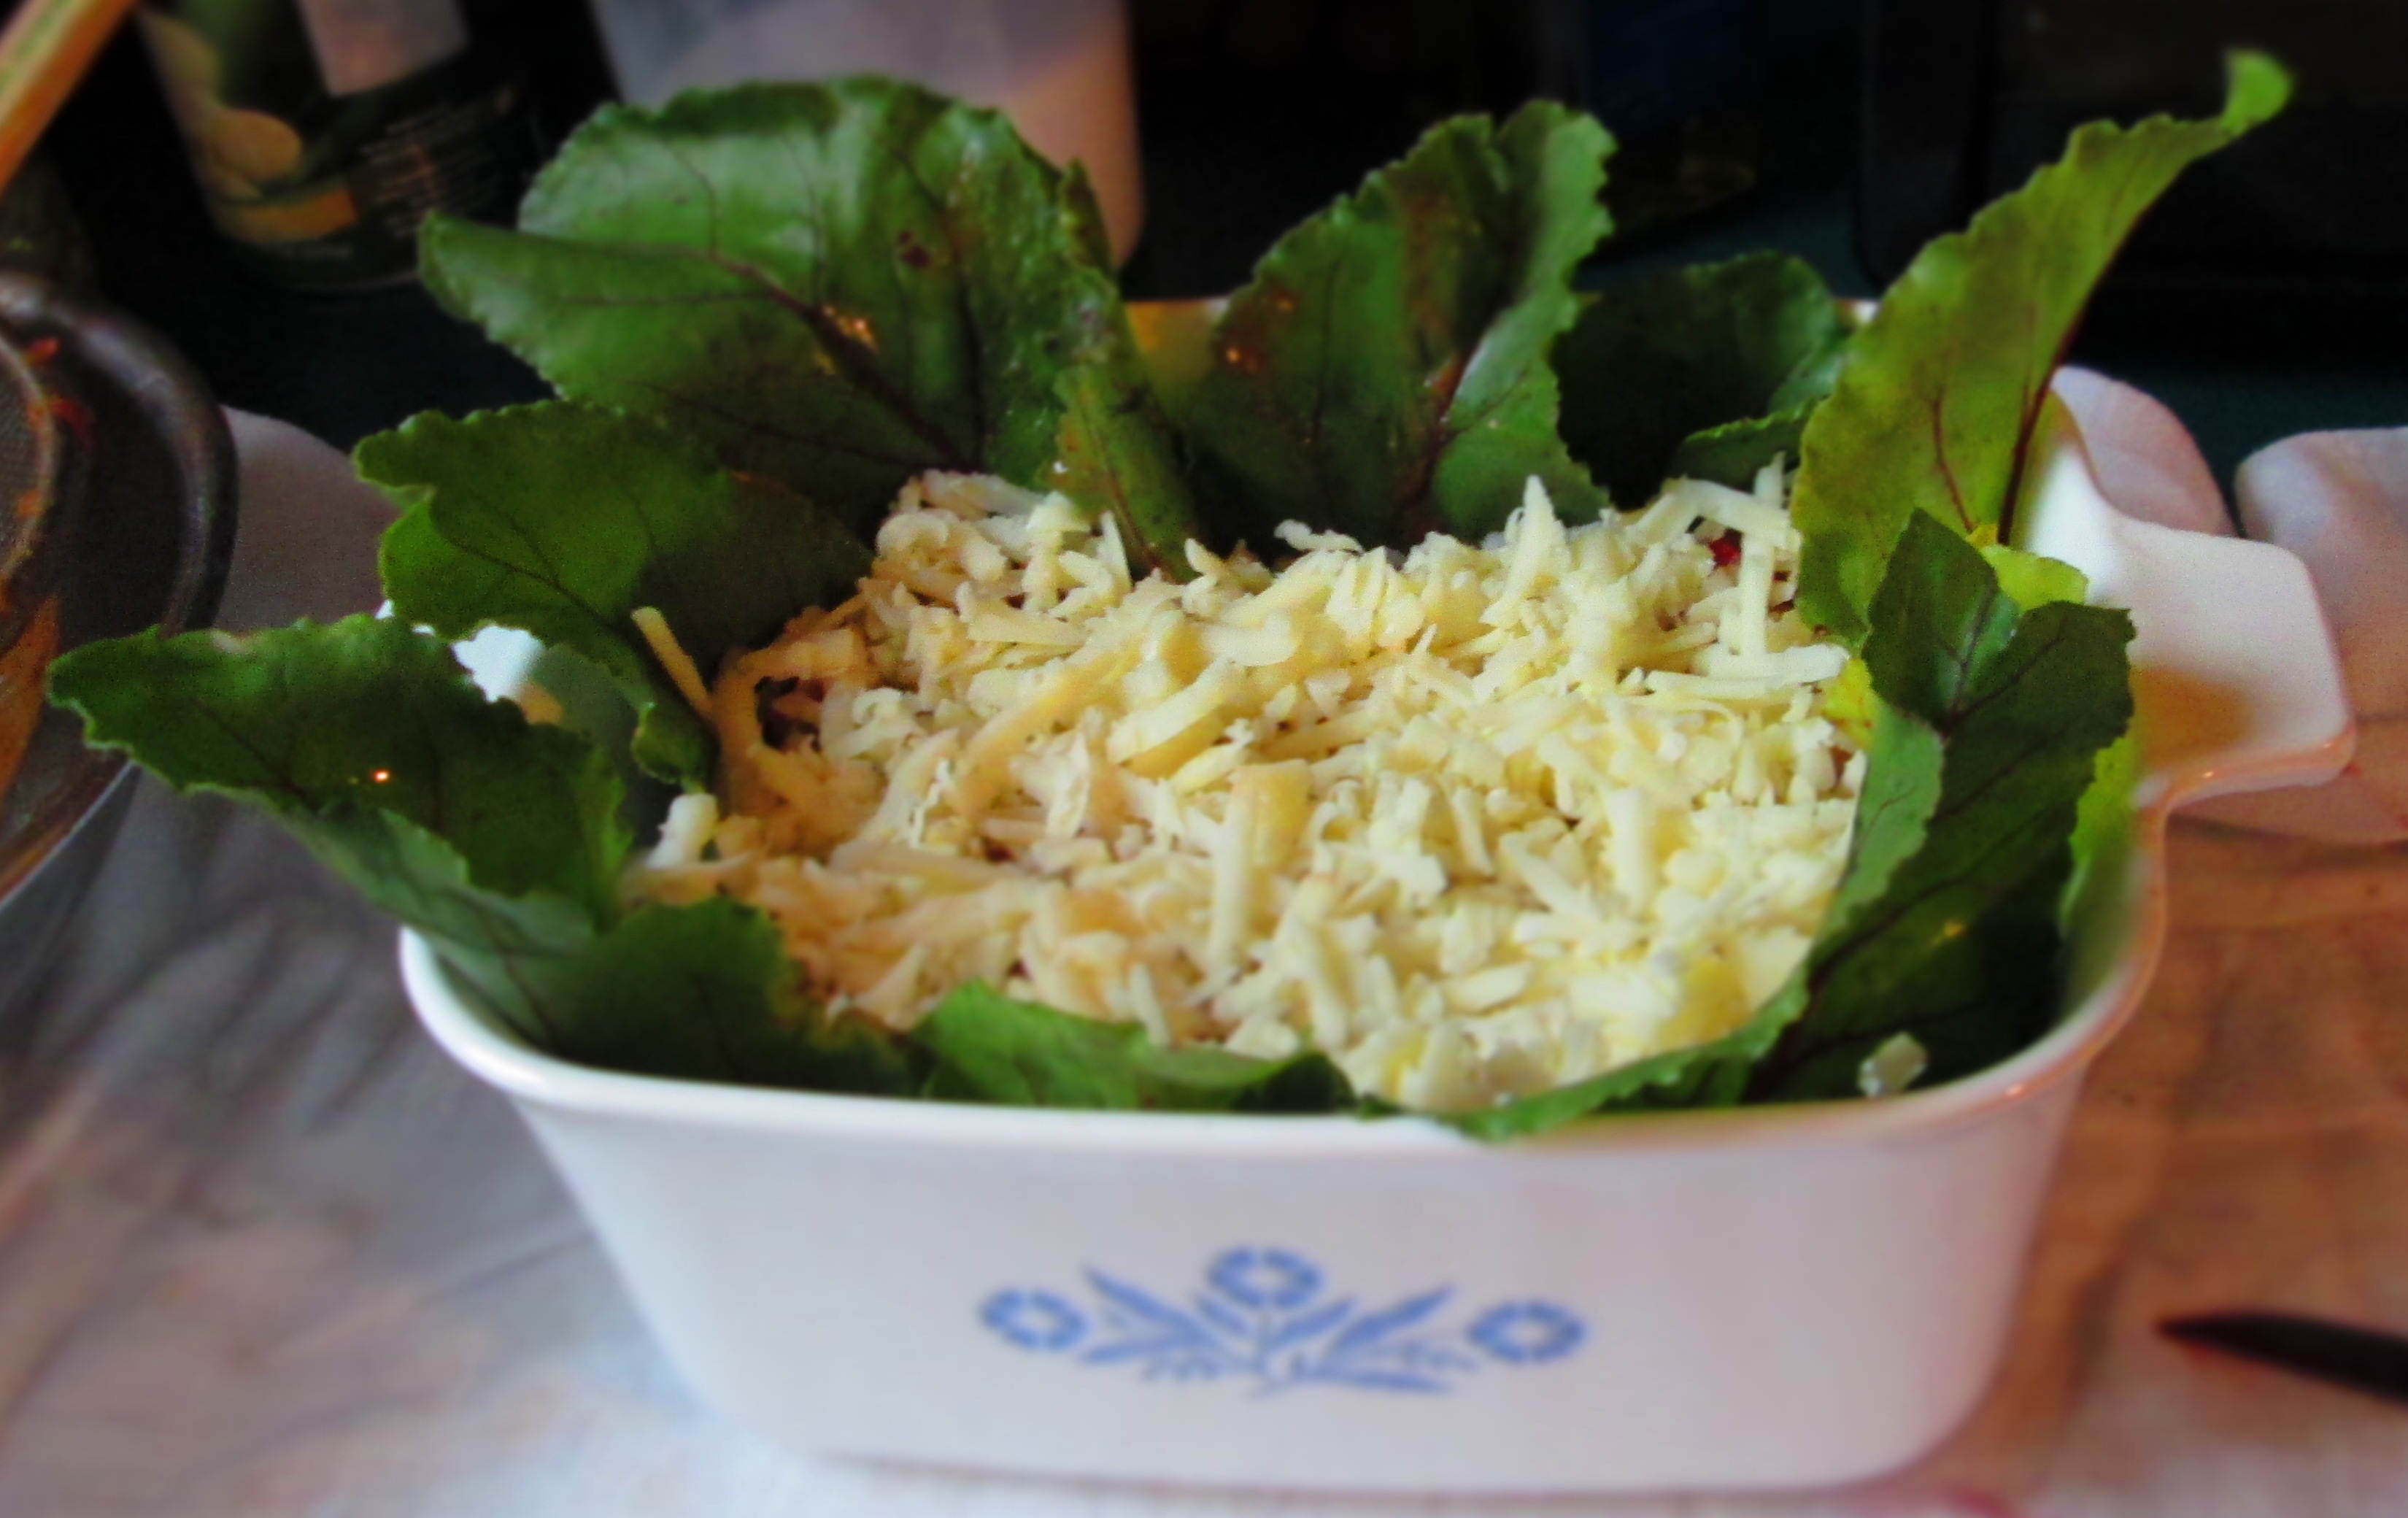
So, I decided to do a casserole, or what Italians call a timbale—a dish that is formed in some sort of mold shape. I used the beet leaves to wrap the chili in a small casserole dish (a 40-year-old cornflower Corningware!), added some cheese, and voilà.
My chili has tempeh in it for extra protein and texture. Tempeh adds a meatiness to chili that makes it appealing to meat-lovers as well. You can either dice, chop, or crumble it, according to your preference. Crumbling it gives it a chopped-meat texture, but I prefer a small dice. It’s important to drain the chili before putting it into the casserole; otherwise, there will be too much liquid. Also, I used homemade corn stock (which I also keep in the freezer), which gave it a fabulous flavor, but any vegetable stock will do.
Enjoy!
Tempeh Chili Casserole with Beet Greens
Makes 4 to 6 servings.
Chili
2 teaspoons olive oil
8 oz. tempeh, chopped
1 medium onion, chopped
Salt
3 large garlic cloves, minced
1 tablespoon tomato paste
1 medium red pepper, chopped
1 medium green pepper, chopped
1 small jalapeno, minced
1 medium carrot, chopped
1 tablespoon chili powder
1 teaspoon cumin
1 (15-oz) can plum tomatoes, chopped
2 cups cooked kidney beans
1 cup corn (preferably organic)
1 cup broth
1/4 cup chopped cilantro
Casserole
Greens from one bunch beets
Olive oil
Make the chili. Heat the oil in a larger pot. Add the tempeh and sauté, stirring often, until browned on all sides. Remove with a slotted spoon and set aside.Add the onions and a pinch of salt and sauté until soft and translucent (if the pot is completely dry, add a bit more oil). Add the garlic and sauté a minute.
Make a space in the pot and add the tomato paste. Begin stirring it in until it’s incorporated into the onions.
Add the red, green, and jalapeno peppers and carrots and continue sautéing until soft.
Stir in the tempeh, chili powder, and cumin and cook another 2 minutes, stirring frequently. Add the tomatoes, beans, corn, and broth and bring to a boil. Lower the heat and simmer, partially covered, about 30 minutes or until thickened. Stir in cilantro.
Take about 3 cups and set aside. Store the rest in the refrigerator or freezer.
Place the 3 cups chili in a strainer set over a bowl and let drain for at least half an hour. Stir occasionally.
Meanwhile, place the beet greens in a large bowl filled with cold water. Swish them around then let sit for 15 minutes. Scoop the leaves out and transfer to another bowl or a clean towel. Pour out the water and rinse out the bowl. Place the leaves back in and fill with water again and let sit another 15 minutes. Scoop them out and lay out on a clean cloth or paper towels. Pat them dry. Pick out the largest ones.
Brush the inside of a 1- or 1½-quart casserole dish with oil. Line it with beet greens so that the greens hang out over the edges. Fill with drained chili. You may have to hold the leaves in place with one hand while you scoop with the other.
Cover the top with cheese.
With your fingertips, oil the leaves. This is important to do because otherwise the leaves will dry out and get crispy in the oven. Fold the leaves over to cover the top. If necessary, lay additional leaves across the top of the cheese (make sure those are oiled as well). If the leaves don’t want to stay down, insert toothpicks where needed.
Cover the top with lid or aluminum foil and bake 20 minutes. Remove foil and bake another 20 minutes or until liquid had dried up. Remove toothpicks.
Serve in casserole dish and scoop out, or invert onto a platter.


 There are so many ways to make a vegetarian chili. Some people, of course, will argue and say that unless there’s meat in it, it can’t be chili, that it’s just a vegetable stew. Whatever. If it tastes like chili, then it’s chili. Or call it vegetable stew. It doesn’t really matter, as long as it tastes good. And this dish does.


 A few months ago