Hi there. This week, I decided to take a little rest stop on my ongoing journey through my Regions of Italy project.
So I got these two Meyer lemons in my Misfits Market box and was trying to figure out what to do with them. Two is not enough to do any kind of substantial lemon dessert (like a pie). What could I make with just two? Then it occurred to me that I could make a nice little batch of marmalade. So that’s what I did. The recipe is very simple. As you can see, there are only two ingredients, plus water. That’s it.
Originally from China, Meyers lemons are a cross between lemons and a mandarin oranges. It has sweeter flavor than regular lemons with a distinct orangey taste. The skin, rather than being “lemon yellow,” has an orange blush to it. It’s also edible.
Quarter the lemons length wise, then slice each quarter thinly. Remove as many seeds as possible.Place the lemons in a medium saucepan (not aluminum!) and add 1 1/3 cups water. Cover the pot and leave it out at room temperature overnight (at least 12 hours).Bring the pot to a boil, then lower the heat to medium-low. Simmer, uncovered, until the liquid is reduced to half, about 20 minutes.
Add the sugar and return to a boil. Simmer over medium heat, uncovered, until the mixture is thick. Stir occasionally and skim off any foam from the top. This should take about 15 minutes. You’ll know it’s done by doing the plate test: Place a small plate or bowl in the freezer for a few minutes, then take it out and drop a little of the lemon liquid on it. After a minute, it should gel up.Transfer the marmalade to a small jar with a tight-fitting lid and seal while hot. If you want to store the marmalade for long term, boil the jars for 5 to 10 minutes. Otherwise, it should stay in the refrigerator up to 6 weeks.
There are so many ways to make a vegetarian chili. Some people, of course, will argue and say that unless there’s meat in it, it can’t be chili, that it’s just a vegetable stew. Whatever. If it tastes like chili, then it’s chili. Or call it vegetable stew. It doesn’t really matter, as long as it tastes good. And this dish does.
It’s also another example of what can be done when you have a little of this and a little of that left over in your fridge and pantry. But trust me, this is worth going out and buying the ingredients for.
Creating beautiful dishes with leftovers is something I love to do. There’s something very satisfying about taking bits and pieces from previous meals and turning them into something new and delicious. Maybe I get it from my mother, who, always trying to substantially feed her family of four, never let anything go to waste.
Sometimes a mish-mash of leftovers can be delicious, but not necessarily nutritious and filling in the long term. What’s often missing is protein. And protein is what you need to keep you satisfied for the long stretch, so you don’t go diving into a bag of nachos like you haven’t eaten in a week.
This recipe is an example of what you can do with a bunch of leftovers that can also be protein-rich, healthy, and filling. If you’re cooking lentils for another dish, make some extra and put it in the freezer so that you have it on hand when needed. Then, when you find yourself with a bunch of leftover odds and ends, bring it all together with some broth, and add those lentils for sustaining protein.
You can substitute whatever vegetables you have on hand, and can add whatever herbs or spices you want to create the kind of flavor profile that you like.
Enjoy!
Lentil, Barley, and Vegetable Soup
Makes 6 servings.
2 teaspoons olive oil
4 large garlic cloves, minced 1 teaspoon paprika ½ cup chopped carrot 1 tablespoon tomato paste 2 cups vegetable broth
½ pound green beans, cut into ¼-inch pieces 2 teaspoons kosher salt freshly ground black pepper to taste
3 packed cups chopped spinach or other greens 2 cups cooked lentils 1 cup cooked barley ¼ chopped parsley
Heat the oil in a 2-quart Dutch oven or saucepan. Add the garlic and sauté over medium-high heat until fragrant, about 1 minute. Sprinkle in the paprika. Add the carrot and cook until softened, about 5 minutes.Stir in the tomato paste. Work it in until it’s blended with the carrot and garlic. Stir frequently. When the bottom of the pot starts to brown, pour in about ¼ cup of the broth. Stir it in and scrape up the brown bits from the bottom of the pot.Add the remaining broth, green beans, salt, and pepper. Bring to a boil, then lower the heat to medium-low and simmer, partially covered, until green beans are tender but still firm, about 6 to 8 minutes. Add the spinach and stir it in thoroughly. (If you’re using other greens, let them cook a few minutes until tender. Spinach doesn’t need much time at all.) Add the lentils and barley. Continue simmering about 6 to 8 minutes longer to ensure everything is hot and to give the ingredients a chance to blend. Stir in the parsley. Taste for seasoning and adjust if needed.
Do you still have cranberry sauce left over after the holidays? I know some of you do. Admit it. You’ll see lots of sites and professional chefs telling you that everything should be thrown out three days after the holiday. I have news for you—if you’ve stored it properly, that cranberry sauce is probably still good. The thing is, because of the sugar content, cranberry sauce has a long shelf life. It’s just like a jar of jam or preserves in your refrigerator. (Of course, if it smells or tastes funny, or if it has mold on it, throw it out.) For those of you who prefer the stuff that comes in cans (you can admit that, too, don’t be ashamed), you can use those up as well, so that they don’t sit in your pantry for another year.
There are many things you can do with leftover cranberry sauce. One way to use it up is to make a dressing with it, and I’ve done just that. I paired homemade cranberry sauce here with baby greens and Anjou pears. So that the cranberry doesn’t overwhelm the delicate ingredients, I strained the dressing.
So, why not start out with plain cranberry sauce (such as what comes in a can) instead of whole berry sauce, you ask. Because I think that whole berry sauce has so much more depth of flavor than flat cranberry sauce. Plus, chances are that if you have a significant amount left over, it’s probably the homemade kind, which is most likely going to be chunky.
You can adjust the recipe to any flavor profile you like. Enjoy!
Cranberry Sauce Vinaigrette
Makes ¾ cup dressing.
1 cup whole berry cranberry sauce 2 tablespoons balsamic vinegar 1 teaspoon stone-ground mustard 1 teaspoon sea salt Freshly ground pepper to taste
3 tablespoons extra virgin olive oil
In a medium bowl, combine the cranberry sauce, balsamic vinegar, mustard, salt, pepper, and ¼ cup water. Drizzle in the oil and whisk together well. Using a rubber spatula, strain the dressing through a mesh strainer into another bowl. Taste for seasoning and adjust if you like.
Pear-Pignoli Salad with Cranberry Sauce Vinaigrette
Makes 4 servings.
2 Anjou pears (ripe but still firm) 6 oz. mixed baby greens ¼ cup pignoli (pine nuts), toasted ¼ cup Cranberry Sauce Vinaigrette 2 tablespoons black sesame seeds
Slice the pears about ¼ inch thick. You want them somewhat thin, but not so thin that they fall apart in the salad. Place them in a large bowl. Add the greens and pignoli and toss gently. Add the dressing and again toss gently. Transfer the salad to a serving platter and arrange neatly. Sprinkle the sesame seeds over the top.
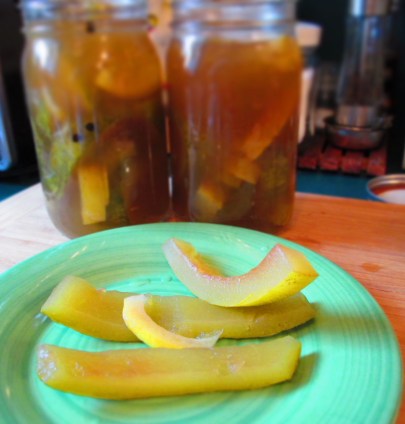
Watermelon Pickles are a specialty of the U.S. South. It’s a very utilitarian recipe, as it makes use of all those watermelon rinds that add up all summer long.
Eating watermelon rinds ay sound strange, but like any other pickled vegetables, they have a delicious sweet-sour flavor that makes a great accompaniment to any picnic or barbecue. They also make great party snacks.
Enjoy!
Watermelon Pickles
2 lbs. watermelon rind ¼ cup kosher salt 2 cups apple cider vinegar ¼ cup brown sugar 1 cinnamon stick ½ teaspoon peppercorns ½ lemon, thinly sliced
Cut away any pink flesh from the watermelon rinds. Cut the rinds into cubes or strips and place them in a large bowl. \Add the salt and enough water to cover them. Cover the bowl and let the rinds soak in the refrigerator overnight.Drain and rinse the rinds. Place them in a large saucepan and cover them with cold water. Bring to a boil; lower the heat to low and simmer until they’re just tender when pierced with the tip of a paring knife, about 20 minutes. Drain and put them back in the pot.
Meanwhile, in a medium saucepan, combine the vinegar, sugar, cinnamon, and peppercorns with 1 cup water (or more, if necessary, to cover the rinds). Bring to a boil; lower the heat to medium-low and simmer until the sugar is dissolved, about 5 minutes. Simmer 5 minutes longer. Pour this over the watermelon rinds, add the lemon slices, and continue simmering over medium-low heat until the fleshy parts of the rinds are translucent, about 20-25 minutes.
Transfer the pickles to jars with tight-fitting lids. Cover with the cooking liquid. Pickles should be submerged; if necessary, add more liquid of one part water, one part vinegar. (Or, you can process them in a hot water bath.)
Pickles will keep in the refrigerator up to 2 week.
So, the holidays have come and gone. You’ve shopped until you dropped, partied hardy, and eaten every holiday goodie there was.
Now you’re settling back into a regular routine again. The decorations have come down (maybe), you’ve made your resolutions (possibly), and you’re starting to eat normal and/or healthy food again (hopefully). You open up your refrigerator and find that container of eggnog that never got finished is still there, with still enough eggnog in it that makes you feel bad about throwing it away.
You don’t have to.
There are many ways to use up leftover eggnog, but one of the simplest is pancakes. Eggnog pancakes are kind of like buttermilk pancakes, but they’re richer and more complex.
Okay, so pancakes don’t have to be complex. But it’s really, really great if they’re tasty and satisfying. Made with eggnog, they are.
So, if you’re like me and hate to throw out even a scrap of food, try this recipe with that leftover eggnog. It’s a great post-holiday treat.
Enjoy!
Winter Eggnog Pancakes
Makes 16 pancakes.
1½ cups all-purpose flour 2 teaspoons baking powder ½ teaspoon baking soda 1 tablespoon maple or coconut palm sugar ¼ teaspoon sea salt ¼ teaspoon cinnamon Pinch nutmeg Pinch allspice 1½ cups eggnog 1 large egg, lightly beaten 1½ tablespoons unsalted butter, melted
In a large bowl, whisk together the flour, baking powder, baking soda, sugar, salt, cinnamon, nutmeg, and allspice.In a medium bowl or measuring cup, whisk together the eggnog, egg, and melted butter. Pour this into the dry ingredients and mix gently just until blended.Heat a nonstick or cast iron skillet over medium heat. Place several mounds of the batter, a scant ¼ cup each, into the pan about an inch apart. Spread the batter out just a little to ensure even cooking (the eggnog makes the batter thick and it may not spread on its own).Let them cook until bubbles form on top and the bottoms have browned, about 2 minutes. Flip them over and continue to cook until the bottoms have browned and there’s no wet batter on the sides, about another 1 to 2 minutes.Serve with real maple syrup, fruit, jam, or whatever toppings you like.
This is my first post in a while. I took a hiatus for few weeks because I found myself hosting Thanksgiving dinner for the first time in many years.
I used to host Thanksgiving at my house years ago because my family and my then-partner’s family both were very unyielding in allowing us to divide our time. So, our solution was to do Thanksgiving dinner at our house and have both families. We did this for several years, and I don’t think that either family was thrilled about it. The reasons for that are both simple and complex, but what it came down to was that it made the holiday stressful for both of us.
After my partner and I broke up, the Thanksgiving meal shifted to my parents’ house, and it’s been there for the past decade.
But early this year, my father passed away, and my mother, understandably, no longer wanted to do any holidays. It fell on me to do it.
It was a bit more difficult for me to deal with it this time around because a) I’m a decade older than the last time I did it, and b) my job situation is different, and I wasn’t able to take off the same amount of time that I used to years ago.
Having said that, I was able to take off the Tuesday and Wednesday before Thanksgiving Day, and my current partner flew in to help me. This was tremendously helpful to me, because I truly wouldn’t have been able to get anything done otherwise.
I actually starting prepping my house about a month before. No, really. That’s how long it took me to put things away, organize, and move things around to optimize the space.
The one good thing about all this was that I was so busy prepping, cooking, and serving/cleaning that I didn’t have a whole lot of time to dwell on the fact that it was the first Thanksgiving without my father. I know my mother was depressed, and I felt bad that I couldn’t spend any time comforting her. But I know others did, and I’m glad. It was early on in my preparations, that the emotions hit me, and now, after it’s all over, it’s hitting me again. It’s been strange and surreal not seeing him sitting there at the table with us.
Anyway, my recipe this week is one that comes from the utilitarian in me, and my desire to not waste food and not take for granted the bounty that we’re fortunate to have in this country.
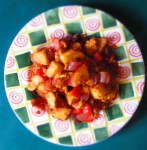
I call this dish Leftover-Thanksgiving-Stuff Chili. It’s exactly what it sounds like: a bunch of stuff I had leftover from Thanksgiving dinner, plus a couple of other things. The nice things is, you can make your own leftover chili with whatever you have in the fridge, or you can follow this recipe, because you know what? It came out great. It’s full of flavor, and because some of the individual elements were made as separate recipes with their own ingredients, the flavors of the chili are layered and complex.
I’ve said this before, but it bears saying again—use leftover cranberry sauce in chili. Its sweet and tart taste adds a great dimension to the dish.
(By the way, the reason you see olives in the photos is because the marinated peppers that I used had olives thrown in there. It was part of the antipasto that I served at dinner. When I say I use everything, I mean it!)
A couple of tips: If you have any beer or wine leftover, use that to deglaze the pot after the tomato paste cooks in, or add it later for a more pronounced flavor. Also, although I’ve listed salt as one of the last items, add the salt a little at a time as you add ingredients, starting with the onions. This ensures that you coax out the maximum flavor from each individual ingredient. Chefs do this regularly, but you will rarely see it written in a recipe because it makes the recipe cumbersome to instruct adding a quantity of salt at each step. But you should do it. 🙂
So, here’s my utilitarian chili. Enjoy!
Leftover-Thanksgiving-Stuff Chili
1 tablespoon olive oil 1 cup chopped yellow onion 1/3 cup chopped red onion 2-3 large garlic cloves, minced 1½ cups chopped green bell pepper 1 tablespoon tomato paste
2 teaspoons chili powder 2 cups broth (you can make part of this beer or wine) 1½ cups chopped tomatoes 2 celery ribs, chopped 1 cup cranberry sauce ½ cup chopped roasted peppers (optional)
3 cups cooked beans (pinto, Roman, Navy, any kind you like)
3 teaspoons kosher salt ½ cup chopped parsley Freshly ground black pepper
Heat the oil in a medium-large sauce pot. Add the onions and sauté over medium-high heat until they’re soft and translucent, about 5 minutes.Add the garlic and sauté another minute. Add the green pepper and sauté until it softens, about 3 or 4 minutes.Add the tomato paste and stir it in well. Mix in the chili powder. Cook, stirring, for about 2 minutes. Deglaze the pot with broth (and or beer/wine). Scrape the bottom of the pot with a wooden spoon to get up any browned bits. Bring it to a boil. Add the remaining ingredients, except the parsley. Mix well. Bring it back to a boil, then lower the heat to medium-low, partially cover, and let it simmer for about 15 minutes, stirring occasionally.Check for seasoning and add more salt and pepper, as desired. Stir in the parsley and serve.
Hash is one of those kitchen sink recipes—it can be made with anything you have on hand—but usually requires potatoes to be considered hash. It used to be a way for restaurants to salvage scraps of food, leftovers from other dishes. And while it’s still a utilitarian dish that helps people use up scraps, it’s become standard dish in its own right. It’s become a breakfast staple with many variations. This is a healthy version because it features tempeh.
Originally from Indonesia, tempeh is a fermented soybean cake. Indonesians consider it a meat substitute and, in fact, it is high in protein. It makes the perfect meat alternative for vegetarian dishes, as it does in this hash recipe. Have it for breakfast, or any other meal.
A while back, while scrolling through photos of food on Instagram, I came across a picture of a peanut butter and jelly sandwich. It was enticing.
Let me just say that while I love peanut butter, I’m not fond of jelly. So, ever since I was a kid, I’ve been eating peanut butter sandwiches, sans jelly.
But the PB&J in this photo was so delicious looking, so scrumptious, that it made me think for a moment that maybe I’d been wrong. Maybe I’d judged jelly too harshly. Maybe I should give it another try.
Mmm, no. I’m old enough to know what I like and don’t like. Honey, yes. Jelly, no.
Then, a thought hit me. What if…now, hear me out…what if I made a peanut butter and cranberry sandwich? I had a jar of homemade cranberry sauce left over from Thanksgiving. I’ve used cranberry sauce for many things—why not a sandwich?
And, so, I did. And it was crazy good. I mean crazy AND good.
I’ve been roasting cauliflower a lot lately because it’s a very versatile vegetable. Once roasted, you can use it in a variety of dishes, and this is one of them.
Spinach Fettuccine nests
Even if you aren’t a fan of cauliflower, I guarantee that you will like it roasted. Roasting brings out both a sweetness and a smokiness, not to mention a fabulous umami flavor. You can certainly start from scratch and roast the cauliflower specifically for this purpose, but I love the idea of roasting a whole head and having it in the refrigerator to use for the whole week. Then, when you’re ready to make dinner, take some out and add it to whatever you’re making. It will taste great. (You can refer to my blog on Creamy Roasted Cauliflower Bisque on how to roast the cauliflower.)
On this particular evening, I made Spinach Fettuccine with Roasted Cauliflower-Almond Sauce. Pasta with cauliflower and nuts (particularly pine nuts, or pignoli) is a typical Italian dish, and is especially popular in Sicily. My version calls for the roasted cauliflower and toasted almonds. The spinach fettuccine that I had came in the form of “nests,” but you can use any kind or brand of spinach fettuccine.Continue reading →


 Hi there. This week, I decided to take a little rest stop on my ongoing journey through my Regions of Italy project.

 Place the lemons in a medium saucepan (not aluminum!) and add 1 1/3 cups water. Cover the pot and leave it out at room temperature overnight (at least 12 hours).
 Bring the pot to a boil, then lower the heat to medium-low. Simmer, uncovered, until the liquid is reduced to half, about 20 minutes.
 Transfer the marmalade to a small jar with a tight-fitting lid and seal while hot. If you want to store the marmalade for long term, boil the jars for 5 to 10 minutes. Otherwise, it should stay in the refrigerator up to 6 weeks.


 Do you still have cranberry sauce left over after the holidays? I know some of you do. Admit it. You’ll see lots of sites and professional chefs telling you that everything should be thrown out three days after the holiday. I have news for you—if you’ve stored it properly, that cranberry sauce is probably still good.


 So, the holidays have come and gone. You’ve shopped until you dropped, partied hardy, and eaten every holiday goodie there was.