Miz Chef

Cooking Up a Healthy Life


Leave a comment

Pasticcini di Pasqua (Little Easter Buns)

Pasticcini di Pasqua, Little Easter Buns

This Sunday is Easter Sunday, which is traditionally a day filled with of various types of sweet breads (by that, I mean actual breads that are sweetened, not the other kind of sweet breads).

In my book, Vegetarian Italian: Traditions—Bread, I offer a recipe for Pasticcini di Pasqua (Little Easter Buns). I’d like to share that with you here, just in time to bake some for Sunday.

You can get many other Italian bread recipes in that volume, and lots of other great Italian recipes in the other books in that series: Appetizers, Pasta, Soups & Stews, Pizza & Focaccia, Entrees & Sides, Rice & Potatoes, and Desserts. (These were originally in one volume, in several editions, but those are no longer available.)

Happy Easter to all those who celebrate. Enjoy!

Pasticcini di Pasqua (Little Easter Buns)

Makes 4 buns.

2 packages active dry yeast
1¼ cups all-purpose flour, plus extra for dusting
2 eggs, divided
¼ cup sugar
1 tablespoon butter, softened
¼ teaspoon salt
1 teaspoon grated orange zest
1 teaspoon grated lemon zest
Few drops food coloring of your choice
4 soft-boiled eggs, shells intact
2 tablespoons colored jimmies or sprinkles (optional)

In a small bowl, sprinkle yeast over ¼ cup very warm water. Stir in 2 tablespoons flour and mix well. Cover bowl with plastic wrap and let sit 1 hour.

Place remaining flour in a large bowl. Add yeast mixture. Beat one of the raw eggs and add to bowl, along with sugar, butter, salt, and orange and lemon zests. Mix well until a soft dough forms. Turn out onto a lightly floured surface and knead until smooth and elastic, about 5 or 6 minutes. Put dough back into bowl, cover with a cloth towel or plastic wrap, and let rise in a warm, draft-free place until doubled in bulk, about 2 hours, or overnight in refrigerator.

Grease a baking sheet with butter or nonstick spray, or line it with parchment paper, and set aside. Preheat oven to 350°F. Place 2 or 3 drops food coloring on each soft-boiled egg and use a pastry brush or your finger to spread color over entire eggs. Set aside.

Divide dough into 4 equal parts. Roll each piece into a ball, then flatten into ¼-inch-thick disks. Place on baking sheet. Press center of each with your fingers to make an indent and gently place an egg into indents. Gently press dough around egg. Beat other raw egg and brush dough. Sprinkle jimmies or sprinkles, if using, around tops of dough and eggs. Bake until buns are golden brown and puffed up, about 35 to 40 minutes. Transfer to a wire rack to cool. Store in a plastic bag or container in refrigerator.

Serve these on Easter morning at room temperature. Remove egg from center, peel, and enjoy.


Advertisement


1 Comment

Squash Blossom Frittata

In summer, along with the abundance of zucchini comes the bounty of squash blossoms, a unique delicacy. In Italian, they’re called fiori di zucca.

You might be wondering, if they’re so fabulous, why don’t they sell them at the produce store or in supermarkets? The reason is that they’re highly perishable. As soon as they’re picked, they begin to deteriorate immediately. The best way to get them, therefore, is to grow zucchini( or any other type of squash) yourself, or get them from a gardening neighbor. Barring that, you can often find them at farmers’ markets.

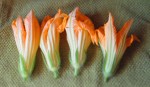
When you do get a batch of blossoms, make sure you handle them gently and use them quickly, preferably within 2 days. To clean them, cut off the stems close to the base. Open them gently with your fingers and check for insects. If you see insects, shake them out. If necessary, run them under a fine stream of running water and then  shake them out gently. If you can, remove the stamens (the long piece inside) as they can harbor insects.

Let them sit on paper towels to dry. If you’re not using them right away, place them in a plastic bag and close it loosely. Store them in the refrigerator.

Squash Blossom Frittata

Makes 4 servings

4 or 5 squash blossoms
5 medium eggs

1 tablespoon parmigiano
¼ teaspoon sea salt
Freshly ground black pepper to taste

Clean the squash blossoms. Open them up very gently and check for insects. Remove the stamens from inside and rinse carefully under a thin stream of water. Place them on a paper towel to dry.In a medium bowl, beat the eggs well with the parmigiano, salt, and pepper.Heat a small nonstick skillet (approximately 6 inches). (If you don’t have a nonstick skillet, use a regular skillet and heat 1 tablespoon butter or olive oil.) Pour in the eggs and arrange the squash blossoms across the top. Cover and cook over medium heat until the underside has browned. Remove the cover. Place a plate that’s wider than the skillet over the top and (using pot holders or kitchen towels!), carefully flip the frittata over onto the plate. Then slide it back into the pan and continue cooking until the underside has browned, another 2 or 3 minutes.Slide the frittata onto a plate or cutting board and cut into wedges. Serve with fresh bread. Enjoy.


2 Comments

White Bean Hummus with Garlic Scapes

white bean hummus garlic scapesBecause garlic scapes have such a short season (early summer), I’ve been on a garlic scape kick, using them in as many ways as I can. Last week, I made Lentils with Garlic Scapes and the week before that, I made Beet Greens with Garlic Scapes.

All delicious. But this week I decided to use the scapes in its purest form: raw.Garlic scapes Continue reading

Lentils with garlic scapes


Leave a comment

Lentils with Garlic Scapes

Lentils with garlic scapesGarlic scapes are one of summer’s treasures and if you have a farmers’ market near you, try to find some. They’re available for a short time in early summer. Scapes can be used in many different ways—basically, any way you would use garlic or onions. Last week, I used them with beet greens (very tasty!).

Garlic scapes

For this recipe, I used garlic scapes as the flavor base for lentils. Scapes lend the dish a mellow garlic-like taste but there’s more complexity to it. The addition of fresh herbs really elevate this to a gourmet meal, but the simplicity can’t be beat. The final result is so flavorful and something really special. Continue reading


1 Comment

Beet Greens and Garlic Scapes

beet greens with garlic scapes

I was just commenting to someone that I sometimes feel that I cook more in summer than in winter. That seems counter-intuitive, but there’s a reason for this. With summer comes all the beautiful vegetables that you can’t get in winter (or they’re not as good in winter), and I definitely want to take full advantage.

One of those things is garlic scapes, which are available for a short while in early summer.garlic scapes

At the farmers’ market this week I found garlic scapes, as well as beets with beautiful lush leaves. Usually I cook beet greens with garlic, so I thought that garlic scapes would work well too. And they do. Continue reading


Leave a comment

Fresh Chickpeas with Kale, Sweet Onions and Rice

IMG_5960

It wasn’t until a couple of years ago that I knew that fresh chickpeas—in the pod—could even be had. One day, I entered an Indian market in Jackson Heights, and there was a bin of what looked like little individual pea pods, shorter and squatter. What are these, I wondered?

The handwritten sign at the top of the bin said chana. I knew that chana meant chickpeas. What?! No way. I picked one up, popped it, and there it was. A fresh, firm, beautiful chickpea. I bought a bunch and cooked my very first batch of chickpeas right out of the shell. It was all very exciting.fresh chickeas in pod

But fresh chickpeas (also known as garbanzos) are not available all the time. In fact, they can only be found in spring. So when I saw them again, I bought some for myself and my mom (I knew she’d love them).

When you have fresh beans like this, not much needs to, or should, be done to them. Fresh beans are meaty, savory, nutty, and have a great feel in the mouth. Plump and pale green, chickpeas are packed with protein, and are a good source of vitamin C, calcium, and iron. They’ve been shown to be a great food to help fight diabetes, hypertension, heart disease, cancer, high cholesterol, and inflammation, and promote healthy digestion.IMG_5976

Between the chickpeas and the kale, this dish is not only filling and delicious, but healthy, substantial, and physically satisfying. The addition of the rice (whatever kind you like), rounds it out for a truly filling meal.

Enjoy!

Fresh Chickpeas with Kale, Sweet Onions and Rice

Makes 2 servings

2 teaspoons olive oil
3 large garlic cloves, minced
½ teaspoon paprika
1 cup fresh chickpeas
1 cup chopped sweet onion
1 teaspoon kosher salt
1 cup vegetable broth
3 cups chopped kale
1 cup cooked rice
¼ cup grated parmigiana (optional)

In a wide skillet, heat the oil with the garlic. When the garlic is fragrant, add the paprika and chickpeas. Sauté 5 minutes.IMG_5981Add the onion and ½ teaspoon of the salt. Continue sautéing until the onion is soft and translucent, about 5 minutes.IMG_5983Pour in the broth, then add the kale and remaining salt. Cover and cook until kale is tender, about another 5 to 7 minutes. Stir occasionally. Taste and adjust seasoning, if needed.IMG_5984IMG_5986Transfer vegetables to 2 bowls and stir ½ cup rice into each. Top with a little parmigiano, if desired.IMG_5992


2 Comments

Fried Green Tomatoes at the Whet-Your-Whistle Bar

IMG_5525Yeah, that would be MY bar. It’s a cart in the corner of my dining room loaded up with various alcoholic delights. Don’t judge me.IMG_5509

Anyway, we hit a little cool snap here last week on the East Coast and suddenly people with gardens found themselves having to make some quick decisions about their remaining vegetables. My parents still had a garden full of tomatoes that had to be taken in.

There’s no better opportunity to make fried green tomatoes.

Although fried green tomatoes are associated with the American South, according to an article on Smithsonian.com and this article from Bon Appetit, they’re actually from the North and Midwest, possibly of Ashkenazi Jewish origins. But the use of cornmeal is probably a Southern contribution to the dish, and I think that the flavor and texture of the cornmeal are what makes the tomatoes so tasty and unique.

Fried green tomatoes are really easy to make and can be flavored with whatever spices you like.

Enjoy!

Fried Green Tomatoes

1½ pounds green tomatoes
1 medium egg
2 teaspoons milk (any kind)
¾ cup cornmeal
1 teaspoon garlic powder
1 teaspoon paprika
1 teaspoon kosher salt

freshly ground pepper to taste
Coconut oil

Line a large plate with paper towels and place it by the stove.

Slice the tomatoes into ½-inch-thick slices.IMG_5512Beat the egg with the milk in a medium bowl. Combine the cornmeal, garlic powder, paprika, salt, and pepper on platter. Place a few of the tomato slices in the egg and coat both sides. Then put them in the cornmeal and coat both sides.IMG_5517Heat about ½ inch oil. Gently shake off excess cornmeal from the tomato slices and place them in the oil. Fry, flipping them over once, until golden brown on both sides, about 3 or 4 minutes per side. Transfer to the paper towels.

Repeat with the remaining tomatoes. Replenish the oil in the pan as needed.

Serve with a creamy dressing, sour cream, or salsa.

Makes 6 to 8 servings.

IMG_5522