Miz Chef

Cooking Up a Healthy Life


Leave a comment

Roasted Squash Mac ‘n’ Cheese

There’s something about mac ‘n’ cheese that makes people crave it, and it’s become American comfort food. It’s a humble, simplistic dish, but it’s such a part of our culinary landscape that everyone from famous chefs to food bloggers have “elevated” it to something grand. But whether you shave truffles in it, top it with a sunny-side egg, mix in cheese that was made by celibate monks in a cloistered hut in the Himalayas, or garnish it with gold dust, it’s still mac ‘n’ cheese.

But you can definitely make it your own. Use different cheeses and vegetables. If you’re a meat eater, you can add meat as well. Change up the pasta—you can go with the traditional elbows, or choose something more fanciful like gemelli, pipette, or campanelli. The only rule here is that you don’t cook it past al dente (tender but still firm), because it will cook a little more in the oven, and nothing ruins a mac ‘n’ cheese more than wimpy, mushy pasta.

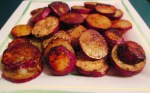
You can use any kind of orange winter squash you like. I happened to have a piece of a round, squat variety that came out of my mother’s garden.

Some days are harder than others, and it’s those days when you need mac ‘n’ cheese. Enjoy!

Roasted Squash Mac ‘n’ Cheese

Makes 4 to 6 servings

5 tablespoons unsalted butter, divided
½ medium squash (butternut, kabocha, or similar)
1 tablespoon olive oil
2 teaspoons kosher salt
freshly ground black pepper
8 oz. short pasta (elbows, gemelli, shells, campanelli, pipette, etc.)
1 teaspoon table salt
2 tablespoons all-purpose flour
1¾ cups whole milk
2 teaspoons dry mustard
Pinch of nutmeg
3 cups shredded cheddar
2 tablespoons grated parmesan cheese
2 tablespoons panko breadcrumbs
2 tablespoons plain dry breadcrumbs (regular or whole wheat)

Preheat the oven to 375˚F. Use 1 tablespoon of the butter to grease a 1½-quart baking dish. Set it aside. Line a large baking sheet with foil or parchment paper.Peel the squash and cut it into small pieces. Place the squash in a bowl; add the oil, 1 teaspoon kosher salt, and black pepper to taste. Mix well. Spread the squash out on the baking sheet. Bake until it’s tender and starting to brown, about 30 to 40 minutes. Transfer the squash to the baking dish. Lower the heat to 350 ˚F.

Bring a medium pot of water to a boil. Add the pasta and table salt; cook until the pasta it’s al dente (varies depending on what pasta you use, but generally 8 to 10 minutes).  Drain thoroughly and add it to the squash.Meanwhile, melt 3 tablespoons of the butter in a medium pan. Stir in the flour and whisk for about 2 minutes. Whisk in the milk and cook, whisking often, until the mixture thickens, about 5 minutes. Add the mustard, nutmeg, 1 teaspoon kosher salt, and black pepper to taste.Stir in the cheddar and let it melt in. Pour into the baking dish with the squash and pasta. Mix well.Melt the remaining butter in a small pan. Add the parmesan and bread crumbs and stir to coat. Spread this over the mac ‘n’ cheese. Bake until it’s bubbly and a bit browned on top, about 30 to 35 minutes. Enjoy!


Leave a comment

Leftover-Thanksgiving-Stuff Chili

This is my first post in a while. I took a hiatus for few weeks because I found myself hosting Thanksgiving dinner for the first time in many years.

I used to host Thanksgiving at my house years ago because my family and my then-partner’s family both were very unyielding in allowing us to divide our time. So, our solution was to do Thanksgiving dinner at our house and have both families. We did this for several years, and I don’t think that either family was thrilled about it. The reasons for that are both simple and complex, but what it came down to was that it made the holiday stressful for both of us.

After my partner and I broke up, the Thanksgiving meal shifted to my parents’ house, and it’s been there for the past decade.

But early this year, my father passed away, and my mother, understandably, no longer wanted to do any holidays. It fell on me to do it.

It was a bit more difficult for me to deal with it this time around because a) I’m a decade older than the last time I did it, and b) my job situation is different, and I wasn’t able to take off the same amount of time that I used to years ago.

Having said that, I was able to take off the Tuesday and Wednesday before Thanksgiving Day, and my current partner flew in to help me. This was tremendously helpful to me, because I truly wouldn’t have been able to get anything done otherwise.

I actually starting prepping my house about a month before. No, really. That’s how long it took me to put things away, organize, and move things around to optimize the space.

The one good thing about all this was that I was so busy prepping, cooking, and serving/cleaning that I didn’t have a whole lot of time to dwell on the fact that it was the first Thanksgiving without my father. I know my mother was depressed, and I felt bad that I couldn’t spend any time comforting her. But I know others did, and I’m glad. It was early on in my preparations, that the emotions hit me, and now, after it’s all over, it’s hitting me again. It’s been strange and surreal not seeing him sitting there at the table with us.

Anyway, my recipe this week is one that comes from the utilitarian in me, and my desire to not waste food and not take for granted the bounty that we’re fortunate to have in this country.

I call this dish Leftover-Thanksgiving-Stuff Chili. It’s exactly what it sounds like: a bunch of stuff I had leftover from Thanksgiving dinner, plus a couple of other things. The nice things is, you can make your own leftover chili with whatever you have in the fridge, or you can follow this recipe, because you know what? It came out great. It’s full of flavor, and because some of the individual elements were made as separate recipes with their own ingredients, the flavors of the chili are layered and complex.

I’ve said this before, but it bears saying again—use leftover cranberry sauce in chili. Its sweet and tart taste adds a great dimension to the dish.

(By the way, the reason you see olives in the photos is because the marinated peppers that I used had olives thrown in there. It was part of the antipasto that I served at dinner. When I say I use everything, I mean it!)

A couple of tips: If you have any beer or wine leftover, use that to deglaze the pot after the tomato paste cooks in, or add it later for a more pronounced flavor. Also, although I’ve listed salt as one of the last items, add the salt a little at a time as you add ingredients, starting with the onions. This ensures that you coax out the maximum flavor from each individual ingredient. Chefs do this regularly, but you will rarely see it written in a recipe because it makes the recipe cumbersome to instruct adding a quantity of salt at each step. But you should do it. 🙂

So, here’s my utilitarian chili. Enjoy!

Leftover-Thanksgiving-Stuff Chili

1 tablespoon olive oil
1 cup chopped yellow onion
1/3 cup chopped red onion
2-3 large garlic cloves, minced
1½ cups chopped green bell pepper
1 tablespoon tomato paste
2 teaspoons chili powder

2 cups broth (you can make part of this beer or wine)
1½ cups chopped tomatoes
2 celery ribs, chopped
1 cup cranberry sauce
½ cup chopped roasted peppers (optional)
3 cups cooked beans (pinto, Roman, Navy, any kind you like)
3 teaspoons kosher salt

½ cup chopped parsley
Freshly ground black pepper

Heat the oil in a medium-large sauce pot. Add the onions and sauté over medium-high heat until they’re soft and translucent, about 5 minutes.Add the garlic and sauté another minute. Add the green pepper and sauté until it softens, about 3 or 4 minutes.Add the tomato paste and stir it in well. Mix in the chili powder. Cook, stirring, for about 2 minutes. Deglaze the pot with broth (and or beer/wine). Scrape the bottom of the pot with a wooden spoon to get up any browned bits. Bring it to a boil. Add the remaining ingredients, except the parsley. Mix well. Bring it back to a boil, then lower the heat to medium-low, partially cover, and let it simmer for about 15 minutes, stirring occasionally.Check for seasoning and add more salt and pepper, as desired. Stir in the parsley and serve.


Leave a comment

Balsamic Roasted Japanese Yams

Japanese yams, also known as satsumaimo, are considered a type of sweet potato. They have a purplish skin, but unlike the sweet potatoes Westerners are used to, Japanese yams have a whitish flesh. They are sweeter than white potatoes but less sweet than orange sweet potatoes. (I don’t call sweet potatoes yams because, really, yams are a completely different thing. But I won’t go there right now.)

Although Japanese yams are low in protein, they are high in vitamins and minerals, such as A and C and potassium and fiber, antioxidants. And it is said by some that they have anti-aging effects. I don’t know if that last part is true, but Japanese yams still make a healthy alternative to white potatoes, and even standard sweet potatoes. They’re perfect for anyone with wheat issues, or who are on low-calorie diets because, yep, they’re low in calories, too.

A lot of fuss has been made around Japanese yams in the last few years. In fact, there’s even a diet with Japanese yams as the focus. They have been touted as a powerhouse health food. I’m clueless as to the validity of this belief, but what I do know is that they’re delicious, and including them in your meal plan is another way to diversify your vegetable intake.

This recipe is very quick and easy and makes for a flavorful side dish for any meal. Enjoy!

Balsamic Roasted Japanese Yams

Makes 4-6 servings.

2 lbs. Japanese yams, rinsed
1/3 cup olive oil
2 tablespoons balsamic vinegar
2 teaspoons kosher salt
1 teaspoon onion powder
1 teaspoon garlic powder
1 teaspoon dried basil
1 teaspoon dried parsley
1 teaspoon dried oregano
Freshly black pepper to taste

Preheat the oven to 375 degrees F.

Trim the ends off the yams and discard. Slice the yams into ½-inch circles and place them in a medium bowl.In a small bowl, whisk together the remaining ingredients. Pour this over the yams and mix well so that all the yams are coated.Get a piece of foil large enough to enclose all the yams and lay it flat. Transfer the yams to the foil and close it tightly to form a packet. (If you can’t do it with 1 piece of foil, then make 2 packets.)

Place the packet(s) on a baking sheet and roast for 30 to 40 minutes, or until they’re tender when pierced with the tip of a knife. (You will have to open up the foil to test them.)When they’re tender, open the foil carefully (the steam will be hot and can burn you) and spread it out flat. Spread the yams out as evenly as possible, and put them back in the oven for another 10 minutes to brown. Turn them over halfway through to get both sides browned. Taste for seasoning and sprinkle them with more salt, if desired.

Transfer them to a serving platter. Serve immediately.


Leave a comment

Cherry Tomato Confit

If you’ve ever had roasted tomatoes, you know about the incredibly sweet, smoky flavor they have. Roasting any vegetable renders its sugars, and results in heightened flavors and vivid colors. The flavor of roasted tomatoes is deep and intense, and goes well with so many dishes.

The word confit is French and means “to preserve.” It’s usually used in relation to meats—as in duck confit, chicken confit, etc.—and it means to cook the meat slowly in its own juices (or other meat juices), along with salt and seasonings. The meat is then shredded and packed in a container and covered with fat to preserve it. This method was created for long-term storage before refrigeration was invented.

But fruits and vegetables can be confited as well. It’s extremely easy to make a tomato confit. All you need to do is mix the tomatoes with some olive oil and some seasonings and put them in the oven and walk away. They roast low and slow, and when they’re done, they’re literally bursting with flavor.

You can put some tomato confit on pieces of toast, drizzle it with olive oil, and sprinkle the tops with parmesan cheese for a great canape or snack.  You can use them on focaccia or in a sandwich, or just served by themselves.

Enjoy!Cherry Tomato Confit

Makes 1½ cups.

2 cups cherry and/or pear tomatoes
¼ cup olive oil, plus more for the jar
1 teaspoon kosher salt
1 teaspoon peppercorns
Herbs of your choice, fresh or dry (basil, oregano, thyme, rosemary, bay leaf, etc.)
2 or 3 large garlic cloves, smashed

Preheat the oven to 250 degrees F.

In a medium bowl combine all the ingredients and mix.Spread the tomatoes and herbs out on a small-medium baking sheet. (You can line it with foil or parchment, if you like.)Bake for 1 hour. Stir the tomatoes, then bake for another 1½ hours. The tomatoes should be wrinkled and easily burst when poked with the tip of a knife. Some tomatoes may burst while in the oven, and some may brown a bit. This is not only okay, it’s deliciously desirable.Transfer everything to a clean, pint-size jar with a tight-fitting lid. Pour in any oil and juices from the pan. Pack in it gently. Cover the tomatoes with oil. Seal. Tomatoes will keep up to a week in the refrigerator.


Leave a comment

Easy Pickled Jalapenos

Jalapenos are great chiles. They provide a little heat and a little chile flavor without blowing your head off. If you’re anything like me, eating a dish that’s too spicy numbs your palate and you can’t taste anything else. So, jalapenos are one of my favorite chiles to use because it’s low on the Scoville Scale.

If you’re not familiar with it, the Scoville scale was created in 1912 by Wilbur Scoville to measure the heat of chile peppers, indicated by Scoville Units. The more capsaicin a pepper has, the higher the Scoville Units. A jalapeno has 2,500 to 8,000 Units. Lower on the scale is the poblano, which has 1,000 to 1,500 Units. Cayenne peppers have 30,000 to 50,000 Units. A Scotch bonnet, one of the hottest peppers in the world, has 100,000–350,000 Units. Now THAT will blow your head off.

However, as much as I may like jalapenos, and as versatile as they are, there are only so many peppers I can use in a week. I have found that when I have an abundance of them (thanks to a backyard garden), pickling them is a great way to use them.

It’s incredibly easy to pickle jalapenos, and they can be used in so many dishes to add a special zing to it. Use them on burgers and sandwiches, in stews and chilis, in casseroles, and anything else you want to have a zippy flavor.


Easy Pickled Jalapenos

½ pound jalapenos
1 cup apple cider vinegar
3 large garlic cloves, sliced thickly
1 tablespoon kosher salt
1 teaspoon peppercorns
1 small carrot, sliced ¼-inch thick

Rinse and dry the jalapenos. Cut off the tops, then slice them into 1/4-inch rings.In a small-medium saucepan, combine the vinegar, garlic, salt, and peppercorns with 1 cup water.Bring the pot to a boil; lower the heat to a simmer.

Add the jalapenos and carrot, and simmer 2 minutes. Remove the pot from heat and let cool about 10 to 15 minutes.With a slotted spoon, transfer the jalapenos and carrot to a clean jar with a tight-fitting lid.Pour the brine into the jar, making sure that everything is submerged.Seal the jar and refrigerate for a week.

Pickles keep up to a month.


Leave a comment

Cipolline in Agrodolce (Sweet and Sour Cipolline Onions)

As we’re coming into the fall season—and I say that lightly because we’ve been having higher-than-normal temperatures for this time of year—we’re beginning to see the first offerings of the autumn harvests. A little.

Anyway, at my farmers’ market, I spotted cipolline, which are a specific kind of onion and very popular in Italian cuisine. I usually buy a batch and make cipolline in agrodolce (sweet and sour cipolline) for Thanksgiving. But since I spotted these way too early for the holidays, but couldn’t resist buying them, I decided to experiment with my recipe a little. The difference here is booze. I wanted to see what a little alcohol would do to the mixture.

The question was, what type of alcohol did I want to add? I debated between bourbon, vodka, and a liqueur. Ultimately, I went with apricot brandy. It gave the onions a sweet but—not surprising—boozy edge. In short, they’re really good. Give it a try.

Cipolline in Agrodolce (Sweet and Sour Cipolline Onions)

1 pound cipolline onions, outer skin removed
2 tablespoons sugar
½ cup apple cider vinegar
½ cup apricot brandy
½ teaspoon kosher salt
½ teaspoon peppercorns
1 bay leaf
½ teaspoon oregano

Bring a medium pot of water to a boil. Add the onions and lower the heat. Simmer for about a minute or two and drain. When the onions are cool enough to handle, trim them and peel off the tough outer layer.

Combine the sugar and ¼ cup water in a medium pot. Bring it to a boil; lower the heat and simmer until thickened, about 10 minutes.

Add the vinegar and bring to a boil again. Simmer until thickened.Add one cup water, the cipolline, and the remaining ingredients. Bring to a boil. Simmer about 45 minutes.

Remove from the heat and let them cool. Transfer everything to a jar or sealable bowl and refrigerate.

Cipolline will last about a week.


4 Comments

Giant Pear Squash with Cannellini

The squash family has many variations. There are the well-known types, such as butternuts, sweet dumplings, kabocha, spaghetti, zucchini, pattypan, and numerous others. But there are so many lesser know varieties, some you would never see except when they appear in neighbors’ gardens.

Giant pear squash

If you visit farmers’ markets, you can find some other squash varieties, but you won’t generally find them in most stores. However, every once in a while, an unusual type will show up in my local produce market. And that’s exactly what happened with the giant pear squash.

Giant pear squash is so called because…well, take a look at it. It’s aptly named. (Yes, it really is as big as it looks in the photo. The photo is not distorted in any way.) It has a very mild flesh, somewhat similar to yellow summer squash. It can easily be used in any dish that requires a mild squash, or as a substitute for zucchini.

You want to cut out the spongy core of the giant pear squash. Not because it’s inedible, but because it contains seeds that are too hard to eat. They kind of look like chulpe, a Peruvian dried corn (see photos below).

Squash seeds, fresh

Squash seeds, dried

Chulpe corn

Continue reading


Leave a comment

Summer Tomato-Cucumber Salad

Well, for those of us in the Northern hemisphere, summer is coming to a close. Garden aficionados are gathering up the final crops of their summer vegetables and herbs, and are preparing their autumn and winter larders.

But there’s still time to enjoy some summer savory dishes. Pick some tomatoes and snap off a cucumber (or get them at the farmers’ market) to make this simple, yet savory, classic dish. Plan one last picnic or barbecue, soak in the warm sun while it lasts, and serve this to hold you over until next year. Pretty soon, it will be time for pumpkins, fireplaces, and warm fleece blankets. And that’s a different kind of joy.

Summer Tomato-Cucumber Salad

1 cup cherry or pear tomatoes, halved
½ medium cucumber, sliced
2 tablespoons extra virgin olive oil
¼ teaspoon sea salt
Freshly ground black pepper to taste
Few leaves fresh basil

Place all the ingredients in a medium bowl. Mix well. Taste for seasoning and adjust, if necessary.

Serve at room temperature. You can make this a few hours ahead of time. Keep it stored  tightly sealed in the refrigerator.


Leave a comment

Wax Bean and Purple Potato Salad

One of the dishes that I remember my mother always making is a cold potato and green bean salad. I considered it such a standard of my mother’s repertoire that I included it in my cookbook, Vegetarian Italian: Traditions. (That book, by the way, is now out of print, but those recipes, including the one below, are available in individual ebooks. This recipe appears in the volume called “Antipasti.”)Anyway, at the farmers’ market, I found one of my favorite things, purple potatoes. I bought some, not really knowing what I was going to do with them. Then, as I moved on down the stalls, I found wax beans, the yellow variety of green beans. I didn’t know what I was going to do with those either, but they were so beautiful, I bought a small bagful.Then I found chocolate tomatoes, which I can never resist (I’m not sure if it’s their color that draws me, or because they’re called “chocolate”). It then hit me what I was going to do with these ingredients—I would combine them to make what I consider to be a classic dish. I got a red onion, and I had the typical, and yet different, ingredients for this salad. You can most certainly make this dish with standard potatoes, ordinary red tomatoes, and average, everyday green beans, and it will be delicious. But using variations on these ingredients, such as the ones I suggest below, will give the dish just a little pop for a fun party or barbecue dish.

Enjoy!

Wax Bean and Purple Potato Salad

2 lbs. purple potatoes
1 lb. wax beans, trimmed
1½ lbs. tomatoes
½ medium red onion, thinly sliced
¼ cup extra virgin olive oil
2 teaspoons kosher salt
Freshly ground pepper to taste
½ cup olives (such as Kalamata, black cured, or Gaeta

Cut the potatoes as necessary so that the pieces are roughly the same size.Place them in a medium pot and cover them with water. Bring to a boil; lower the heat and simmer until tender, about 10 to 12 minutes (but start checking them earlier). Drain them in a colander and set aside to cool. When they’re cool enough to handle, peel and place them in a large bowl.Meanwhile, place the beans in a medium pot and cover with water. Bring to a boil; lower the heat and simmer until tender, about 8 to 10 minutes.Combine the potatoes with the beans, tomatoes, onion, oil, salt, and pepper. Mix gently. Add the olives and mix again. Taste for seasoning and adjust if needed. If it seems dry, add a little more olive oil. Transfer the salad to a serving bowl and serve.


2 Comments

Battered Squash Blossoms

Last week, I offered a recipe for Squash Blossom Frittata. Squash blossoms are the flowers that grow on any squash plant, including zucchini, butternut, pumpkin, sweet dumpling, and others. They’re used frequently along the Mediterranean—particularly popular in Italy, Greece, and Turkey—and in Mexico, where they’re called flor de calabaza (squash plants are native to the New World).

They’re a summer delicacy that can easily be obtained…if you grow your own squash or know someone who does. Otherwise, you’ll have to seek them out at farmers’ markets or specialty markets.

They’re not sold in most markets because they’re extremely fragile and don’t last very long. Handle them gently and use them quickly, preferably within 2 days. To clean them, cut off the stems close to the base. Open them gently with your fingers and check for insects. If you see insects, shake them out. If necessary, run them under a fine stream of running water and then  shake them out gently. If you can, remove the stamens (the long piece inside) as they can harbor insects.

Let them sit on paper towels to dry. If you’re not using them right away, place them in a plastic bag and close it loosely. Store them in the refrigerator.

In Italy, they’re called fiori di zucca. Although they are used in many different ways, the traditional, and most popular, way to use them in Italian cuisine is to batter and fry them. That’s the recipe I’m offering today.

Enjoy!

Battered Squash Blossoms

2 dozen squash blossoms
4 large eggs
Pinch sea salt
Freshly ground black pepper
1 cup all-purpose flour

Cooking oil (See Note below)

Clean the squash blossoms by gently shaking out insects and running the blossoms under a gentle stream of water. Lay them out on paper towels or kitchen towel to dry.

Place a large platter or a couple of large plates near the stove and line them with paper towels.

Beat the eggs together with the salt and pepper.Place the flour in a shallow dish.Heat about a half inch oil in a wide frying pan.

While it’s heating, prepare a few blossoms. Dip a blossom in the egg, coating both sides. Let the egg drip off. Next, dredge it in flour; shake off the excess. Do a few more and set them aside.When the oil is very hot, place a few blossoms in the pan and cook until the undersides are lightly browned, about 30 to 40 seconds. Turn them over with tongs and cook until other sides are lightly browned, another 15 to 20 seconds.Transfer them to the paper towels. Continue with the rest of the blossoms. Serve hot.Store any leftovers in a sealed container in the refrigerator. Heat in the oven or a toaster oven.Note: If you want to bake them instead of frying them, lay them out on a baking sheet lined with parchment paper. Batter the blossoms as instructed above. Using a pastry brush, pat the blossoms with oil. Bake them at 350 degrees F for about 15 minutes, or until lightly browned.

I like to open the larger flowers out before placing them in the oil. It makes for a lovely presentation.