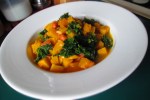
So, after I made Butternut-Black Bean Tacoslast week, I had some butternut squash left over. There were many things I could have done with it, but after finding a beautiful head of kale, I decided to make butternut and kale soup.
This soup is packed with nutrients and it’s just plain delicious. Enjoy.Continue reading →
Why butternut and black bean tacos? Why not? Butternut squashes are fabulous. Anything inside a taco is fabulous. So butternut squash in a taco is…well…doubly fabulous.
Butternut squash is my favorite squash because it’s so versatile, and its flavor is so delicately sweet. It’s not fun to peel, but once you get past that part, you can do pretty much anything with it. So for this recipe, I’ve paired it with black beans, not just for the protein but because the two ingredients make such a beautiful contrast. Throw in some red bell pepper and it’s a sight to behold.
I love cooking with quinoa. It’s not only one of the most nutritious grains—a so-called “superfood”—it’s also deliciously nutty and the texture is slightly crunchy, even while it’s tender.
If you’re already cooking with quinoa, and other nutritious grains, such as amaranth and millet, you’re doing a good deed for your body. Quinoa is one of the only grains that has protein and, of course, it’s gluten free. But if you want to take your healthy ways a step further you might want to incorporate sprouted grains into your diet. You may or may not have heard about sprouted grains, but they are now available as uncooked grains, in dried pastas, and breads, as well as other products.
So what’s the deal with sprouted grains?
Grains contain phytic acid, which is also referred to as an “antinutrient” because of its tendency to block absorption of certain minerals. Phytic acid binds to such nutrients as calcium, magnesium, iron, copper, and zinc. So, while quinoa is a good source of these nutrients, the phytic acid can block them from being aborbed into your system.
Sprouting neutralizes phytic acids, as well as enzyme inhibitors, making the grains’ nutrients more bioavailable. Essential amino acids, such as lysine, also get blocked. Quinoa is one of the few grains on earth that contains lysine, so sprouting quinoa, in particular, is advantageous. Plus, germination produces vitamin C and increases the grain’s (or bean’s or seed’s) B vitamins. Sprouted quinoa looks and tastes just like regular quinoa, except with the added benefits.
You can find packages of sprouted quinoa in health food stores, but considering how much standard supermarkets’ shelves have expanded to include products for health-conscious consumers, who knows, you might be able to find sprouted quinoa in your neighborhood supermarket—if not now, then in the near future.
Sprouted Quinoa with Roasted Vegetables and Roasted Garlic Dressing
Makes 6 servings.
1½ cups diced eggplant 3 cups diced zucchini ¼ cup + 1 teaspoon olive oil 1 teaspoon + a pinch kosher salt Freshly ground black pepper 3 large plum tomatoes 4 garlic cloves, skin on 1 cup sprouted quinoa ¼ cup extra virgin olive oil 2 teaspoons Dijon mustard 1 teaspoon sherry vinegar
¼ teaspoon sea salt ¼ cup chopped Italian parsley
Preheat the oven to 350 degrees F. Grease a large baking sheet, or line it with foil or parchment paper. Do the same with a small baking sheet.
Combine the eggplant and zucchini in a bowl. Pour in 3 tablespoons olive oil, 1 teaspoon kosher salt, grind in some black pepper, and toss to coat. Spread the vegetables out on the large baking sheet. (You can line the sheet with aluminum foil or parchment, if you like.)Roast, stirring occasionally, until tender and browned, about 20 to 30 minutes.Cut the tomatoes in half and removed the seeds. Dice the tomatoes and place in a medium bowl. Toss with 1 tablespoon oil and a pinch of kosher salt. Lay the tomatoes out on the small baking sheet and roast, stirring occasionally until tender and browned, about 30 minutes.Place the garlic cloves on a piece of aluminum foil. Pour 1 teaspoon olive oil on them, and wrap the foil. Place on a small baking sheet (you can place the packet on one of the baking sheets the other vegetables are on).Roast until soft, about 20 minutes.While the vegetables are roasting, combine the quinoa with 2 cups water and a pinch of salt in a small saucepan. Bring to a boil; lower the heat to medium-low and simmer, half covered, until the water is absorbed, about 10 to 15 minutes. Remove from the heat and let sit for 5 minutes. Fluff with a fork.Unwrap the garlic. When it’s cool enough to handle, squeeze the garlic out of the skin into a small bowl. Add the extra virgin olive oil, mustard, vinegar, and sea salt. Whisk until well blended.
In a large bowl, combine the eggplant, zucchini, tomatoes, and quinoa. Add the dressing and mix well. Mix in the parsley. Taste for seasoning and adjust if needed.
Pancit bihon noodles are long, thin noodles made from cornstarch and are used widely in Philippine cuisine. They’ve got a nice firm texture and can be used in pretty much any recipe that calls for long, spaghetti-like noodles. And they are gluten free.
Noodles were introduced to the Philippines by the Chinese. It’s said that the word pancit comes from Hokkien, a southern Chinese dialect: pian e sit, which means “something conveniently cooked.” Pancit noodles became a staple—in fact, national—dish of the Philippines.
The recipe I offer here today is a basic Asian noodle dish, and you can add or remove anything you like. Look for pancit bihon in Asian markets.
Pancit Bihon Noodles with Snow Peas
Makes 4 to 6 servings.
½ lb. snow peas 8 oz. pancit bihon noodles 2 teaspoons cooking oil (such as grapeseed or sunflower) 3 large garlic cloves, minced 1 tablespoon sesame oil 1 tablespoon soy sauce Sea salt, if desired
Trim the snow peas and either cut into strips or just chop coarsely.Bring a medium-large pot of water to a boil. Add the noodles and stir them in. Cook until tender, about 5 to 7 minutes.Drain in a colander and run under cool water to stop the cooking. Set aside.In a wok or wide frying pan, heat the cooking oil, then add the garlic and sauté until fragrant. Add the snow peas and sauté a few minutes until softened but still crisp.Add the noodles, sesame oil, and soy sauce. Mix well with tongs.Taste for seasoning and add a little salt, if needed. Serve hot.
A while back, while scrolling through photos of food on Instagram, I came across a picture of a peanut butter and jelly sandwich. It was enticing.
Let me just say that while I love peanut butter, I’m not fond of jelly. So, ever since I was a kid, I’ve been eating peanut butter sandwiches, sans jelly.
But the PB&J in this photo was so delicious looking, so scrumptious, that it made me think for a moment that maybe I’d been wrong. Maybe I’d judged jelly too harshly. Maybe I should give it another try.
Mmm, no. I’m old enough to know what I like and don’t like. Honey, yes. Jelly, no.
Then, a thought hit me. What if…now, hear me out…what if I made a peanut butter and cranberry sandwich? I had a jar of homemade cranberry sauce left over from Thanksgiving. I’ve used cranberry sauce for many things—why not a sandwich?
And, so, I did. And it was crazy good. I mean crazy AND good.
A few years ago, I introduced a recipe for Cranberry Sauce with a Sorghum Twist. I think using sorghum syrup is a great way to enjoy traditional dishes without using white cane sugar.
In my cranberry sauce, it also adds a different dimension to the flavor. And it’s still one of my favorite cranberry sauce recipes.
So, below is a reprint of my original post from 2013. I hope you like it. Have a fun, safe, and peaceful Thanksgiving.
More spaghetti squash? Why not? It’s squash season, after all. Squash is synonymous with autumn.
Although spaghetti squash can be found from fall through the spring, there’s something comforting and pleasurable about roasting vegetables in the fall, especially squash. And since many people aren’t sure what to do with spaghetti squash, I’ve been offering some recipes. Last week, I offered Easy Spaghetti Squash Chili. This week, I have for you Roasted Maple-Bourbon Spaghetti Squash with Amaranth Pilaf.
Cultivated by the Aztecs 8,000 years ago, amaranth is a tiny little grain that is surprisingly high in protein, as well as other nutrients. One cup of raw amaranth contains 28 grams of protein, 15 milligrams of iron, and 18 milligrams of fiber, which makes it one of the most nutrient-rich grains on earth.
Amaranth is also a great source of lysine, a protein-rich amino acid. This is good news for those of us who suffer from canker and cold sores. L-lysine has been shown to shorten the life span of canker sores. I can personally attest to this because when one of those little monsters starts making itself known, I start digging into the giant bottle of lysine, and believe me, it works.
So this dish makes the perfect side dish to any autumn meal, but because of the amaranth and almonds, it also is a satisfying entree on its own. And spaghetti squash is low in calories, low in carbs, and almost fat free, so whatever diet you may be on, you can’t go wrong with this squash. You can serve it in lovely slices, or you can scrape out the spaghetti-like flesh and eat it like a pasta dish. Continue reading →
A few months ago I did a blog where I offered a recipe using spaghetti squash. Some people commented to me that they were glad I had done that because they never quite knew what to do with spaghetti squash.
Spaghetti squash can be used in many different ways. This week I decided to use it in a chili. And because spaghetti squash is a fast-cooking squash (about 15 minutes in a steamer), I made the entire recipe a quick-and-easy chili. You can throw this together in less than an hour.
Celery root, or celeriac, is one of those vegetables that people don’t know what to do with when they see it. Truth is, it can be used in so many ways—essentially, in any dish where root vegetables are called for.
Celery root, aka celeriac
You should, however, like the taste of celery. Celery root has a very strong celery flavor and if that’s not your thing, you might not like it. On the other hand, it’s also sweeter than celery, so even if celery isn’t your favorite thing, you may be pleasantly surprised. I happen to like the flavor of celery, but I don’t enjoy chomping on it when it’s cooked. So, while I add it to other foods, I always pick it out. (I do like it raw, though. Go figure.)
Will you like celery root? You won’t know until you try. Here’s a simple way to cook it. If you’ve never had it before, this is an easy introduction to it.
You can find celery root at farmers’ markets, most supermarkets, and sometimes at local produce stores.
Enjoy.
Sauteed Celery Root with Red Onion
Makes about 4 servings.
1 medium celery root 2 teaspoons olive oil 1 medium red onion, thinly sliced 1 teaspoon dry basil 1 teaspoon paprika ½ teaspoon garlic powder ½ teaspoon kosher salt Freshly ground black pepper to taste
Peel celery root. Cut off root and stem, then slice off the skin with a vegetable peeler or sharp knife.
Cut the celery root into wedges, then slice them into ¼-inch-thick pieces. You should get about 2 cups.
Heat the oil in a skillet. Add the onion and sauté until soft and translucent, about 5 minutes.
Add basil and paprika. Add the celery root, garlic powder, salt, and pepper.
Sauté stirring occasionally, until celery root starts to brown. This could take up to 15 minutes.
Cover and lower heat, cook until tender, about 10 minutes. Taste for seasoning and adjust if necessary.
Tuscan kale is a beautiful specimen of the kale family. The leaves are long and dainty looking, and look really pretty in a garden. But like standard kale, the leaves are hearty and the stems tough. Thick stems should be cut off and the leaves need to cook for a substantial amount of time (versus greens such s spinach or chard, which cook down in a few minutes).

 So, after I made Butternut-Black Bean Tacos last week, I had some butternut squash left over. There were many things I could have done with it, but after finding a beautiful head of kale, I decided to make butternut and kale soup.
 Why butternut and black bean tacos? Why not? Butternut squashes are fabulous. Anything inside a taco is fabulous. So butternut squash in a taco is…well…doubly fabulous.


 More spaghetti squash? Why not? It’s squash season, after all. Squash is synonymous with autumn.

 A few months ago


