Why butternut and black bean tacos? Why not? Butternut squashes are fabulous. Anything inside a taco is fabulous. So butternut squash in a taco is…well…doubly fabulous.
Butternut squash is my favorite squash because it’s so versatile, and its flavor is so delicately sweet. It’s not fun to peel, but once you get past that part, you can do pretty much anything with it. So for this recipe, I’ve paired it with black beans, not just for the protein but because the two ingredients make such a beautiful contrast. Throw in some red bell pepper and it’s a sight to behold.
I love cooking with quinoa. It’s not only one of the most nutritious grains—a so-called “superfood”—it’s also deliciously nutty and the texture is slightly crunchy, even while it’s tender.
If you’re already cooking with quinoa, and other nutritious grains, such as amaranth and millet, you’re doing a good deed for your body. Quinoa is one of the only grains that has protein and, of course, it’s gluten free. But if you want to take your healthy ways a step further you might want to incorporate sprouted grains into your diet. You may or may not have heard about sprouted grains, but they are now available as uncooked grains, in dried pastas, and breads, as well as other products.
So what’s the deal with sprouted grains?
Grains contain phytic acid, which is also referred to as an “antinutrient” because of its tendency to block absorption of certain minerals. Phytic acid binds to such nutrients as calcium, magnesium, iron, copper, and zinc. So, while quinoa is a good source of these nutrients, the phytic acid can block them from being aborbed into your system.
Sprouting neutralizes phytic acids, as well as enzyme inhibitors, making the grains’ nutrients more bioavailable. Essential amino acids, such as lysine, also get blocked. Quinoa is one of the few grains on earth that contains lysine, so sprouting quinoa, in particular, is advantageous. Plus, germination produces vitamin C and increases the grain’s (or bean’s or seed’s) B vitamins. Sprouted quinoa looks and tastes just like regular quinoa, except with the added benefits.
You can find packages of sprouted quinoa in health food stores, but considering how much standard supermarkets’ shelves have expanded to include products for health-conscious consumers, who knows, you might be able to find sprouted quinoa in your neighborhood supermarket—if not now, then in the near future.
Sprouted Quinoa with Roasted Vegetables and Roasted Garlic Dressing
Makes 6 servings.
1½ cups diced eggplant 3 cups diced zucchini ¼ cup + 1 teaspoon olive oil 1 teaspoon + a pinch kosher salt Freshly ground black pepper 3 large plum tomatoes 4 garlic cloves, skin on 1 cup sprouted quinoa ¼ cup extra virgin olive oil 2 teaspoons Dijon mustard 1 teaspoon sherry vinegar
¼ teaspoon sea salt ¼ cup chopped Italian parsley
Preheat the oven to 350 degrees F. Grease a large baking sheet, or line it with foil or parchment paper. Do the same with a small baking sheet.
Combine the eggplant and zucchini in a bowl. Pour in 3 tablespoons olive oil, 1 teaspoon kosher salt, grind in some black pepper, and toss to coat. Spread the vegetables out on the large baking sheet. (You can line the sheet with aluminum foil or parchment, if you like.)Roast, stirring occasionally, until tender and browned, about 20 to 30 minutes.Cut the tomatoes in half and removed the seeds. Dice the tomatoes and place in a medium bowl. Toss with 1 tablespoon oil and a pinch of kosher salt. Lay the tomatoes out on the small baking sheet and roast, stirring occasionally until tender and browned, about 30 minutes.Place the garlic cloves on a piece of aluminum foil. Pour 1 teaspoon olive oil on them, and wrap the foil. Place on a small baking sheet (you can place the packet on one of the baking sheets the other vegetables are on).Roast until soft, about 20 minutes.While the vegetables are roasting, combine the quinoa with 2 cups water and a pinch of salt in a small saucepan. Bring to a boil; lower the heat to medium-low and simmer, half covered, until the water is absorbed, about 10 to 15 minutes. Remove from the heat and let sit for 5 minutes. Fluff with a fork.Unwrap the garlic. When it’s cool enough to handle, squeeze the garlic out of the skin into a small bowl. Add the extra virgin olive oil, mustard, vinegar, and sea salt. Whisk until well blended.
In a large bowl, combine the eggplant, zucchini, tomatoes, and quinoa. Add the dressing and mix well. Mix in the parsley. Taste for seasoning and adjust if needed.
Pancit bihon noodles are long, thin noodles made from cornstarch and are used widely in Philippine cuisine. They’ve got a nice firm texture and can be used in pretty much any recipe that calls for long, spaghetti-like noodles. And they are gluten free.
Noodles were introduced to the Philippines by the Chinese. It’s said that the word pancit comes from Hokkien, a southern Chinese dialect: pian e sit, which means “something conveniently cooked.” Pancit noodles became a staple—in fact, national—dish of the Philippines.
The recipe I offer here today is a basic Asian noodle dish, and you can add or remove anything you like. Look for pancit bihon in Asian markets.
Pancit Bihon Noodles with Snow Peas
Makes 4 to 6 servings.
½ lb. snow peas 8 oz. pancit bihon noodles 2 teaspoons cooking oil (such as grapeseed or sunflower) 3 large garlic cloves, minced 1 tablespoon sesame oil 1 tablespoon soy sauce Sea salt, if desired
Trim the snow peas and either cut into strips or just chop coarsely.Bring a medium-large pot of water to a boil. Add the noodles and stir them in. Cook until tender, about 5 to 7 minutes.Drain in a colander and run under cool water to stop the cooking. Set aside.In a wok or wide frying pan, heat the cooking oil, then add the garlic and sauté until fragrant. Add the snow peas and sauté a few minutes until softened but still crisp.Add the noodles, sesame oil, and soy sauce. Mix well with tongs.Taste for seasoning and add a little salt, if needed. Serve hot.
Leave the zucchini and other fair-weather vegetables to summer. Winter calls for thick-skinned squashes.
My favorite is butternut squash. In my opinion, it not only has the best flavor, but the best texture as well. When cooked down, it’s creamy and smooth, and incredibly diverse.
Roasting brings out the sweetness and beauty in most vegetables, but this is especially true of squash. My mother wanted me to roast squash for Thanksgiving and I wanted to come up with something that was familiar, that I knew would be liked, but something every-so-slightly different. I came up with an easy, delicious honey-soy-mirin glaze and honey-pomegranate sauce…because, you know, pomegranates.
Unless you’ve been living under a rock, you’ve heard how healthful pomegranates are. Here’s a quick rundown of their health benefits:
Based on US RDA, one cup of pomegranate seeds contains 7 grams fiber, 3 grams protein, 30% vitamin C, 36% vitamin K, 16% folate, and 12% potassium. They have antiinflammatory, antibacterial, and antifungal properties.They help fight cancer, especially prostate and breast, and heart disease, and have been known to improve memory function.
Delicious AND healthy. Do you need anything more? Give this a try on a cold winter day…or even a warm one. Enjoy!
Roasted Butternut Squash with Honey-Soy-Mirin Glaze and Honey-Pomegranate Sauce
1 pomegranate 2 tablespoons honey 1 tablespoon white wine or ginger ale
Grease a baking sheet. Preheat the oven to 400 degrees F.
Peel and seed the squash. Cut into 1/2-inch-thick slices and place them in a large bowl.In a small bowl, mix together the honey, olive oil, soy sauce, mirin. pour over the squash.
Sprinkle in salt and pepper. Use your hands to spread the mixture over both sides of the squash. Lay the slices neatly on the baking sheet in a single layer.
Roast until almost tender, about 20 to 30 minutes. Turn the slices over and continue roasting until fully tender and golden brown at the edges.Meanwhile, make the Honey-Pomegranate Sauce. Cut open the pomegranate and place the pieces in a large bowl of cool water. Separate the seeds from the membrane and discard the skin. Let the membranes rise to the top and scoop them out.Drain in a mesh strainer and rinse.Measure out ½ cup seeds and place in a small pot. Reserve the remaining seeds for the top or another purpose. Mix together the honey and wine and add to pomegranate seeds. Cook over medium-low heat until thickened, about 10 minutes.Transfer cooked squash to a serving platter. Drizzle sauce over top, sprinkle on some fresh pomegranate seeds, and serve.
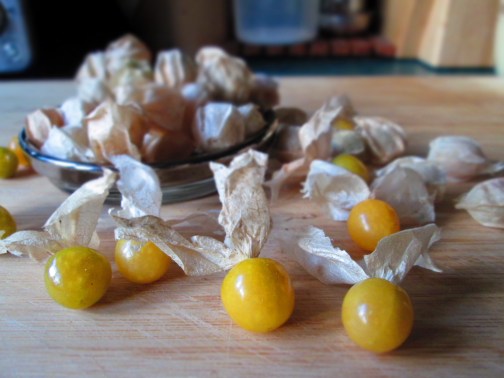
So, what exactly are husk cherries? That’s what I wanted to know when I spotted them at the Union Square farmers’ Market in Manhattan. At first I thought they were gooseberries because they looked exactly like gooseberries—they were golden globes covered in a paper-thin, skin-like husk.
But the sign said “husk cherries.” Naturally, I bought some.
Native to the New World, husk cherries are not cherries at all. Sometimes also called husk tomatoes, Cape gooseberries, and ground cherries, they’re a type of flowering plant belonging to the nightshade family.
Their flavor is quite unique. It’s like a cross between a tomato, a papaya, and a pineapple. Sweet and savory at the same time. The easiest and no-brainer way to use them is in a salsa, which is exactly how Native Americans peoples used them, as well as eating them out of hand.
I think if food-loving people were smart, they’d introduce themselves to husk cherries and make them better known to the world. They’re really a great little fruit/vegetable. If you ever see them, buy a small bagful and give this recipe a try.
Enjoy!
Husk Cherry Salsa
Makes approximately 1½ cups.
1 cup husk cherries ¼ cup finely chopped red onion 2 tablespoons extra virgin olive oil 1 tablespoon minced chile of your choice ¼ minced cilantro 2 tablespoons lemon or lime juice ¼ teaspoon sea salt
Freshly ground black pepper to taste
Remove the husks from the cherries by peeling the husks back and twisting them off. Rinse the cherries in cool water and set on paper towels to drain. Cut the cherries in half and place them in a bowl.Add the remaining ingredients and mix well. Taste and adjust seasoning, if necessary. Serve with tortilla chips or pita bread, or use as a relish for fish, chicken, pork, or vegetables.
A few years ago, I introduced a recipe for Cranberry Sauce with a Sorghum Twist. I think using sorghum syrup is a great way to enjoy traditional dishes without using white cane sugar.
In my cranberry sauce, it also adds a different dimension to the flavor. And it’s still one of my favorite cranberry sauce recipes.
So, below is a reprint of my original post from 2013. I hope you like it. Have a fun, safe, and peaceful Thanksgiving.
Thanksgiving is coming up and people are always looking for new and different ways to serve favorite and/or traditional dishes. Purple potatoes are a great way to liven up the table.
Purple potatoes are originally from South America (where potatoes in general are originally from), particularly Peru and Bolivia. In fact, they’re sometimes referred to as Purple Peruvian potatoes. While they taste pretty much the same as standard white potatoes, because of their pigment, purple potatoes are high in antioxidants—4 times as much as white potatoes. Antioxidants are cancer-fighting agents, are good for immunity and heart health.
I found some beautiful purple potatoes at the farmers’ market and decided to mash them. Their dramatic blue/purple color makes this a special dish while still giving everyone the scrumptious mashed potatoes they’ve come to love and expect.
Enjoy.
Mashed Purple Potatoes
6 small to medium purple potatoes 2 tablespoons olive oil 1 tablespoon half-n-half ½ teaspoon sea salt Freshly ground black pepper
Scrub the potatoes and cut them in halves or quarters. Place them in a medium pot, cover with cold water, and bring to a boil.
Lower the heat to low, partially cover, and simmer until the potatoes are tender when pierced with the tip of a knife. Drain well and let cool a bit. When they’re cool enough to handle, peel off the skin.
Place the potatoes in a mixing bowl. Add the oil, half-n-half, salt, and pepper. Mash with a potato masher. (Don’t use a food processor or blender, as this will make the potatoes gummy.)
Check the potatoes for seasoning and adjust, if needed.
More spaghetti squash? Why not? It’s squash season, after all. Squash is synonymous with autumn.
Although spaghetti squash can be found from fall through the spring, there’s something comforting and pleasurable about roasting vegetables in the fall, especially squash. And since many people aren’t sure what to do with spaghetti squash, I’ve been offering some recipes. Last week, I offered Easy Spaghetti Squash Chili. This week, I have for you Roasted Maple-Bourbon Spaghetti Squash with Amaranth Pilaf.
Cultivated by the Aztecs 8,000 years ago, amaranth is a tiny little grain that is surprisingly high in protein, as well as other nutrients. One cup of raw amaranth contains 28 grams of protein, 15 milligrams of iron, and 18 milligrams of fiber, which makes it one of the most nutrient-rich grains on earth.
Amaranth is also a great source of lysine, a protein-rich amino acid. This is good news for those of us who suffer from canker and cold sores. L-lysine has been shown to shorten the life span of canker sores. I can personally attest to this because when one of those little monsters starts making itself known, I start digging into the giant bottle of lysine, and believe me, it works.
So this dish makes the perfect side dish to any autumn meal, but because of the amaranth and almonds, it also is a satisfying entree on its own. And spaghetti squash is low in calories, low in carbs, and almost fat free, so whatever diet you may be on, you can’t go wrong with this squash. You can serve it in lovely slices, or you can scrape out the spaghetti-like flesh and eat it like a pasta dish. Continue reading →
A few months ago I did a blog where I offered a recipe using spaghetti squash. Some people commented to me that they were glad I had done that because they never quite knew what to do with spaghetti squash.
Spaghetti squash can be used in many different ways. This week I decided to use it in a chili. And because spaghetti squash is a fast-cooking squash (about 15 minutes in a steamer), I made the entire recipe a quick-and-easy chili. You can throw this together in less than an hour.
Celery root, or celeriac, is one of those vegetables that people don’t know what to do with when they see it. Truth is, it can be used in so many ways—essentially, in any dish where root vegetables are called for.
Celery root, aka celeriac
You should, however, like the taste of celery. Celery root has a very strong celery flavor and if that’s not your thing, you might not like it. On the other hand, it’s also sweeter than celery, so even if celery isn’t your favorite thing, you may be pleasantly surprised. I happen to like the flavor of celery, but I don’t enjoy chomping on it when it’s cooked. So, while I add it to other foods, I always pick it out. (I do like it raw, though. Go figure.)
Will you like celery root? You won’t know until you try. Here’s a simple way to cook it. If you’ve never had it before, this is an easy introduction to it.
You can find celery root at farmers’ markets, most supermarkets, and sometimes at local produce stores.
Enjoy.
Sauteed Celery Root with Red Onion
Makes about 4 servings.
1 medium celery root 2 teaspoons olive oil 1 medium red onion, thinly sliced 1 teaspoon dry basil 1 teaspoon paprika ½ teaspoon garlic powder ½ teaspoon kosher salt Freshly ground black pepper to taste
Peel celery root. Cut off root and stem, then slice off the skin with a vegetable peeler or sharp knife.
Cut the celery root into wedges, then slice them into ¼-inch-thick pieces. You should get about 2 cups.
Heat the oil in a skillet. Add the onion and sauté until soft and translucent, about 5 minutes.
Add basil and paprika. Add the celery root, garlic powder, salt, and pepper.
Sauté stirring occasionally, until celery root starts to brown. This could take up to 15 minutes.
Cover and lower heat, cook until tender, about 10 minutes. Taste for seasoning and adjust if necessary.


 Why butternut and black bean tacos? Why not? Butternut squashes are fabulous. Anything inside a taco is fabulous. So butternut squash in a taco is…well…doubly fabulous.


 potatoes in general are originally from), particularly Peru and Bolivia. In fact, they’re sometimes referred to as Purple Peruvian potatoes. While they taste pretty much the same as standard white potatoes, because of their pigment, purple potatoes are high in antioxidants—4 times as much as white potatoes. Antioxidants are cancer-fighting agents, are good for immunity and heart health.


 More spaghetti squash? Why not? It’s squash season, after all. Squash is synonymous with autumn.

 A few months ago


