Miz Chef

Cooking Up a Healthy Life


2 Comments

Whole Wheat Pasta Salad with Kale & Creamy Avocado Dressing

Summer is finally here, and with the coming of sunshine and warm breezes comes the need for pasta salad. After all, you need something easy to bring to all those picnics, barbecues, and beach parties, right?

Pasta salad, however, need not be fattening or unhealthy. In fact, it can be quite the opposite. This pasta salad calls for whole wheat pasta, which already is healthier than regular pasta salad, but you can use gluten-free pasta as well. Rather than mayo or other fat-laden dressing, this one uses avocado. It makes the pasta creamy, rich, and loaded with nutrients (plus some good fat). Add raw kale to the mix and you’ve got a healthy, but delicious, alternative.

Kale can be tough, but squeezing kale with avocado softens the leaves. The salt in the dressing further breaks down the cell walls of the kale, helping it along its journey to tenderness.

This is an excellent start to the summer. Enjoy!

Whole Wheat Pasta Salad with Kale & Creamy Avocado Dressing

Makes 4 servings.

8 oz. cherry tomatoes, halved
2 teaspoons olive oil
2 cups whole wheat pasta
2 teaspoons table salt
2 Haas avocados
2 tablespoons lime juice
½ teaspoons sea salt
Freshly ground black pepper to taste
2 packed kale leaves, shredded*
2 tablespoons extra virgin olive oil
1 tablespoon balsamic vinegar
1 teaspoon red pepper flakes (optional)
¼ cup grated parmesan

Toss the tomatoes with the olive oil in a small bowl. Spread the tomatoes out on a small baking sheet lined with foil and roast until soft and charred, about 20 minutes.Bring a medium pot of water to a boil. Add the pasta and table salt and bring to a boil. Boil over medium-high heat, stirring frequently, until the pasta is al dente, about 8 to 12 minutes (depending on what pasta you choose). Drain and set it aside while you prepare the sauce.

In a food processor, combine the meat from the avocados, lime juice, 1 tablespoon of the extra virgin olive oil, sea salt, and black pepper. Process until smooth.Place the kale in a medium bowl. Pour the avocado sauce over it and squeeze the kale with your hand until everything is well blended. Mix in the balsamic and red pepper flakes, if you’re using it.
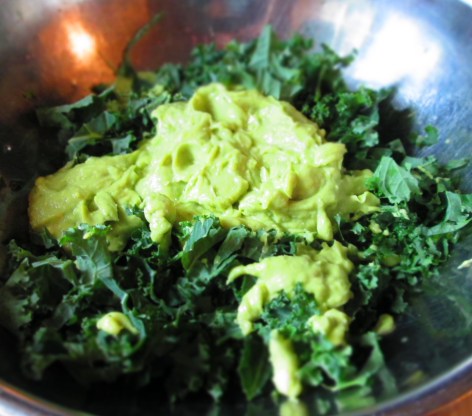
Add the cooked pasta and parmesan and mix well. Taste for seasoning and adjust it to your liking.Transfer the pasta to a serving bowl. Serve warm, at room temperature, or cold.

*To shred kale, first strip the leaves off the stems by lightly pinching the stem and running your fingers down the stem to the tip, pulling the leaves off along the way. Stack a few leaves and roll them up into a tight log. With a sharp knife, slice the kale thinly.

Advertisement


2 Comments

Giant Pear Squash with Cannellini

The squash family has many variations. There are the well-known types, such as butternuts, sweet dumplings, kabocha, spaghetti, zucchini, pattypan, and numerous others. But there are so many lesser know varieties, some you would never see except when they appear in neighbors’ gardens.

Giant pear squash

If you visit farmers’ markets, you can find some other squash varieties, but you won’t generally find them in most stores. However, every once in a while, an unusual type will show up in my local produce market. And that’s exactly what happened with the giant pear squash.

Giant pear squash is so called because…well, take a look at it. It’s aptly named. (Yes, it really is as big as it looks in the photo. The photo is not distorted in any way.) It has a very mild flesh, somewhat similar to yellow summer squash. It can easily be used in any dish that requires a mild squash, or as a substitute for zucchini.

You want to cut out the spongy core of the giant pear squash. Not because it’s inedible, but because it contains seeds that are too hard to eat. They kind of look like chulpe, a Peruvian dried corn (see photos below).

Squash seeds, fresh

Squash seeds, dried

Chulpe corn

Continue reading


Leave a comment

Wax Bean and Purple Potato Salad

One of the dishes that I remember my mother always making is a cold potato and green bean salad. I considered it such a standard of my mother’s repertoire that I included it in my cookbook, Vegetarian Italian: Traditions. (That book, by the way, is now out of print, but those recipes, including the one below, are available in individual ebooks. This recipe appears in the volume called “Antipasti.”)Anyway, at the farmers’ market, I found one of my favorite things, purple potatoes. I bought some, not really knowing what I was going to do with them. Then, as I moved on down the stalls, I found wax beans, the yellow variety of green beans. I didn’t know what I was going to do with those either, but they were so beautiful, I bought a small bagful.Then I found chocolate tomatoes, which I can never resist (I’m not sure if it’s their color that draws me, or because they’re called “chocolate”). It then hit me what I was going to do with these ingredients—I would combine them to make what I consider to be a classic dish. I got a red onion, and I had the typical, and yet different, ingredients for this salad. You can most certainly make this dish with standard potatoes, ordinary red tomatoes, and average, everyday green beans, and it will be delicious. But using variations on these ingredients, such as the ones I suggest below, will give the dish just a little pop for a fun party or barbecue dish.

Enjoy!

Wax Bean and Purple Potato Salad

2 lbs. purple potatoes
1 lb. wax beans, trimmed
1½ lbs. tomatoes
½ medium red onion, thinly sliced
¼ cup extra virgin olive oil
2 teaspoons kosher salt
Freshly ground pepper to taste
½ cup olives (such as Kalamata, black cured, or Gaeta

Cut the potatoes as necessary so that the pieces are roughly the same size.Place them in a medium pot and cover them with water. Bring to a boil; lower the heat and simmer until tender, about 10 to 12 minutes (but start checking them earlier). Drain them in a colander and set aside to cool. When they’re cool enough to handle, peel and place them in a large bowl.Meanwhile, place the beans in a medium pot and cover with water. Bring to a boil; lower the heat and simmer until tender, about 8 to 10 minutes.Combine the potatoes with the beans, tomatoes, onion, oil, salt, and pepper. Mix gently. Add the olives and mix again. Taste for seasoning and adjust if needed. If it seems dry, add a little more olive oil. Transfer the salad to a serving bowl and serve.


3 Comments

Tomato Tagliolini with Fresh Peas, Asparagus & Squash Blossoms

The fun thing about pasta is that it comes in many shapes, sizes, and flavors. You can play around with it almost endlessly. When I saw this particular pasta, I was drawn by its beautiful red color, which comes from tomatoes. Once it’s cooked, it retains a soft reddish color and a mild tomato flavor. Continue reading


Leave a comment

Sprouted Quinoa with Roasted Vegetables and Roasted Garlic Dressing

I love cooking with quinoa. It’s not only one of the most nutritious grains—a so-called “superfood”—it’s also deliciously nutty and the texture is slightly crunchy, even while it’s tender.

If you’re already cooking with quinoa, and other nutritious grains, such as amaranth and millet, you’re doing a good deed for your body. Quinoa is one of the only grains that has protein and, of course, it’s gluten free. But if you want to take your healthy ways a step further you might want to incorporate sprouted grains into your diet. You may or may not have heard about sprouted grains, but they are now available as uncooked grains, in dried pastas, and breads, as well as other products.

So what’s the deal with sprouted grains?

Grains contain phytic acid, which is also referred to as an “antinutrient” because of its tendency to block absorption of certain minerals. Phytic acid binds to such nutrients as calcium, magnesium, iron, copper, and zinc. So, while quinoa is a good source of these nutrients, the phytic acid can block them from being aborbed into your system.

Sprouting neutralizes phytic acids, as well as enzyme inhibitors, making the grains’ nutrients more bioavailable. Essential amino acids, such as lysine, also get blocked. Quinoa is one of the few grains on earth that contains lysine, so sprouting quinoa, in particular, is advantageous. Plus, germination produces vitamin C and increases the grain’s (or bean’s or seed’s) B vitamins. Sprouted quinoa looks and tastes just like regular quinoa, except with the added benefits.

You can find packages of sprouted quinoa in health food stores, but considering how much standard supermarkets’ shelves have expanded to include products for health-conscious consumers, who knows, you might be able to find sprouted quinoa in your neighborhood supermarket—if not now, then in the near future.

Sprouted Quinoa with Roasted Vegetables and Roasted Garlic Dressing

Makes 6 servings.

1½ cups diced eggplant
3 cups diced zucchini
¼ cup + 1 teaspoon olive oil
1 teaspoon + a pinch kosher salt
Freshly ground black pepper
3 large plum tomatoes
4 garlic cloves, skin on
1 cup sprouted quinoa
¼ cup extra virgin olive oil
2 teaspoons Dijon mustard
1 teaspoon sherry vinegar
¼ teaspoon sea salt

¼ cup chopped Italian parsley

Preheat the oven to 350 degrees F. Grease a large baking sheet, or line it with foil or parchment paper. Do the same with a small baking sheet.

Combine the eggplant and zucchini in a bowl. Pour in 3 tablespoons olive oil, 1 teaspoon kosher salt, grind in some black pepper, and toss to coat. Spread the vegetables out on the large baking sheet. (You can line the sheet with aluminum foil or parchment, if you like.)Roast, stirring occasionally, until tender and browned, about 20 to 30 minutes.Cut the tomatoes in half and removed the seeds. Dice the tomatoes and place in a medium bowl. Toss with 1 tablespoon oil and a pinch of kosher salt. Lay the tomatoes out on the small baking sheet and roast, stirring occasionally until tender and browned, about 30 minutes.Place the garlic cloves on a piece of aluminum foil. Pour 1 teaspoon olive oil on them, and wrap the foil. Place on a small baking sheet (you can place the packet on one of the baking sheets the other vegetables are on).Roast until soft, about 20 minutes.While the vegetables are roasting, combine the quinoa with 2 cups water and a pinch of salt in a small saucepan. Bring to a boil; lower the heat to medium-low and simmer, half covered, until the water is absorbed, about 10 to 15 minutes. Remove from the heat and let sit for 5 minutes. Fluff with a fork.Unwrap the garlic. When it’s cool enough to handle, squeeze the garlic out of the skin into a small bowl. Add the extra virgin olive oil, mustard, vinegar, and sea salt. Whisk until well blended.

In a large bowl, combine the eggplant, zucchini, tomatoes, and quinoa. Add the dressing and mix well. Mix in the parsley. Taste for seasoning and adjust if needed.

Save

Save

Save

Save


Leave a comment

Roasted Butternut Squash with Honey-Soy-Mirin Glaze and Honey-Pomegranate Sauce

img_6373

Leave the zucchini and other fair-weather vegetables to summer. Winter calls for thick-skinned squashes. img_6321

My favorite is butternut squash. In my opinion, it not only has the best flavor, but the best texture as well. When cooked down, it’s creamy and smooth, and incredibly diverse. 

Roasting brings out the sweetness and beauty in most vegetables, but this is especially true of squash. My mother wanted me to roast squash for Thanksgiving and I wanted to come up with something that was familiar, that I knew would be liked, but something every-so-slightly different. I came up with an easy, delicious honey-soy-mirin glaze and honey-pomegranate sauce…because, you know, pomegranates. 

Unless you’ve been living under a rock, you’ve heard how healthful pomegranates are. Here’s a quick rundown of their health benefits:

Based on US RDA, one cup of pomegranate seeds contains 7 grams fiber, 3 img_6349grams protein, 30% vitamin C, 36% vitamin K, 16% folate, and 12% potassium. They have antiinflammatory, antibacterial, and antifungal properties.They help fight cancer, especially prostate and breast, and heart disease, and have been known to improve memory function.

Delicious AND healthy. Do you need anything more? Give this a try on a cold winter day…or even a warm one. Enjoy!img_6356

Roasted Butternut Squash with Honey-Soy-Mirin Glaze and Honey-Pomegranate Sauce

2-3 pound butternut squash
1 tablespoon honey
1 tablespoon olive oil
1 tablespoon soy sauce
1 tablespoon mirin
1/2 teaspoon sea salt
Freshly ground black pepper

Honey-Pomegranate Sauce

1 pomegranate
2 tablespoons honey
1 tablespoon white wine or ginger ale

Grease a baking sheet. Preheat the oven to 400 degrees F.

Peel and seed the squash. Cut into 1/2-inch-thick slices and place them in a large bowl.img_6324In a small bowl, mix together the honey, olive oil, soy sauce, mirin. pour over the squash.img_6325

Sprinkle in salt and pepper. Use your hands to spread the mixture over both sides of the squash. Lay the slices neatly on the baking sheet in a single layer.

img_6329

Roast until almost tender, about 20 to 30 minutes. Turn the slices over and continue roasting until fully tender and golden brown at the edges.img_6348Meanwhile, make the Honey-Pomegranate Sauce. Cut open the pomegranate and place the pieces in a large bowl of cool water. Separate the seeds from the membrane and discard the skin. Let the membranes rise to the top and scoop them out.img_6353Drain in a mesh strainer and rinse.img_6355Measure out ½ cup seeds and place in a small pot. Reserve the remaining seeds for the top or another purpose. Mix together the honey and wine and add to pomegranate seeds. Cook over medium-low heat until thickened, about 10 minutes.img_6358Transfer cooked squash to a serving platter. Drizzle sauce over top, sprinkle on some fresh pomegranate seeds, and serve.img_6371

Save

Save

Save

Save

Save


Leave a comment

Roasted Spaghetti Squash with Amaranth Pilaf and Red Onions

Roasted Spaghetti SquashMore spaghetti squash? Why not? It’s squash season, after all. Squash is synonymous with autumn. img_6232

Although spaghetti squash can be found from fall through the spring, there’s something comforting and pleasurable about roasting vegetables in the fall, especially squash. And since many people aren’t sure what to do with spaghetti squash, I’ve been offering some recipes. Last week, I offered Easy Spaghetti Squash Chili. This week, I have for you Roasted Maple-Bourbon Spaghetti Squash with Amaranth Pilaf.

Cultivated by the Aztecs 8,000 years ago, amaranth is a tiny little grain that is surprisingly high in protein, as well as other nutrients. One cup of raw amaranth contains 28 grams of protein, 15 milligrams of iron, and 18 milligrams of fiber, which makes it one of the most nutrient-rich grains on earth. img_6256

Amaranth is also a great source of lysine, a protein-rich amino acid. This is good news for those of us who suffer from canker and cold sores. L-lysine has been shown to shorten the life span of canker sores. I can personally attest to this because when one of those little monsters starts making itself known, I start digging into the giant bottle of lysine, and believe me, it works.

So this dish makes the perfect side dish to any autumn meal, but because of the amaranth and almonds, it also is a satisfying entree on its own. And spaghetti squash is low in calories, low in carbs, and almost fat free, so whatever diet you may be on, you can’t go wrong with this squash. You can serve it in lovely slices, or you can scrape out the spaghetti-like flesh and eat it like a pasta dish. Continue reading


1 Comment

Easy Spaghetti Squash Chili

img_6245A few months ago I did a blog where I offered a recipe using spaghetti squash. Some people commented to me that they were glad I had done that because they never quite knew what to do with spaghetti squash.

Spaghetti squash can be used in many different ways. This week I decided to use it in a chili. And because spaghetti squash is a fast-cooking squash (about 15 minutes in a steamer), I made the entire recipe a quick-and-easy chili. You can throw this together in less than an hour.

Enjoy.

Continue reading


Leave a comment

Sauteed Celery Root with Red Onion

img_6224

Celery root, or celeriac, is one of those vegetables that people don’t know what to do with when they see it. Truth is, it can be used in so many ways—essentially, in any dish where root vegetables are called for.

img_6212

Celery root, aka celeriac

You should, however, like the taste of celery. Celery root has a very strong celery flavor and if that’s not your thing, you might not like it. On the other hand, it’s also sweeter than celery, so even if celery isn’t your favorite thing, you may be pleasantly surprised. I happen to like the flavor of celery, but I don’t enjoy chomping on it when it’s cooked. So, while I add it to other foods, I always pick it out. (I do like it raw, though. Go figure.)

Will you like celery root? You won’t know until you try. Here’s a simple way to cook it. If you’ve never had it before, this is an easy introduction to it.

You can find celery root at farmers’ markets, most supermarkets, and sometimes at local produce stores.

Enjoy.

Sauteed Celery Root with Red Onion

Makes about 4 servings.

1 medium celery root
2 teaspoons olive oil
1 medium red onion, thinly sliced
1 teaspoon dry basil
1 teaspoon paprika
½ teaspoon garlic powder
½ teaspoon kosher salt
Freshly ground black pepper to taste

Peel celery root. Cut off root and stem, then slice off the skin with a vegetable peeler or sharp knife.

img_6213

Cut the celery root into wedges, then slice them into ¼-inch-thick pieces. You should get about 2 cups.

img_6214

Heat the oil in a skillet. Add the onion and sauté until soft and translucent, about 5 minutes.

img_6218

Add basil and paprika. Add the celery root, garlic powder, salt, and pepper.

img_6220

Sauté stirring occasionally, until celery root starts to brown. This could take up to 15 minutes.

Cover and lower heat, cook until tender, about 10 minutes. Taste for seasoning and adjust if necessary.

img_6225


Save

Save

Save

Save

Save


Leave a comment

Quick Omelet Cups

IMG_6178

Today’s recipe is one that I created in order to have quick, easy-to-transport, and easy-to-heat breakfasts that fit in with a low-carb diet. Working a full-time job, commuting 15 hours a week, and having a writing career on the side makes it difficult for me to prepare meals for myself on a daily basis.

Obviously, I love to cook, but lack of time and energy keeps me from doing a whole lot of it. To be truthful, I rely on my mom’s leftovers to get me through the week. But when there isn’t enough for a week’s worth of lunches and dinners (never mind breakfast), or when I’m on a particular diet, I have to engage in a long, arduous cooking spree on the weekend.

And that’s what happened when I created these omelet cups. I needed something that I could have for breakfast that would fill me and that I didn’t have to think about–I could just grab some and go.

I wanted to pack them with as many veggies as I could, so I got what was fresh at the farmer’s market that week: zucchini, summer squash, and green beans. Spinach is always a good veggie option for egg dishes, but needed to make this fast (especially because it was a thousand degrees that day and I didn’t want to spend more time in my hot kitchen than I had to). But you can certainly use fresh spinach if you want to.

These are very easy to make, are wonderfully transportable, and easily heated in a microwave or toaster oven. Or eaten at room temperature. They are not only low carb, but gluten and wheat free as well. And since this makes a batch of 12, you can throw some in the freezer for three months.

Enjoy!

Quick Omelet Cups

10 oz. frozen spinach, thawed
1 tablespoon olive oil
½ cup chopped onion
½ cup chopped green bell pepper
½ cup chopped green beans
1 cup chopped zucchini
1 cup chopped summer (yellow) squash
½ teaspoon kosher salt
Freshly ground black pepper to taste
8 large eggs
½ cup shredded cheddar cheese

Squeeze as much water as you can from the spinach and set aside. Grease the cups of a standard 12-cup muffin tin (or 2 6-cups tins) and set aside. (If you want, you can use paper muffin cups.) Preheat the oven to 350 degrees.

Heat the oil in a wide frying pan. Add the onion and sauté until soft and translucent.IMG_6163

Add the green pepper and continue sautéing until the pepper softens. Add the green beans, zucchini, summer squash, salt, and black pepper. Continue sautéing, stirring occasionally, until vegetables have softened and begin to brown.IMG_6164
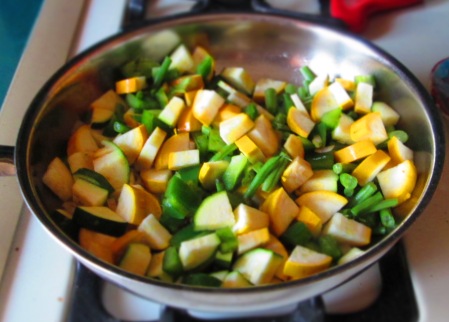
Add the spinach and mix well. Taste for seasoning and adjust if needed.IMG_6165
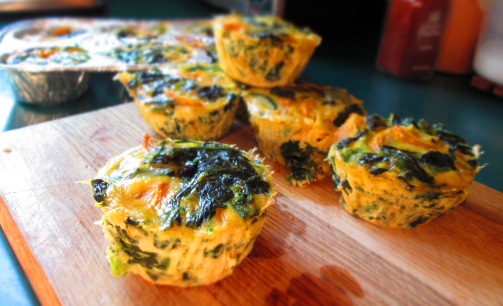
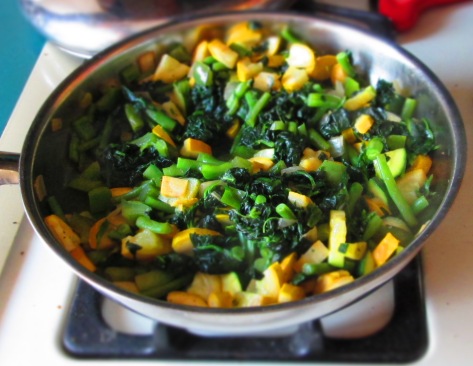
Beat the eggs in a large bowl. Mix in the cooked vegetables, along with the cheese.IMG_6170Ladle equal amounts into each of the 12 muffin cups.IMG_6173and bake about 20 minutes, or until a toothpick inserted into the center of an omelet cup comes out fairly clean.IMG_6176Serve hot or at room temperature. These can be kept in the refrigerator up to a week, or frozen up to 3 months.IMG_6184


Save

Save

Save