Miz Chef

Cooking Up a Healthy Life


Leave a comment

Quick Omelet Cups

IMG_6178

Today’s recipe is one that I created in order to have quick, easy-to-transport, and easy-to-heat breakfasts that fit in with a low-carb diet. Working a full-time job, commuting 15 hours a week, and having a writing career on the side makes it difficult for me to prepare meals for myself on a daily basis.

Obviously, I love to cook, but lack of time and energy keeps me from doing a whole lot of it. To be truthful, I rely on my mom’s leftovers to get me through the week. But when there isn’t enough for a week’s worth of lunches and dinners (never mind breakfast), or when I’m on a particular diet, I have to engage in a long, arduous cooking spree on the weekend.

And that’s what happened when I created these omelet cups. I needed something that I could have for breakfast that would fill me and that I didn’t have to think about–I could just grab some and go.

I wanted to pack them with as many veggies as I could, so I got what was fresh at the farmer’s market that week: zucchini, summer squash, and green beans. Spinach is always a good veggie option for egg dishes, but needed to make this fast (especially because it was a thousand degrees that day and I didn’t want to spend more time in my hot kitchen than I had to). But you can certainly use fresh spinach if you want to.

These are very easy to make, are wonderfully transportable, and easily heated in a microwave or toaster oven. Or eaten at room temperature. They are not only low carb, but gluten and wheat free as well. And since this makes a batch of 12, you can throw some in the freezer for three months.

Enjoy!

Quick Omelet Cups

10 oz. frozen spinach, thawed
1 tablespoon olive oil
½ cup chopped onion
½ cup chopped green bell pepper
½ cup chopped green beans
1 cup chopped zucchini
1 cup chopped summer (yellow) squash
½ teaspoon kosher salt
Freshly ground black pepper to taste
8 large eggs
½ cup shredded cheddar cheese

Squeeze as much water as you can from the spinach and set aside. Grease the cups of a standard 12-cup muffin tin (or 2 6-cups tins) and set aside. (If you want, you can use paper muffin cups.) Preheat the oven to 350 degrees.

Heat the oil in a wide frying pan. Add the onion and sauté until soft and translucent.IMG_6163

Add the green pepper and continue sautéing until the pepper softens. Add the green beans, zucchini, summer squash, salt, and black pepper. Continue sautéing, stirring occasionally, until vegetables have softened and begin to brown.IMG_6164
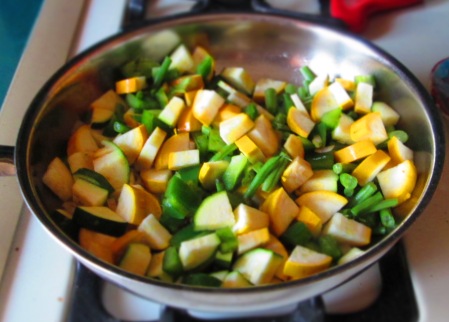
Add the spinach and mix well. Taste for seasoning and adjust if needed.IMG_6165
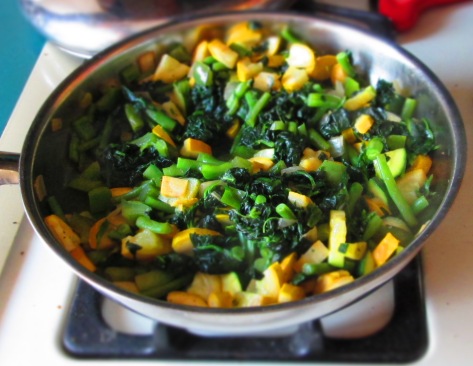
Beat the eggs in a large bowl. Mix in the cooked vegetables, along with the cheese.IMG_6170Ladle equal amounts into each of the 12 muffin cups.IMG_6173and bake about 20 minutes, or until a toothpick inserted into the center of an omelet cup comes out fairly clean.IMG_6176Serve hot or at room temperature. These can be kept in the refrigerator up to a week, or frozen up to 3 months.IMG_6184


Save

Save

Save


4 Comments

Red and Gold Beet Salad


beet saladLove, love, love beets. There are different varieties, but I think it’s safe to say that the majority of us find the red most often. Getting the golden, pink, rainbow, or any other kind of beets, for me, requires a special trip to a farmers’ market or specialty store.

Well, this past week, I lucked out. The farmers’ market that sets up shop outside of my workplace once a week had golden beets, which is not always the case.beets

Anyway, in my opinion, the best thing to do with beets is make a salad with them. It’s the easiest thing in the world and so flavorful. And when you mix beets, it’s beautiful, too.

But if you can only find the red beets, it’s just as delicious. I like to roast beets, but in the summer, turning on the oven is not fun, so I boil them. (If you have a grill you can use, then that’s even better!). There’s nothing wrong with boiling, just don’t overcook them and use only just enough water to cover them in the pot. Enjoy!

Red and Gold Beet Salad

1½ pounds red and yellow beets
½ small red onion, thinly sliced
3 tablespoons extra virgin olive oil
1 teaspoon balsamic vinegar
½ teaspoon sea salt
Freshly ground pepper to taste

Wash and trim the beets of excess roots or threads. Place in a medium-large pot and fill with enough water to cover the beets. Bring to a boil; lower the heat to medium-low and simmer, partially covered, until the beets are cooked. You should be able to stick the tip of a knife easily all the way through.

Remove beets from the water and let them cool. Peel off the skin and trim off unappealing parts (such as near the roots). Cut them into quarters or bite-sized pieces. Place in a medium bowl. Add the remaining ingredients and stir gently. Serve.
beet salad

Save

Save


Leave a comment

Picnic Posole Salad

posole text

I’ve been making posole salad for picnics, parties, and barbecues years. I think people enjoy it because it’s both something different from the usual fare, while offering something familiar and not too “out there.”

hominy

Dried hominy

So what is posole (or pozole)? Not everyone outside of the Latin community is familiar with posole. Posole means “hominy” (from the Nahuatl word pozolle), and actually refers to a stew, popular in Mexico and made with hominy and pork or chicken. But it is sometimes also used (loosely and unofficially) to refer to the hominy itself, which is properly called mote. Corn, in general, is known as maize.

Mote is maize that has had its hulls removed through a process known as nixtamalization. This involves boiling the kernels in a water-and-lime (or ash) solution. The resulting product is used in many traditional dishes throughout Latin America, the most commonly known being posole stew, a dish that goes back to the pre-Colombian Aztecs. Continue reading


2 Comments

White Bean Hummus with Garlic Scapes

white bean hummus garlic scapesBecause garlic scapes have such a short season (early summer), I’ve been on a garlic scape kick, using them in as many ways as I can. Last week, I made Lentils with Garlic Scapes and the week before that, I made Beet Greens with Garlic Scapes.

All delicious. But this week I decided to use the scapes in its purest form: raw.Garlic scapes Continue reading

Lentils with garlic scapes


Leave a comment

Lentils with Garlic Scapes

Lentils with garlic scapesGarlic scapes are one of summer’s treasures and if you have a farmers’ market near you, try to find some. They’re available for a short time in early summer. Scapes can be used in many different ways—basically, any way you would use garlic or onions. Last week, I used them with beet greens (very tasty!).

Garlic scapes

For this recipe, I used garlic scapes as the flavor base for lentils. Scapes lend the dish a mellow garlic-like taste but there’s more complexity to it. The addition of fresh herbs really elevate this to a gourmet meal, but the simplicity can’t be beat. The final result is so flavorful and something really special. Continue reading


1 Comment

Beet Greens and Garlic Scapes

beet greens with garlic scapes

I was just commenting to someone that I sometimes feel that I cook more in summer than in winter. That seems counter-intuitive, but there’s a reason for this. With summer comes all the beautiful vegetables that you can’t get in winter (or they’re not as good in winter), and I definitely want to take full advantage.

One of those things is garlic scapes, which are available for a short while in early summer.garlic scapes

At the farmers’ market this week I found garlic scapes, as well as beets with beautiful lush leaves. Usually I cook beet greens with garlic, so I thought that garlic scapes would work well too. And they do. Continue reading


4 Comments

Chilean Tomato and Sweet Onion Salad

IMG_3119

One of the best things about summer is all the beautiful, luscious tomatoes that become available. So this is the season for tomato salads. It’s almost not even worth it to make tomato salad any other time of the year.

This is a simple Chilean version, which gets a bit of a kick from minced Serrano or jalapeno pepper. But if you like, you can omit it. Choose any tomatoes you like—there are so many options this time of year! Heirloom varieties make a stunning salad, but good old beefsteak tomatoes do better than fine. Continue reading


Leave a comment

Oat Noodle Salad with Umeboshi Plum Dressing

IMG_6054

Yes, I’m still on a noodle kick. This time I’ve created a recipe using oat flour noodles. The nice thing about gluten-free noodles is that they’re lighter than wheat noodles, but like wheat noodles, they can be used in a variety of ways.IMG_6043

For some reason, these noodles are sold in packages with the odd weight of 13.4 ounces. I don’t know how or why they came up with that number, but it makes it awkward to create a recipe. (They probably started with 380 grams and it just happens to convert to 13.4 ounces, but why 380?) Well, I used approximately 10 ounces, which is three of the bundles that come in the package in the photo.

In this recipe, I’ve paired oat noodles with string beans and Japanese yams (although, if you can’t find Japanese yams, you can use sweet potatoes). The noodles and yams will soak up the dressing very efficiently, so if the salad is too dry for your tastes, you can add a little more olive oil, but the salad will not be oily in the slightest.

Ume Plum

Ume Plum

For the dressing, I used an umeboshi plum. Umbeboshi plums, a Japanese specialty, are ume plums (but more closely related to apricots) that have been salted and fermented. In the world of natural healing, umeboshi plums are considered miracle workers. If you divide foods into acidic, alkaline, and neutral, umeboshis are alkaline and can adjust imbalances in your body. It’s been used in Asia, particularly, Japan, China, and Korea, for centuries for a variety of ailments, including fatigue, nausea, diarrhea, colds, indigestion, headaches, and hangovers, among other things. Samurai soldiers were given umboshi as part of their field rations. They not used the plums to help them battle fatigue, they also used them to flavor foods such as rice and vegetables. Umeboshis also acted as a water and food purifier. Continue reading


Leave a comment

Fresh Chickpeas with Kale, Sweet Onions and Rice

IMG_5960

It wasn’t until a couple of years ago that I knew that fresh chickpeas—in the pod—could even be had. One day, I entered an Indian market in Jackson Heights, and there was a bin of what looked like little individual pea pods, shorter and squatter. What are these, I wondered?

The handwritten sign at the top of the bin said chana. I knew that chana meant chickpeas. What?! No way. I picked one up, popped it, and there it was. A fresh, firm, beautiful chickpea. I bought a bunch and cooked my very first batch of chickpeas right out of the shell. It was all very exciting.fresh chickeas in pod

But fresh chickpeas (also known as garbanzos) are not available all the time. In fact, they can only be found in spring. So when I saw them again, I bought some for myself and my mom (I knew she’d love them).

When you have fresh beans like this, not much needs to, or should, be done to them. Fresh beans are meaty, savory, nutty, and have a great feel in the mouth. Plump and pale green, chickpeas are packed with protein, and are a good source of vitamin C, calcium, and iron. They’ve been shown to be a great food to help fight diabetes, hypertension, heart disease, cancer, high cholesterol, and inflammation, and promote healthy digestion.IMG_5976

Between the chickpeas and the kale, this dish is not only filling and delicious, but healthy, substantial, and physically satisfying. The addition of the rice (whatever kind you like), rounds it out for a truly filling meal.

Enjoy!

Fresh Chickpeas with Kale, Sweet Onions and Rice

Makes 2 servings

2 teaspoons olive oil
3 large garlic cloves, minced
½ teaspoon paprika
1 cup fresh chickpeas
1 cup chopped sweet onion
1 teaspoon kosher salt
1 cup vegetable broth
3 cups chopped kale
1 cup cooked rice
¼ cup grated parmigiana (optional)

In a wide skillet, heat the oil with the garlic. When the garlic is fragrant, add the paprika and chickpeas. Sauté 5 minutes.IMG_5981Add the onion and ½ teaspoon of the salt. Continue sautéing until the onion is soft and translucent, about 5 minutes.IMG_5983Pour in the broth, then add the kale and remaining salt. Cover and cook until kale is tender, about another 5 to 7 minutes. Stir occasionally. Taste and adjust seasoning, if needed.IMG_5984IMG_5986Transfer vegetables to 2 bowls and stir ½ cup rice into each. Top with a little parmigiano, if desired.IMG_5992


6 Comments

Green Beans with Hazelnuts and Grapefruit Butter

IMG_5944Green beans are a versatile vegetable. You can use them in many different ways. For those of you who have only had mushy green beans that have been boiled to death, I feel sorry for you. But I’m here to tell you, there’s something else. (That’s my small, brief homage to Prince.)

I had purchased a bag of green beans for a diet that I was going on and found myself with lots of leftover beans. I had just roasted a batch the week before, and as much as I love roasted green beans, I wanted to do something different. I also had these beautiful pink grapefruits in the refrigerator, so I came up with this recipe.

It’s a little different but simple enough to make easily and quickly. There are very few ingredients and very few steps involved, yet the taste is fresh and flavorful, but not overpowering. See what you think. Continue reading