Miz Chef

Cooking Up a Healthy Life


Leave a comment

Roasted Butternut Squash with Honey-Soy-Mirin Glaze and Honey-Pomegranate Sauce

img_6373

Leave the zucchini and other fair-weather vegetables to summer. Winter calls for thick-skinned squashes. img_6321

My favorite is butternut squash. In my opinion, it not only has the best flavor, but the best texture as well. When cooked down, it’s creamy and smooth, and incredibly diverse. 

Roasting brings out the sweetness and beauty in most vegetables, but this is especially true of squash. My mother wanted me to roast squash for Thanksgiving and I wanted to come up with something that was familiar, that I knew would be liked, but something every-so-slightly different. I came up with an easy, delicious honey-soy-mirin glaze and honey-pomegranate sauce…because, you know, pomegranates. 

Unless you’ve been living under a rock, you’ve heard how healthful pomegranates are. Here’s a quick rundown of their health benefits:

Based on US RDA, one cup of pomegranate seeds contains 7 grams fiber, 3 img_6349grams protein, 30% vitamin C, 36% vitamin K, 16% folate, and 12% potassium. They have antiinflammatory, antibacterial, and antifungal properties.They help fight cancer, especially prostate and breast, and heart disease, and have been known to improve memory function.

Delicious AND healthy. Do you need anything more? Give this a try on a cold winter day…or even a warm one. Enjoy!img_6356

Roasted Butternut Squash with Honey-Soy-Mirin Glaze and Honey-Pomegranate Sauce

2-3 pound butternut squash
1 tablespoon honey
1 tablespoon olive oil
1 tablespoon soy sauce
1 tablespoon mirin
1/2 teaspoon sea salt
Freshly ground black pepper

Honey-Pomegranate Sauce

1 pomegranate
2 tablespoons honey
1 tablespoon white wine or ginger ale

Grease a baking sheet. Preheat the oven to 400 degrees F.

Peel and seed the squash. Cut into 1/2-inch-thick slices and place them in a large bowl.img_6324In a small bowl, mix together the honey, olive oil, soy sauce, mirin. pour over the squash.img_6325

Sprinkle in salt and pepper. Use your hands to spread the mixture over both sides of the squash. Lay the slices neatly on the baking sheet in a single layer.

img_6329

Roast until almost tender, about 20 to 30 minutes. Turn the slices over and continue roasting until fully tender and golden brown at the edges.img_6348Meanwhile, make the Honey-Pomegranate Sauce. Cut open the pomegranate and place the pieces in a large bowl of cool water. Separate the seeds from the membrane and discard the skin. Let the membranes rise to the top and scoop them out.img_6353Drain in a mesh strainer and rinse.img_6355Measure out ½ cup seeds and place in a small pot. Reserve the remaining seeds for the top or another purpose. Mix together the honey and wine and add to pomegranate seeds. Cook over medium-low heat until thickened, about 10 minutes.img_6358Transfer cooked squash to a serving platter. Drizzle sauce over top, sprinkle on some fresh pomegranate seeds, and serve.img_6371

Save

Save

Save

Save

Save


Leave a comment

Husk Cherry Salsa

img_6407

So, what exactly are husk cherries? That’s what I wanted to know when I spotted them at the Union Square farmers’ Market in Manhattan. At first I thought they were gooseberries because they looked exactly like gooseberries—they were golden globes covered in a paper-thin, skin-like husk.

But the sign said “husk cherries.” Naturally, I bought some.img_6445

Native to the New World, husk cherries are not cherries at all. Sometimes also called husk tomatoes, Cape gooseberries, and ground cherries, they’re a type of flowering plant belonging to the nightshade family.

Their flavor is quite unique. It’s like a cross between a tomato, a papaya, and a pineapple. Sweet and savory at the same time. The easiest and no-brainer way to use them is in a salsa, which is exactly how Native Americans peoples used them, as well as eating them out of hand.

I think if food-loving people were smart, they’d introduce themselves to husk cherries and make them better known to the world. They’re really a great little fruit/vegetable. If you ever see them, buy a small bagful and give this recipe a try.

Enjoy!

img_6456

Husk Cherry Salsa

Makes approximately 1½ cups.

1 cup husk cherries
¼ cup finely chopped red onion
2 tablespoons extra virgin olive oil
1 tablespoon minced chile of your choice
¼ minced cilantro
2 tablespoons lemon or lime juice
¼ teaspoon sea salt

Freshly ground black pepper to taste


Remove the husks from the cherries by peeling the husks back and twisting them off. Rinse the cherries in cool water and set on paper towels to drain. Cut the cherries in half and place them in a bowl.img_6451Add the remaining ingredients and mix well. Taste and adjust seasoning, if necessary. Serve with tortilla chips or pita bread, or use as a relish for fish, chicken, pork, or vegetables.img_6455

Save

Save


2 Comments

Cranberry Sauce with a Sorghum Twist

cranberry enhancedA few years ago, I introduced a recipe for Cranberry Sauce with a Sorghum Twist. I think using sorghum syrup is a great way to enjoy traditional dishes without using white cane sugar.

In my cranberry sauce, it also adds a different dimension to the flavor. And it’s still one of my favorite cranberry sauce recipes.

So, below is a reprint of my original post from 2013. I hope you like it. Have a fun, safe, and peaceful Thanksgiving.

______________________________ Continue reading


Leave a comment

Mashed Purple Potatoes

img_6345

Thanksgiving is coming up and people are always looking for new and different ways to serve favorite and/or traditional dishes. Purple potatoes are a great way to liven up the table.

Purple potatoes are originally from South America (where img_6316potatoes in general are originally from), particularly Peru and Bolivia. In fact, they’re sometimes referred to as Purple Peruvian potatoes. While they taste pretty much the same as standard white potatoes, because of their pigment, purple potatoes are high in antioxidants—4 times as much as white potatoes. Antioxidants are cancer-fighting agents, are good for immunity and heart health.

I found some beautiful purple potatoes at the farmers’ market and decided to mash them. Their dramatic blue/purple color makes this a special dish while still giving everyone the scrumptious mashed potatoes they’ve come to love and expect.

Enjoy.

Mashed Purple Potatoes

6 small to medium purple potatoes
2 tablespoons olive oil
1 tablespoon half-n-half
½ teaspoon sea salt
Freshly ground black pepper

Scrub the potatoes and cut them in halves or quarters. Place them in a medium pot, cover with cold water, and bring to a boil.img_6317

Lower the heat to low, partially cover, and simmer until the potatoes are tender when pierced with the tip of a knife. Drain well and let cool a bit. When they’re cool enough to handle, peel off the skin.img_6338

Place the potatoes in a mixing bowl. Add the oil, half-n-half, salt, and pepper. Mash with a potato masher. (Don’t use a food processor or blender, as this will make the potatoes gummy.)img_6339

Check the potatoes for seasoning and adjust, if needed.


Save


Leave a comment

Roasted Spaghetti Squash with Amaranth Pilaf and Red Onions

Roasted Spaghetti SquashMore spaghetti squash? Why not? It’s squash season, after all. Squash is synonymous with autumn. img_6232

Although spaghetti squash can be found from fall through the spring, there’s something comforting and pleasurable about roasting vegetables in the fall, especially squash. And since many people aren’t sure what to do with spaghetti squash, I’ve been offering some recipes. Last week, I offered Easy Spaghetti Squash Chili. This week, I have for you Roasted Maple-Bourbon Spaghetti Squash with Amaranth Pilaf.

Cultivated by the Aztecs 8,000 years ago, amaranth is a tiny little grain that is surprisingly high in protein, as well as other nutrients. One cup of raw amaranth contains 28 grams of protein, 15 milligrams of iron, and 18 milligrams of fiber, which makes it one of the most nutrient-rich grains on earth. img_6256

Amaranth is also a great source of lysine, a protein-rich amino acid. This is good news for those of us who suffer from canker and cold sores. L-lysine has been shown to shorten the life span of canker sores. I can personally attest to this because when one of those little monsters starts making itself known, I start digging into the giant bottle of lysine, and believe me, it works.

So this dish makes the perfect side dish to any autumn meal, but because of the amaranth and almonds, it also is a satisfying entree on its own. And spaghetti squash is low in calories, low in carbs, and almost fat free, so whatever diet you may be on, you can’t go wrong with this squash. You can serve it in lovely slices, or you can scrape out the spaghetti-like flesh and eat it like a pasta dish. Continue reading


1 Comment

Easy Spaghetti Squash Chili

img_6245A few months ago I did a blog where I offered a recipe using spaghetti squash. Some people commented to me that they were glad I had done that because they never quite knew what to do with spaghetti squash.

Spaghetti squash can be used in many different ways. This week I decided to use it in a chili. And because spaghetti squash is a fast-cooking squash (about 15 minutes in a steamer), I made the entire recipe a quick-and-easy chili. You can throw this together in less than an hour.

Enjoy.

Continue reading


Leave a comment

Sauteed Celery Root with Red Onion

img_6224

Celery root, or celeriac, is one of those vegetables that people don’t know what to do with when they see it. Truth is, it can be used in so many ways—essentially, in any dish where root vegetables are called for.

img_6212

Celery root, aka celeriac

You should, however, like the taste of celery. Celery root has a very strong celery flavor and if that’s not your thing, you might not like it. On the other hand, it’s also sweeter than celery, so even if celery isn’t your favorite thing, you may be pleasantly surprised. I happen to like the flavor of celery, but I don’t enjoy chomping on it when it’s cooked. So, while I add it to other foods, I always pick it out. (I do like it raw, though. Go figure.)

Will you like celery root? You won’t know until you try. Here’s a simple way to cook it. If you’ve never had it before, this is an easy introduction to it.

You can find celery root at farmers’ markets, most supermarkets, and sometimes at local produce stores.

Enjoy.

Sauteed Celery Root with Red Onion

Makes about 4 servings.

1 medium celery root
2 teaspoons olive oil
1 medium red onion, thinly sliced
1 teaspoon dry basil
1 teaspoon paprika
½ teaspoon garlic powder
½ teaspoon kosher salt
Freshly ground black pepper to taste

Peel celery root. Cut off root and stem, then slice off the skin with a vegetable peeler or sharp knife.

img_6213

Cut the celery root into wedges, then slice them into ¼-inch-thick pieces. You should get about 2 cups.

img_6214

Heat the oil in a skillet. Add the onion and sauté until soft and translucent, about 5 minutes.

img_6218

Add basil and paprika. Add the celery root, garlic powder, salt, and pepper.

img_6220

Sauté stirring occasionally, until celery root starts to brown. This could take up to 15 minutes.

Cover and lower heat, cook until tender, about 10 minutes. Taste for seasoning and adjust if necessary.

img_6225


Save

Save

Save

Save

Save


Leave a comment

Quick Omelet Cups

IMG_6178

Today’s recipe is one that I created in order to have quick, easy-to-transport, and easy-to-heat breakfasts that fit in with a low-carb diet. Working a full-time job, commuting 15 hours a week, and having a writing career on the side makes it difficult for me to prepare meals for myself on a daily basis.

Obviously, I love to cook, but lack of time and energy keeps me from doing a whole lot of it. To be truthful, I rely on my mom’s leftovers to get me through the week. But when there isn’t enough for a week’s worth of lunches and dinners (never mind breakfast), or when I’m on a particular diet, I have to engage in a long, arduous cooking spree on the weekend.

And that’s what happened when I created these omelet cups. I needed something that I could have for breakfast that would fill me and that I didn’t have to think about–I could just grab some and go.

I wanted to pack them with as many veggies as I could, so I got what was fresh at the farmer’s market that week: zucchini, summer squash, and green beans. Spinach is always a good veggie option for egg dishes, but needed to make this fast (especially because it was a thousand degrees that day and I didn’t want to spend more time in my hot kitchen than I had to). But you can certainly use fresh spinach if you want to.

These are very easy to make, are wonderfully transportable, and easily heated in a microwave or toaster oven. Or eaten at room temperature. They are not only low carb, but gluten and wheat free as well. And since this makes a batch of 12, you can throw some in the freezer for three months.

Enjoy!

Quick Omelet Cups

10 oz. frozen spinach, thawed
1 tablespoon olive oil
½ cup chopped onion
½ cup chopped green bell pepper
½ cup chopped green beans
1 cup chopped zucchini
1 cup chopped summer (yellow) squash
½ teaspoon kosher salt
Freshly ground black pepper to taste
8 large eggs
½ cup shredded cheddar cheese

Squeeze as much water as you can from the spinach and set aside. Grease the cups of a standard 12-cup muffin tin (or 2 6-cups tins) and set aside. (If you want, you can use paper muffin cups.) Preheat the oven to 350 degrees.

Heat the oil in a wide frying pan. Add the onion and sauté until soft and translucent.IMG_6163

Add the green pepper and continue sautéing until the pepper softens. Add the green beans, zucchini, summer squash, salt, and black pepper. Continue sautéing, stirring occasionally, until vegetables have softened and begin to brown.IMG_6164
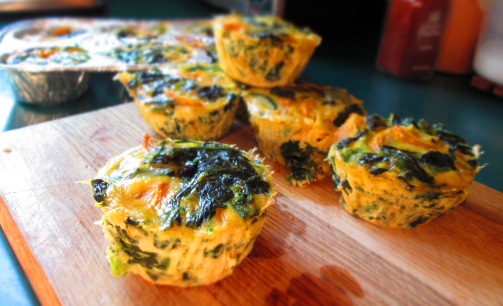
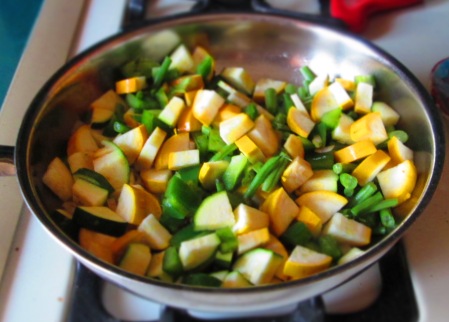
Add the spinach and mix well. Taste for seasoning and adjust if needed.IMG_6165
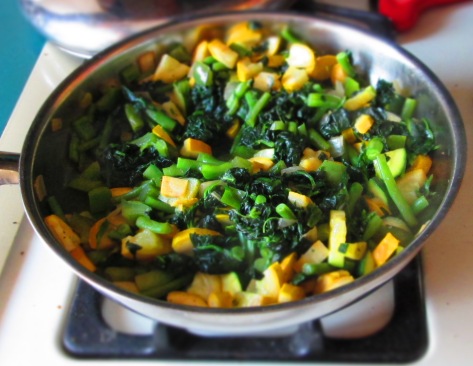
Beat the eggs in a large bowl. Mix in the cooked vegetables, along with the cheese.IMG_6170Ladle equal amounts into each of the 12 muffin cups.IMG_6173and bake about 20 minutes, or until a toothpick inserted into the center of an omelet cup comes out fairly clean.IMG_6176Serve hot or at room temperature. These can be kept in the refrigerator up to a week, or frozen up to 3 months.IMG_6184


Save

Save

Save


4 Comments

Red and Gold Beet Salad


beet saladLove, love, love beets. There are different varieties, but I think it’s safe to say that the majority of us find the red most often. Getting the golden, pink, rainbow, or any other kind of beets, for me, requires a special trip to a farmers’ market or specialty store.

Well, this past week, I lucked out. The farmers’ market that sets up shop outside of my workplace once a week had golden beets, which is not always the case.beets

Anyway, in my opinion, the best thing to do with beets is make a salad with them. It’s the easiest thing in the world and so flavorful. And when you mix beets, it’s beautiful, too.

But if you can only find the red beets, it’s just as delicious. I like to roast beets, but in the summer, turning on the oven is not fun, so I boil them. (If you have a grill you can use, then that’s even better!). There’s nothing wrong with boiling, just don’t overcook them and use only just enough water to cover them in the pot. Enjoy!

Red and Gold Beet Salad

1½ pounds red and yellow beets
½ small red onion, thinly sliced
3 tablespoons extra virgin olive oil
1 teaspoon balsamic vinegar
½ teaspoon sea salt
Freshly ground pepper to taste

Wash and trim the beets of excess roots or threads. Place in a medium-large pot and fill with enough water to cover the beets. Bring to a boil; lower the heat to medium-low and simmer, partially covered, until the beets are cooked. You should be able to stick the tip of a knife easily all the way through.

Remove beets from the water and let them cool. Peel off the skin and trim off unappealing parts (such as near the roots). Cut them into quarters or bite-sized pieces. Place in a medium bowl. Add the remaining ingredients and stir gently. Serve.
beet salad

Save

Save


Leave a comment

Triple-Flavor Ice Cream Cake with Gluten-Free Cookies

IMG_6127

What do you do when you have a birthday lunch or dinner to go to, and one of the people going has Celiac Disease and can’t have regular cake, but it’s 100 degrees F out and the thought of turning on the oven to bake a gluten-free cake makes you want to cry?

You make an ice cream cake.

Make an ice cream cake? Why not just buy an ice cream cake, you ask.

Well, let me explain it to you this way. I come from an Italian family. My father loves telling stories about how when he was a boy, he would go up into the mountains in his hometown in Italy and pick fresh chestnuts and eat them until he got sick, and how he remembers the cheeses and curing meats hanging in the kitchen of his family home. I have a mother whose idea of a simple meal consists of a minimum of six different dishes—for the second course, mind you—and for whom a “quick” sauce means opening up a jar of home-canned tomatoes. So, you see, buying a Shop Rite ice cream cake won’t do. Even Cookie Puss wouldn’t be able to charm his way onto my parents’ table.

Anyway, back to the cake. I drew the line at making the ice cream from scratch, so I went out and bought three different flavors: white chocolate raspberry truffle, coffee caramel, and pineapple coconut.

I also bought gluten-free cookies, which I crushed to put in between the layers. Each flavor of ice cream was different layer, with the cookies in between.

The end result was a very attractive and definitely delicious dessert that was simple to make and let the house stay unbaked in the middle of summer. Huge plus. Continue reading